Google Analytics for Shopify: Best Practice Implementation
Do you trust your data? Run through a Google Analytics audit on your Shopify store.
Brad Redding
Brad Redding is the Founder & CEO of Elevar. Specializing in analytics, tracking, GTM, and conversion optimization.
A solid data foundation is paramount to effective eCommerce marketing and optimization analysis.
If you’re in need of a Google Analytics refresh or starting from scratch then this guide is for you.
This tutorial is specific to eCommerce stores using Shopify and Google Analytics, however the same concepts can be applied across other platforms as well (e.g. Magento, BigCommerce, etc) .
Looking to implement Google Analytics 4? See our guide on how to implement Google Analytics 4 with Shopify, including a pre-built container that you can import to your GTM account.
Table of Contents:
- Step 1: Setup GA in Shopify
- How to enable Google Analytics:
- How to Enable Enhanced eCommerce:
- Custom Event Data
- Step 2: Setup Google Tag Manager
- Step 3: GA Account Setup
- Step 4: GA Property Configuration
- Property Settings
- Tracking Info Settings
- Session Settings
- Step 5: View Configuration
- View Settings
- Goals
- Content Grouping
- Filters
- Channel Settings
- eCommerce Settings
- Calculated Metrics
Step 1: Setup GA in Shopify
If you are not on Shopify, I typically suggest implementing Google Analytics (“GA”) via Google Tag Manager (“GTM”).
However if you’re utilizing Shopify then there is no need to implement via GTM because Shopify’s out-of-the-box implementation is great!
What’s even better – Shopify has the vast majority of Enhanced eCommerce features already configured which vastly improves merchandising and conversion insights.
How to enable Google Analytics:
When logged into Shopfiy, copy your GA property script in the section below and click SAVE.
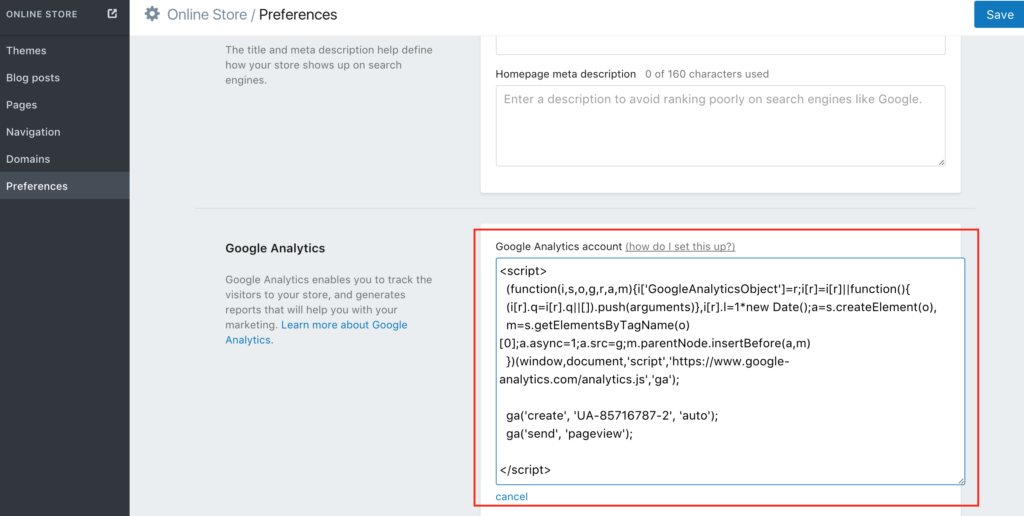
How to Enable Enhanced eCommerce:
This requires two steps:
- Once you’ve saved your GA script in the last step, then simply check the “Enabled Enhanced eCommerce” checkbox that appears and click SAVE.
- And don’t forget to enable in your GA View here:
Unfortunately this setup is not retroactive so you’ll have to wait ~ 24 hours to begin seeing these reports in Google Analytics like below:
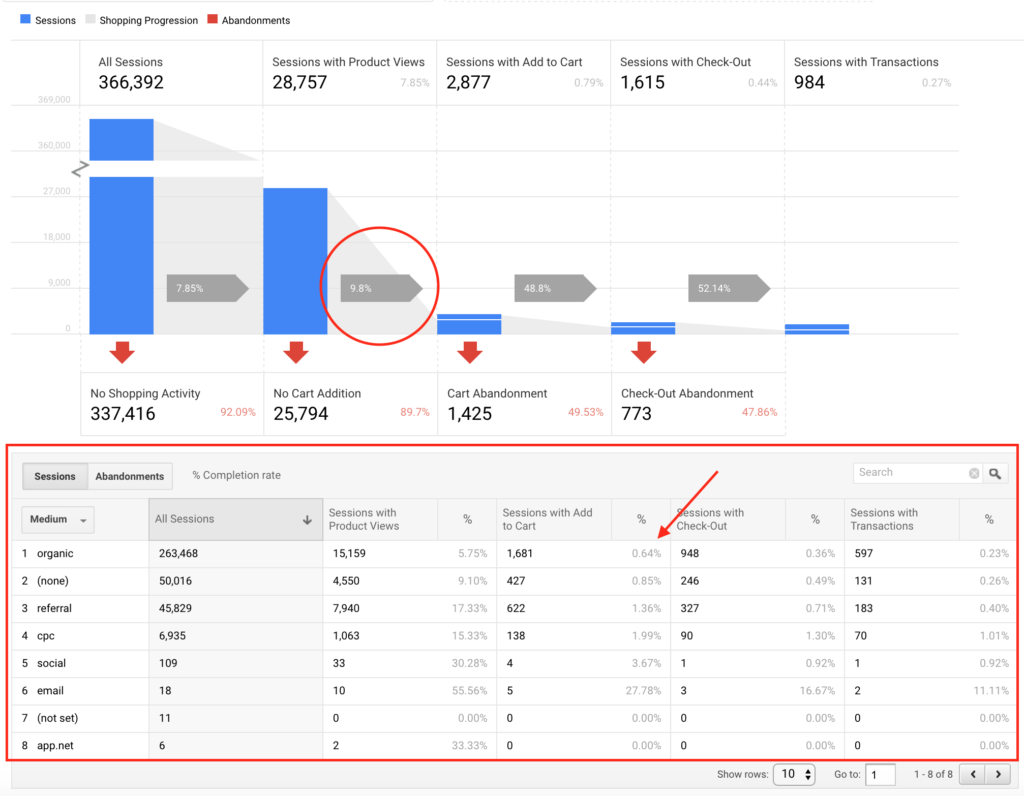
Other insights to inspire when you review your own report:
- Do you have a significant amount of sessions that are not viewing product pages? If so, how can you drive more traffic here?
- Do you have a significant amount of sessions that are viewing your products pages but not adding to cart? If so, what friction points exist for users preventing them from proceeding…is it price? Or Shipping options? Return policy? Poor imagery?
You can also apply your own custom segments to view these reports which can unlock even more insights.
Checkout Funnel via Custom Events
You may wonder how to get more visibility into the checkout funnel steps without having to rely on Goal funnels only.
Interestingly enough, Shopify actually pushes Custom Events for each checkout step for you already!
This allows you to view unique users by step with this simple report setup:
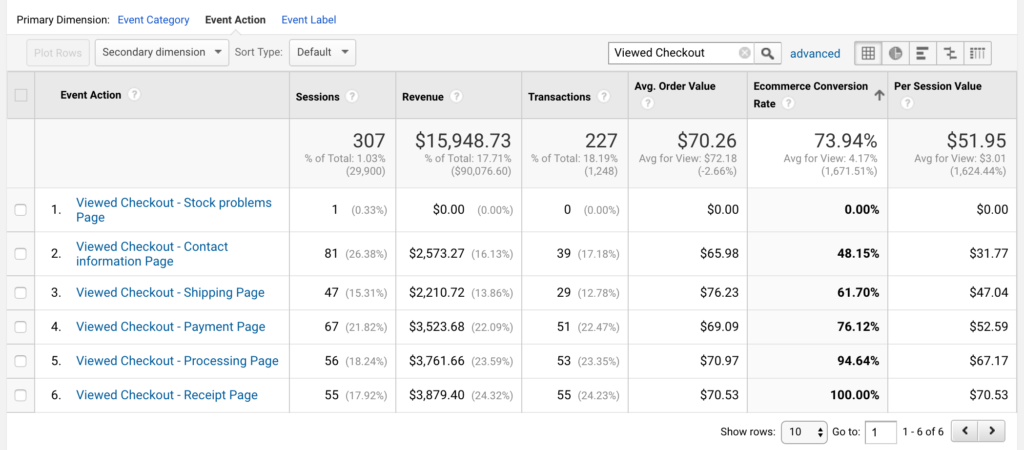
Now you can view the checkout steps through a table based report and apply different dimensions or segments to dig deeper into problematic areas.
Quick Tip: Shopify has built in abandoned cart emails that sends users to their last checkout step completed. Create a segment that Excludes Entrances that contain “checkout” in the URL to see how users progress through the entire checkout that aren’t initiated from abandoned cart emails.
Step 2: Setup Google Tag Manager
Even though we’re using Shopify’s native Google Analytics integration, GTM should also be implemented to help make the process of adding 3rd party tags, pixels, and advanced behavior data even easier.
Here’s how:
Step 1. Copy your Google Tag Manager snippet from your GTM admin (without the opening and closing <script> </script> tags):
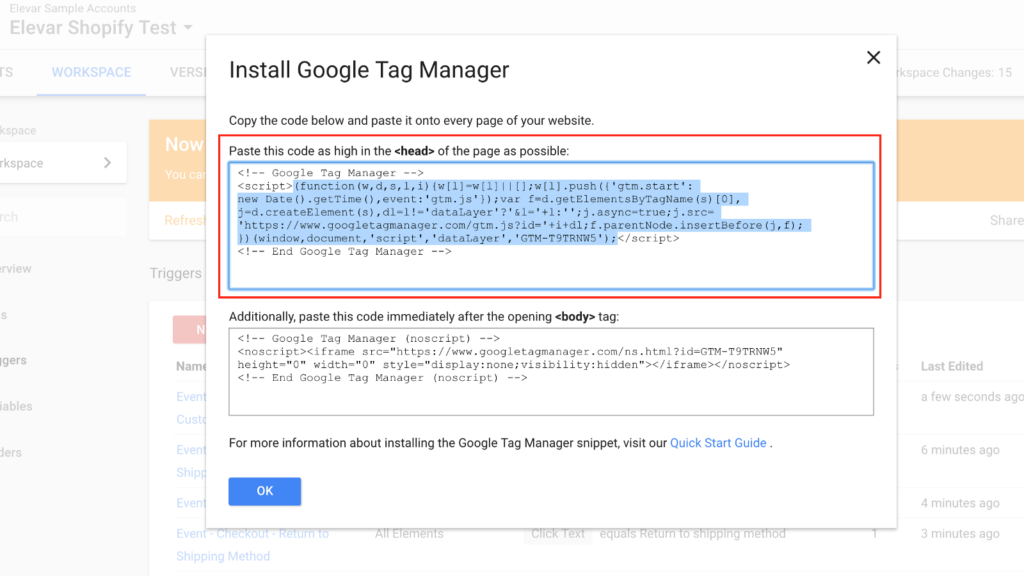
Step 2. Paste the copied script in your Shopify Account > Sales Channels > Online Store > Google Analytics > Additional Google Analytics Javascript, so it looks like the below:
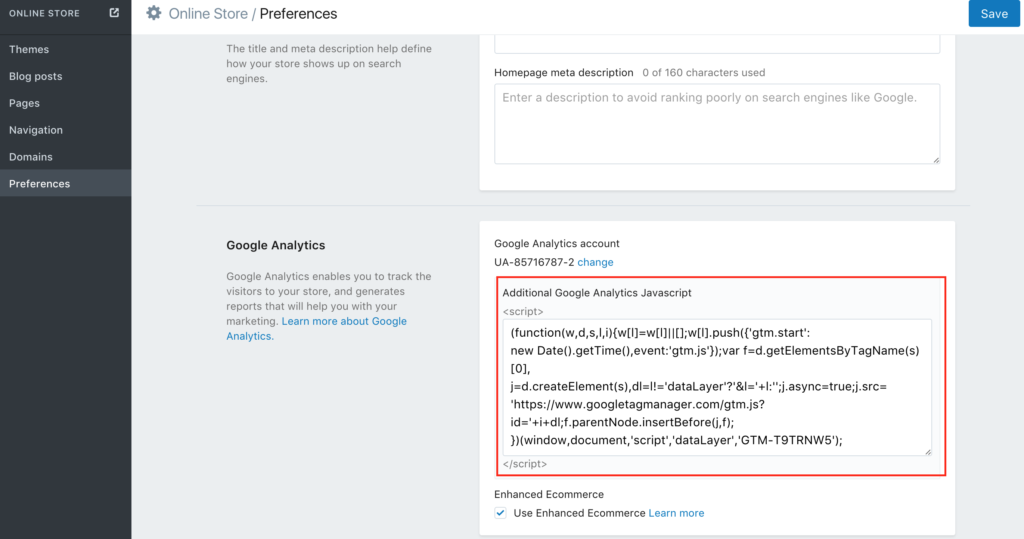
(Don’t sweat the GTM noscript that they ask to be placed in the <body> of your site. This is just for browsers that have JavaScript disabled which is a very low % of users.)
That’s it. You can read more about how to set up and test GTM in Shopify here.
Step 3: GA Account Management
Hopefully you already have a Google Analytics account setup if you’ve made it this far!
An Account can have up to 50 properties and each property can have up to 25 views. If you’re a small-mid sized business then the likelihood of you reaching these caps are minimal.
Once you’ve created your Account, the configuration options here are:
- User Management: Visibility into all users that have been assigned to any property or view
- Filter Management: View all filters created as part of any view under the account
- Change Log: View all edits to any property or view setting for the entire account
This is a good place to start if you need to prune users who no longer require access to your GA data.
If you’d like to learn more about the account > property > view structure, read this overview from Google.
Step 4: GA Property Configurations
In Google Analytics, “Properties” are where the unique UA-###### is assigned.
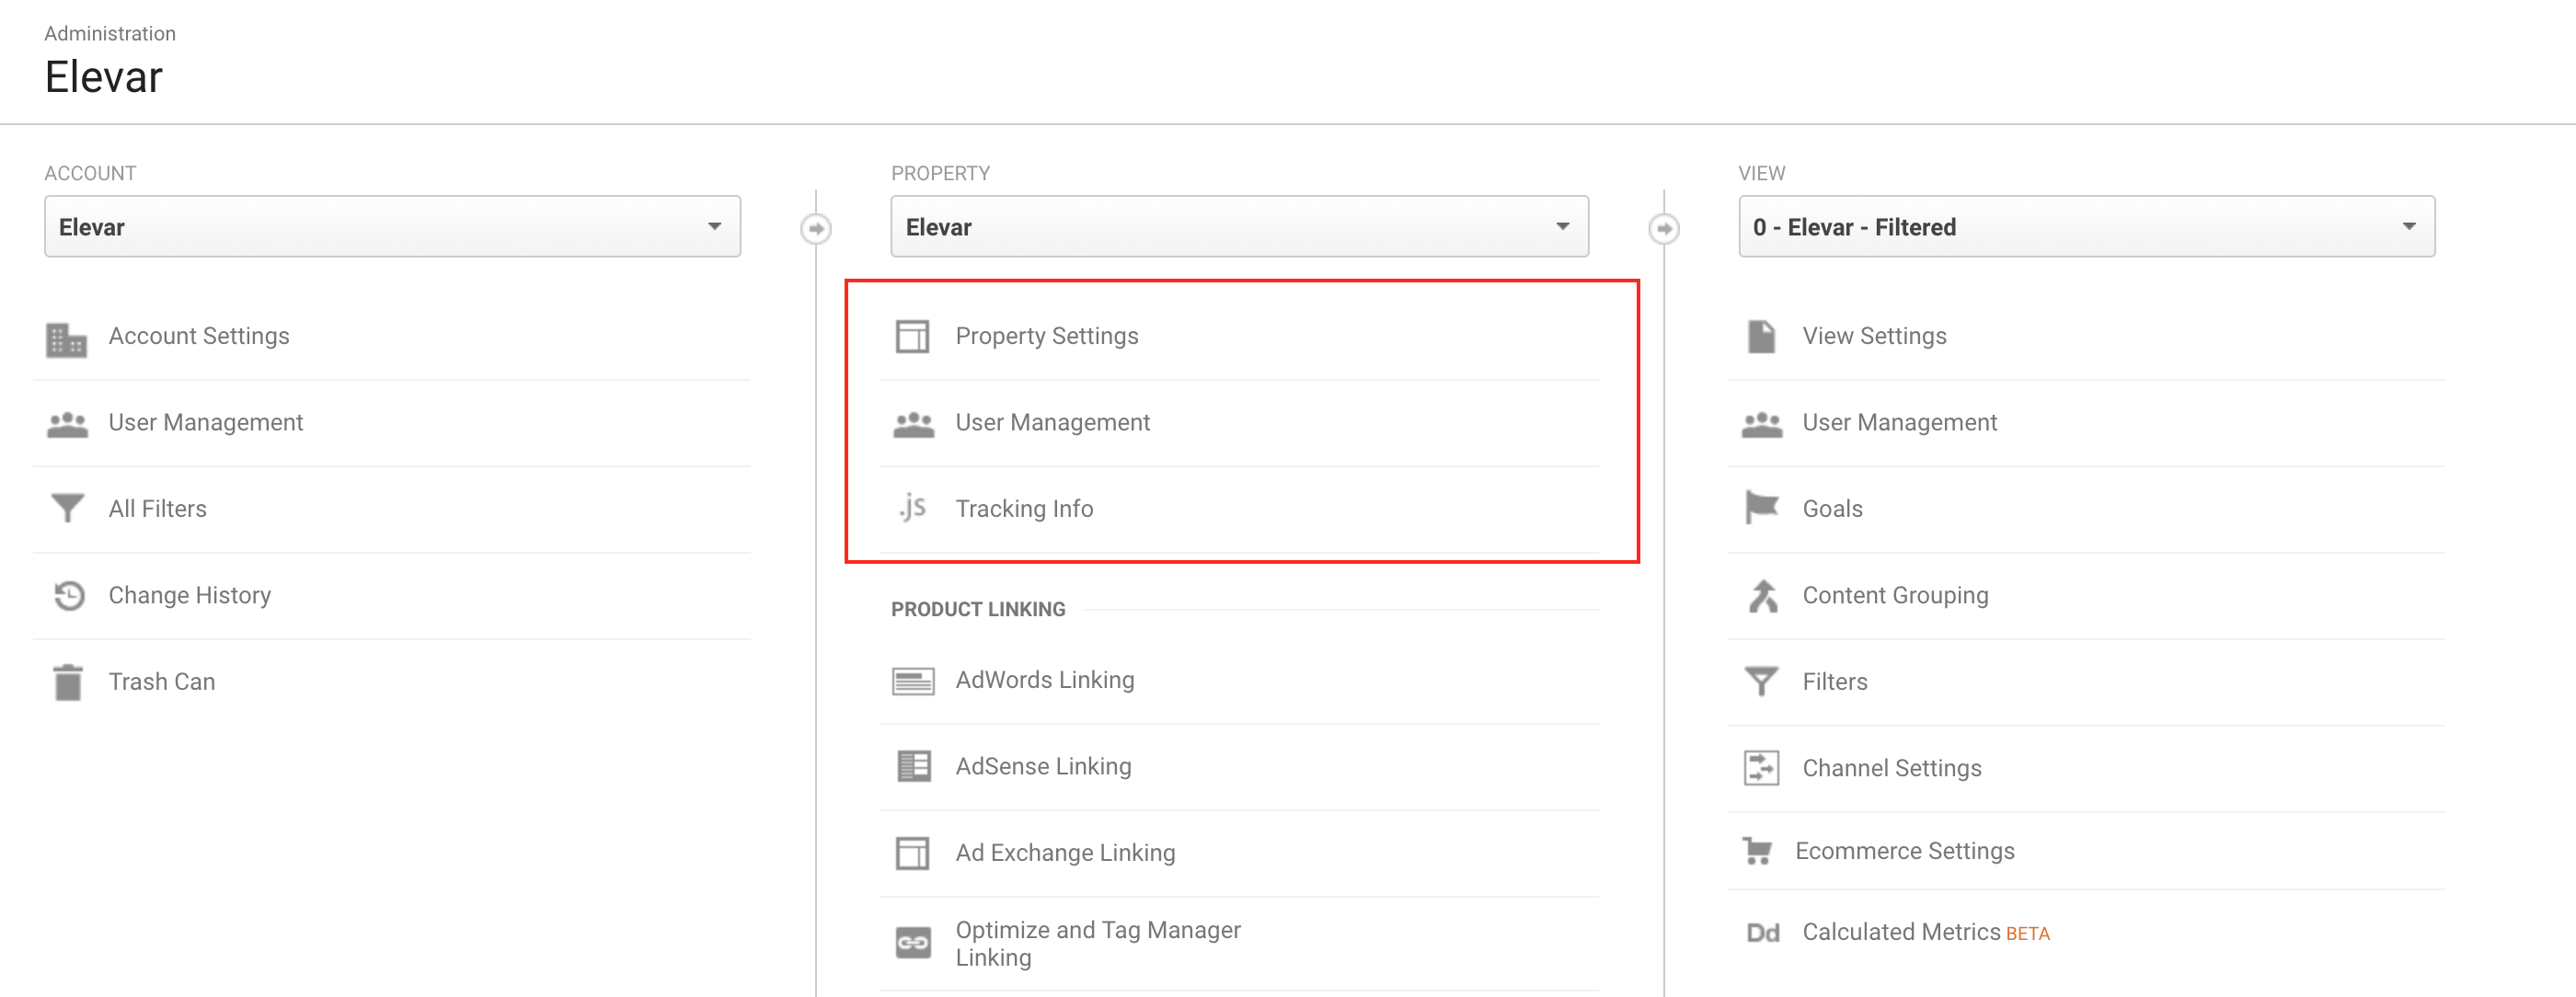
Tip: I always have a separate property for my staging website to mitigate the risk of pushing non-production data into production views.
Property Settings
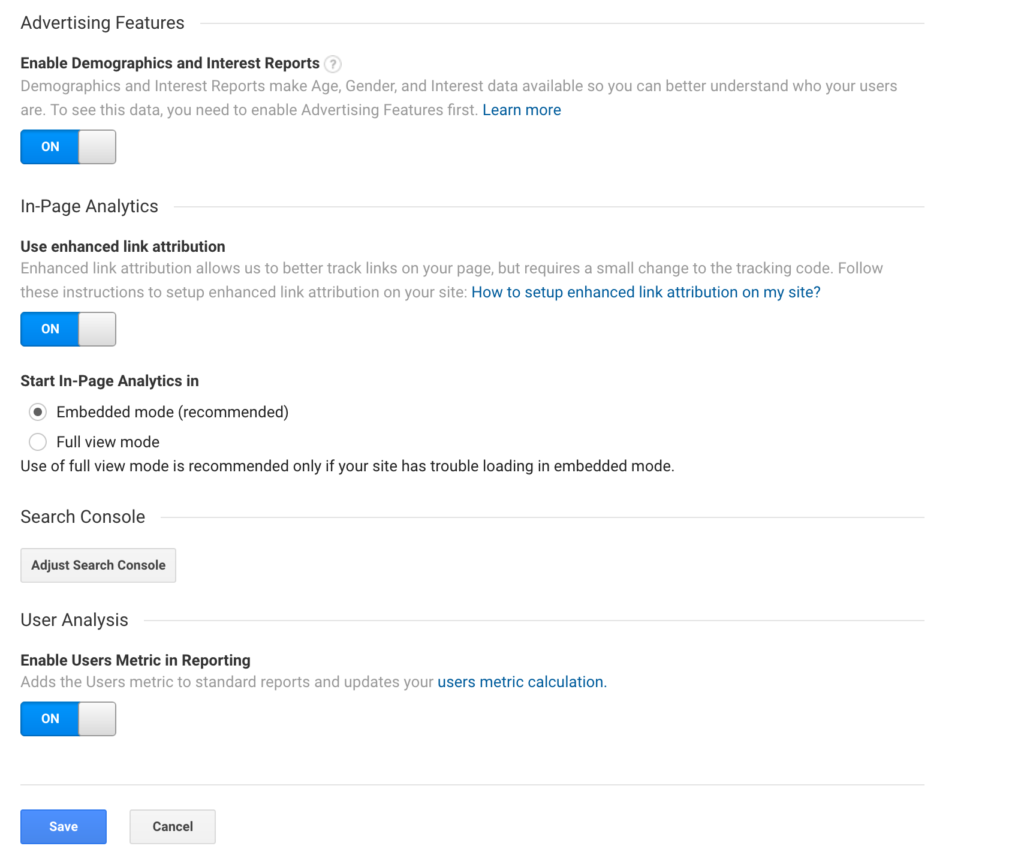
a. Enable Demographic & Interest Reports:
Turn On to unlock important cohort reports about your users such as age, gender, and interests.
b. Adjust Search Console:
This unlocks reports in Google Analytics > Acquisition > Search Console to combine organic search analysis with behavior, goals, and conversion data.
For example: Do you have landing pages that have a high click-thru rate in search but low conversion rate?
This could mean the onpage experience doesn’t match the intent of the user who chose to click your link from search over others…and there are many strategies you could implement from here to validate this hypothesis.
If you have not connected your Search Console yet:
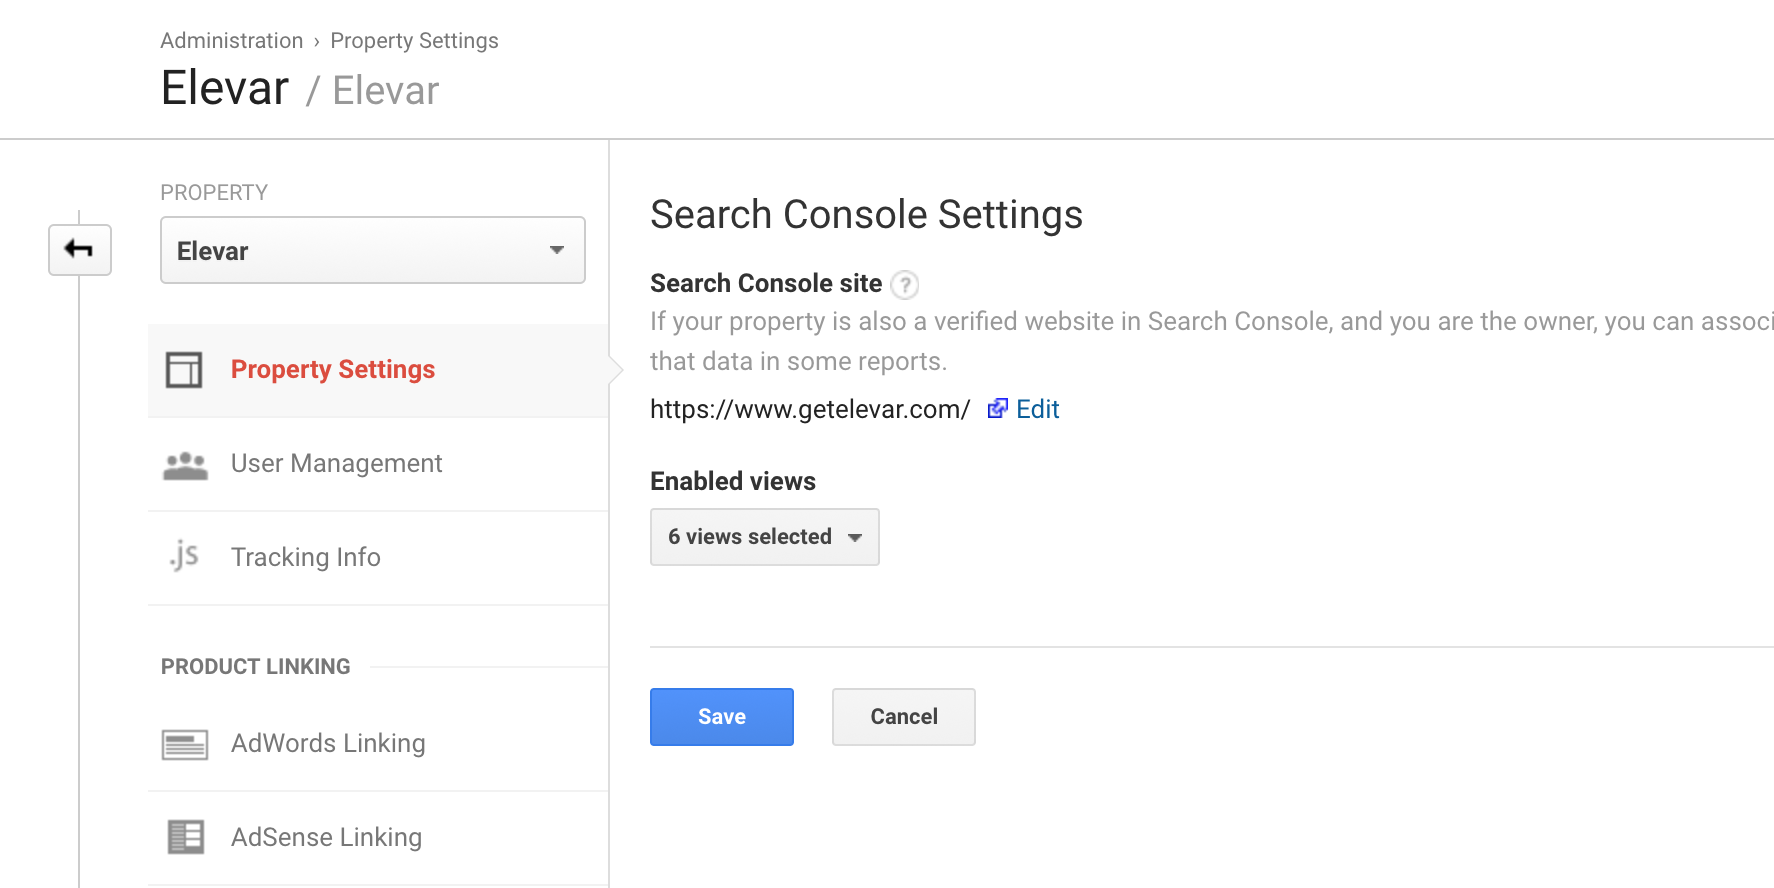
- Click “edit”
- This will take you to the Search Console website selection
- If you’ve already configured a search property then select your default view from the radio button options applied.
- Otherwise you will need to add a site to search console (Google walks you through the steps to add a property).
c. Enable Users Metric in Reporting
This is new(ish) setting to GA which I now enable. Google claims this is a more accurate estimation of user data across reports.
Tracking Info Settings
a. Data Collection
Enable Remarketing and Advertising Reporting Features: Turn On
These serve a few purposes:
- Enabling Demographic and Interest reporting in GA.
- Enabling ability to grow Remarketing audience(s). Even if you aren’t using AdWords today, it is a good idea to have this in place so if you begin remarketing 60 days from today then you start with an audience that you can begin segmenting (e.g. abandoned cart) and marketing to.
b. User ID
This feature enables you to associate engagement data from different devices and multiple sessions so you can discover how users interact with your website over an extended period of time on their path to purchase (or abandonment).
Unfortunately, it isn’t as simple as flipping the on switch. This requires an authentication (e.g. log in) where you pass a unique User ID to GA for every user who logs in.
This is an advanced feature implementation so I won’t go into more detail here.
Session Settings
a. Session Timeout
By default this is set to 30 minutes. What this means is that if I visit your site at 130pm and click around a bit and then take a 31 minute phone call (without closing my browser) and then go back to browsing at 201pm (31 minutes after I started) then I will count as two sessions instead of one.
This is a subjective configuration setting based on the uniqueness of your business. I usually leave this as is.
If I see a high Average Session Duration ( > 10 minutes) or the site has lengthy content that requires more than a few minutes of reading/browsing then this might go up to 45 or 60 minutes.
b. Campaign Timeout
By default this is set to 6 months. A similar concept as session timeouts, except this is strictly for Campaigns that you are setting via URL tagging (e.g. utm_campaign) or through AdWords campaigns.
Example: If I click a “Black Friday Sale” Paid Search campaign ad to visit your website and then type your website URL directly into the browser the following week and complete a purchase then my conversion will still be attributed to the “Black Friday Sale” campaign.
c. Organic Search Sources
I’ve never really modified this setting. Google does a good job here already.
d. Referral Exclusion List
Including a URL here means that Google will not count clicks from one URL (ex. blog.yourwebsite.com) to another URL (ex. www.yourwebsite.com) as a “Referral” which would initiate a new session.
A very common example of this is in checkout:
- A user visits from Google search and is in checkout where we offer CC or Paypal
- They elect to pay via Paypal and go to paypal.com to pay for their purchase
- After entering their payment creds on Paypal, they’re sent back to our order review page
If I don’t have paypal.com set up as a Referral Exclusion URL then I’ll see a lot of new referral sessions entering at our order review page – which isn’t accurate.
And worse – my last click conversion attribution will go to paypal.com when it should go to Google Search.
Here is the minimum you’ll need to setup:
- yourwebsite.com
- checkout.shopify.com
- paypal.com
- any other 3rd party payment methods utilized
- if you have a blog on a subdomain like blog.yourwebsite.com then include that as well
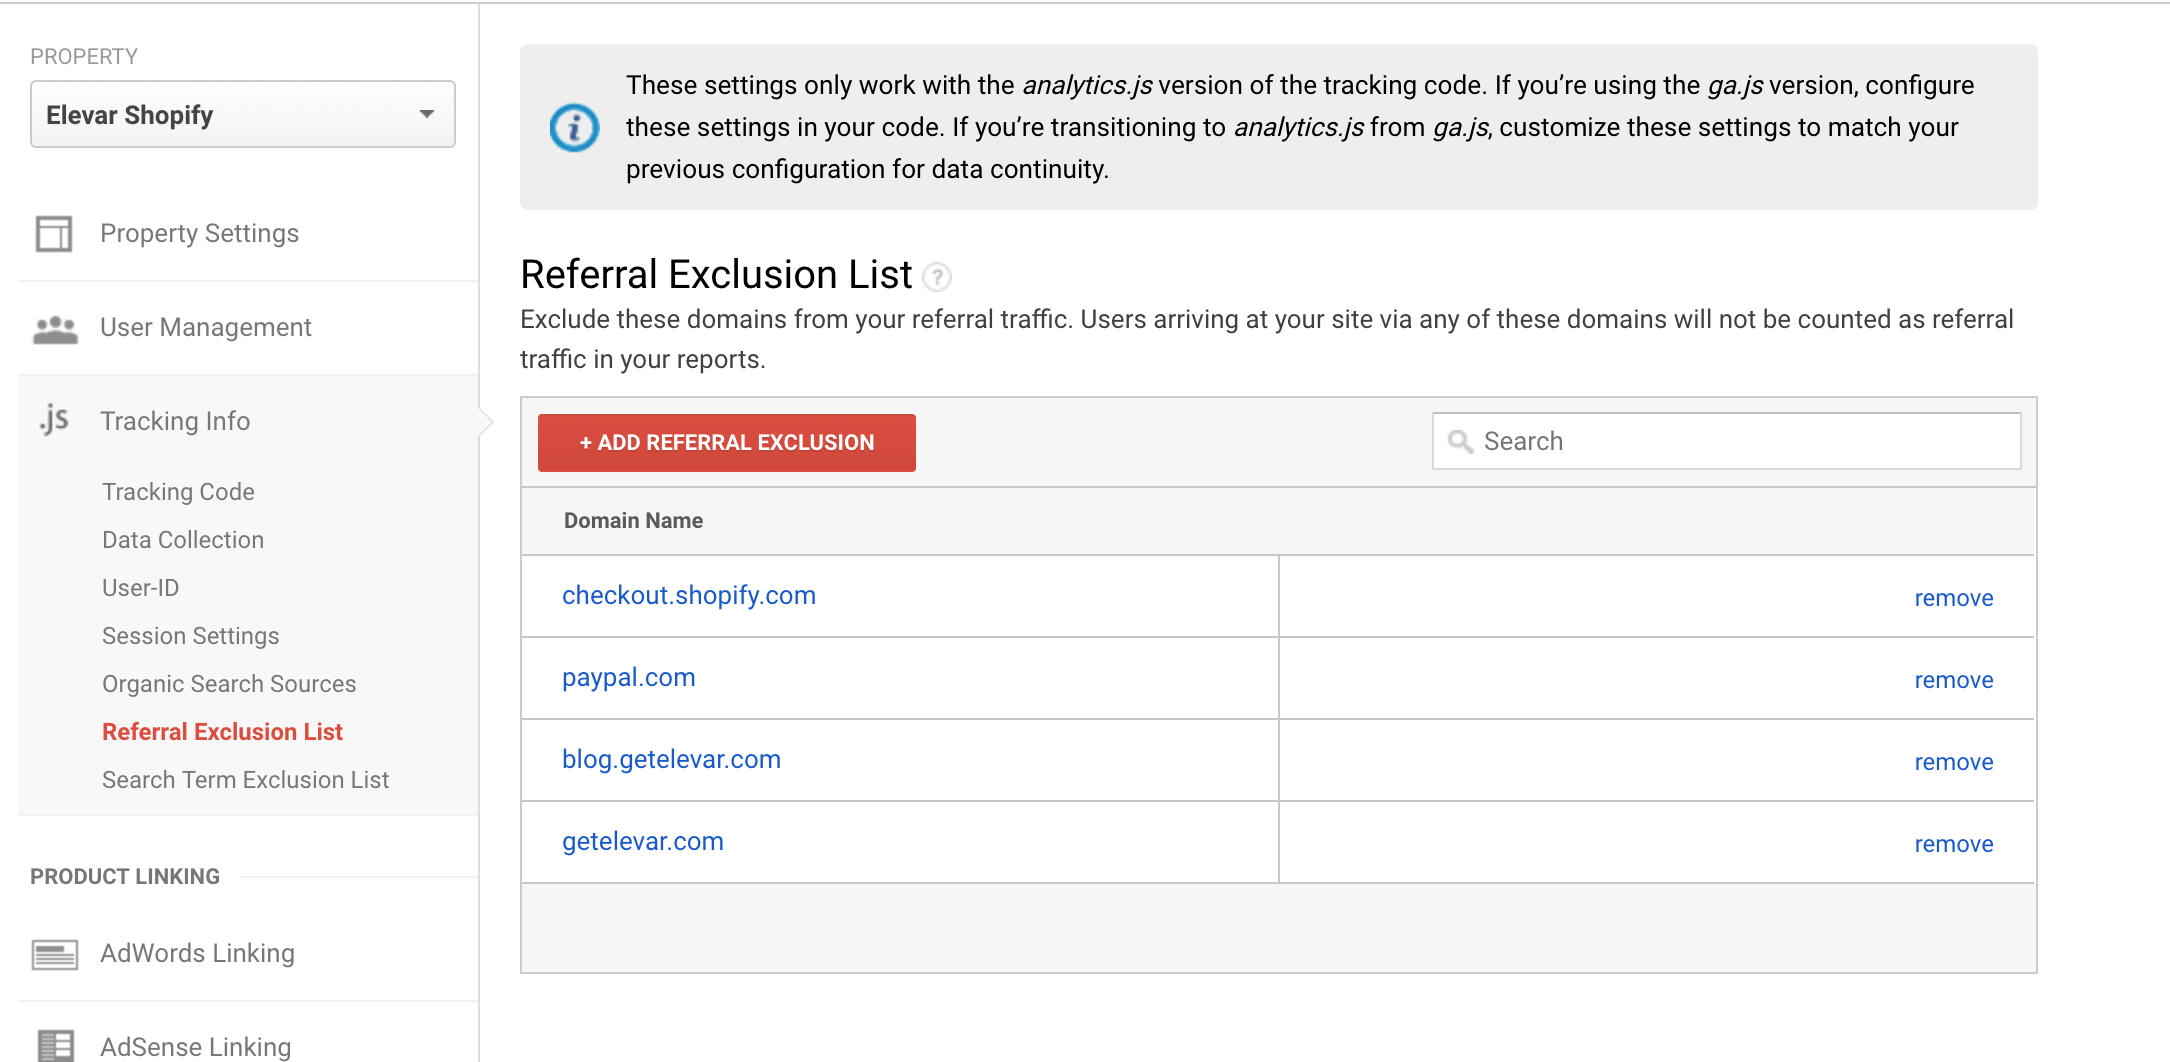
Configuring this helps maintain data quality for sessions and conversions.
e. Search Term Exclusion List
I normally leave this untouched.
f. Adwords Linking
If you utilize paid search then this is a must so you’re able to analyze paid search metrics (cost, CTR’s, etc) along with your onsite behavior and conversion data.
Simply click NEW LINK GROUP and walk through the steps to configure your account.
If you aren’t using AdWords today, I always recommend creating an account for the following reasons:
- You can begin building Remarketing Campaign lists to utilize if you ever decide to begin using paid search or display marketing.
- You’ll have access to the Keyword Planning tool which can help you uncover keyword phrases (head and long tail) important to your business. Here’s an example:
If you sell baseball bats and see the keywords “baseball bats on clearance” and “baseball bat closeouts” have 1K-10K avg searches per month but you realize that you don’t have any category or custom landing pages promoting “clearance” or “closeouts” then you might consider creating these pages with SEO rich content:
- in your URL – ex. yoursite.com/baseball-bats-closeout
- title
- meta description
- h1 title tag of “Baseball bats on Clearance”
- canonical URL
All in addition to your product data that are on sale/closeout. A bonus would be appending this type of rich data to your product names :).
For example: instead of “Demarini 32″ inch Baseball Bat” update this to be “Demarini 32″ inch Baseball Bat on Closeout”.
g. You can skip the AdSense and Ad Exchange Linking configurations.
h. Audiences
Create custom segments aka audiences to link to your AdWords account for use in paid search and display remarketing efforts. Here’s an example of custom audiences targeted at users who do not convert:
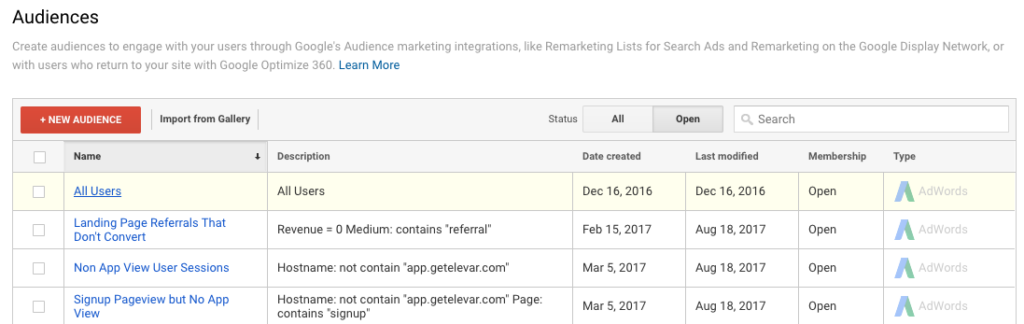
I reference this potential feature earlier in our data collection settings and property settings.
i. Dynamic Attributes
This setting allows your remarketing campaign creative content to be dynamically generated based on product data in your Google Merchant feed personalized to what users viewed onsite. Additionally if you have defined major page types (like categories) and cart value then you can create more targeted marketing segments.
For example: a user with $1,000 in their shopping cart is a much different prospect than a user with $75.
If your business goal is improving your top line revenue then you might offer a more aggressive discount code to the $1,000 user vs the $75 user.
j. Custom Dimensions & Metrics & Data Import
These are large features in GA that require it’s own guide! More to come on this..
Step 5: GA View Configurations
This is where you view all of your reporting data for your business. So – this requires the most proper care!
You should have at least three views:
- Unfiltered View
- Filtered View
- Test View
I’ve seen various naming conventions for these to help with organization and I find a numeric convention works best to sort views by the most used. So using my three views above I could have:
- 00 – Filtered View
- 80 – Unfiltered View
- 90 – Test View
I will go through my primary view configurations first and then duplicate the view to minimize having to repeat the same setup.
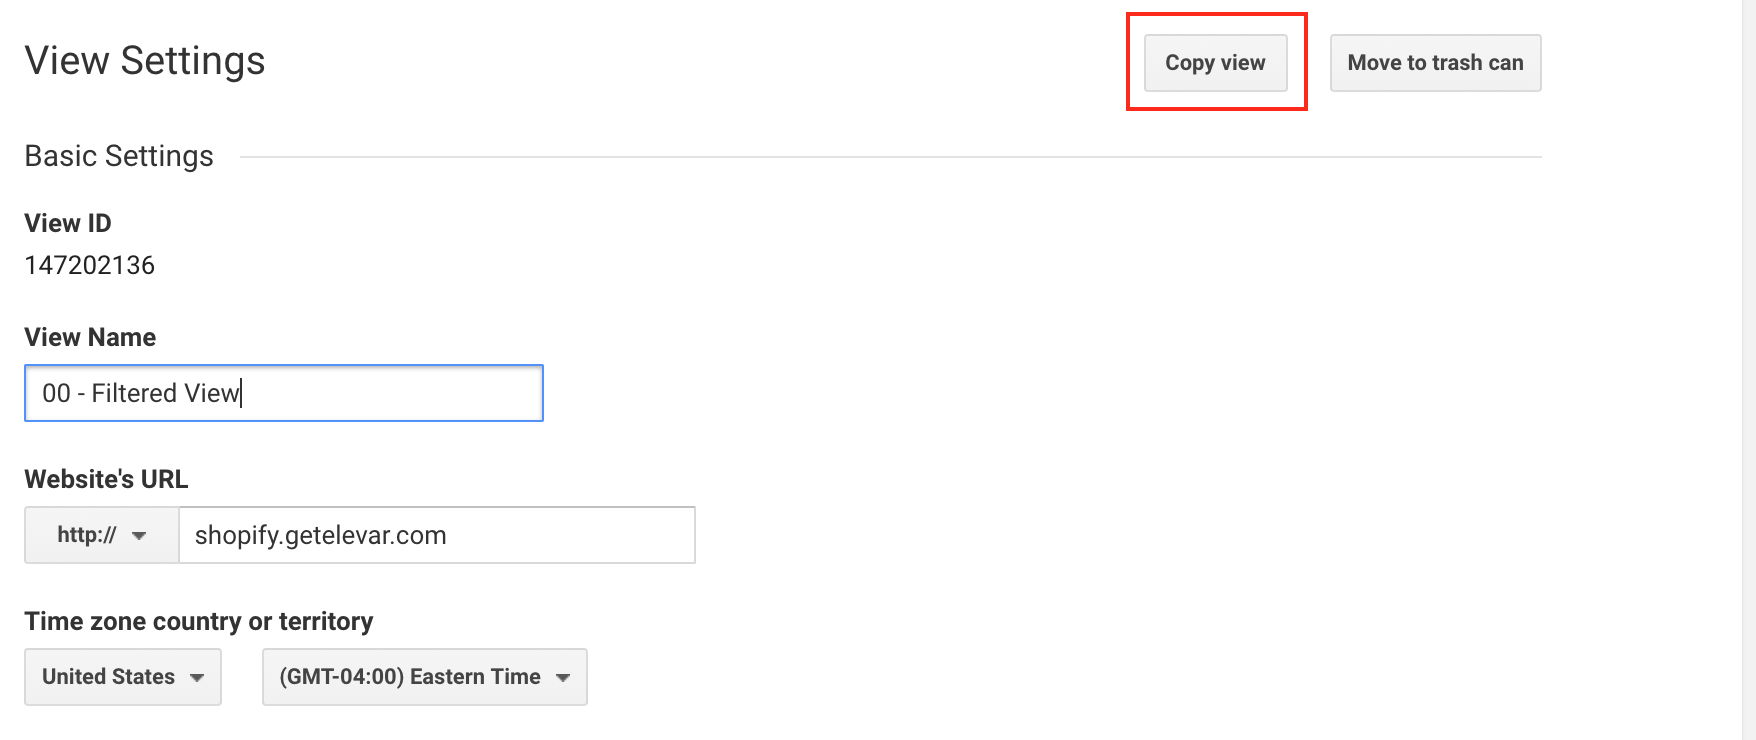
View Settings
a. Time Zone Country
A minor setting but this is the timezone used for reports and when sessions “restart” at midnight. Yes…if a session begins at 1155pm and continues past midnight then any activity after midnight will be considered a new session.
So if you’re an east coast company but > 50% of your traffic comes from the west coast (especially at night) then you may want to consider changing this setting to Pacific instead of Eastern.
b. Default Page:
Leave blank (unless you’re on an old platform that appends .html, .php etc to the end of all URLs)
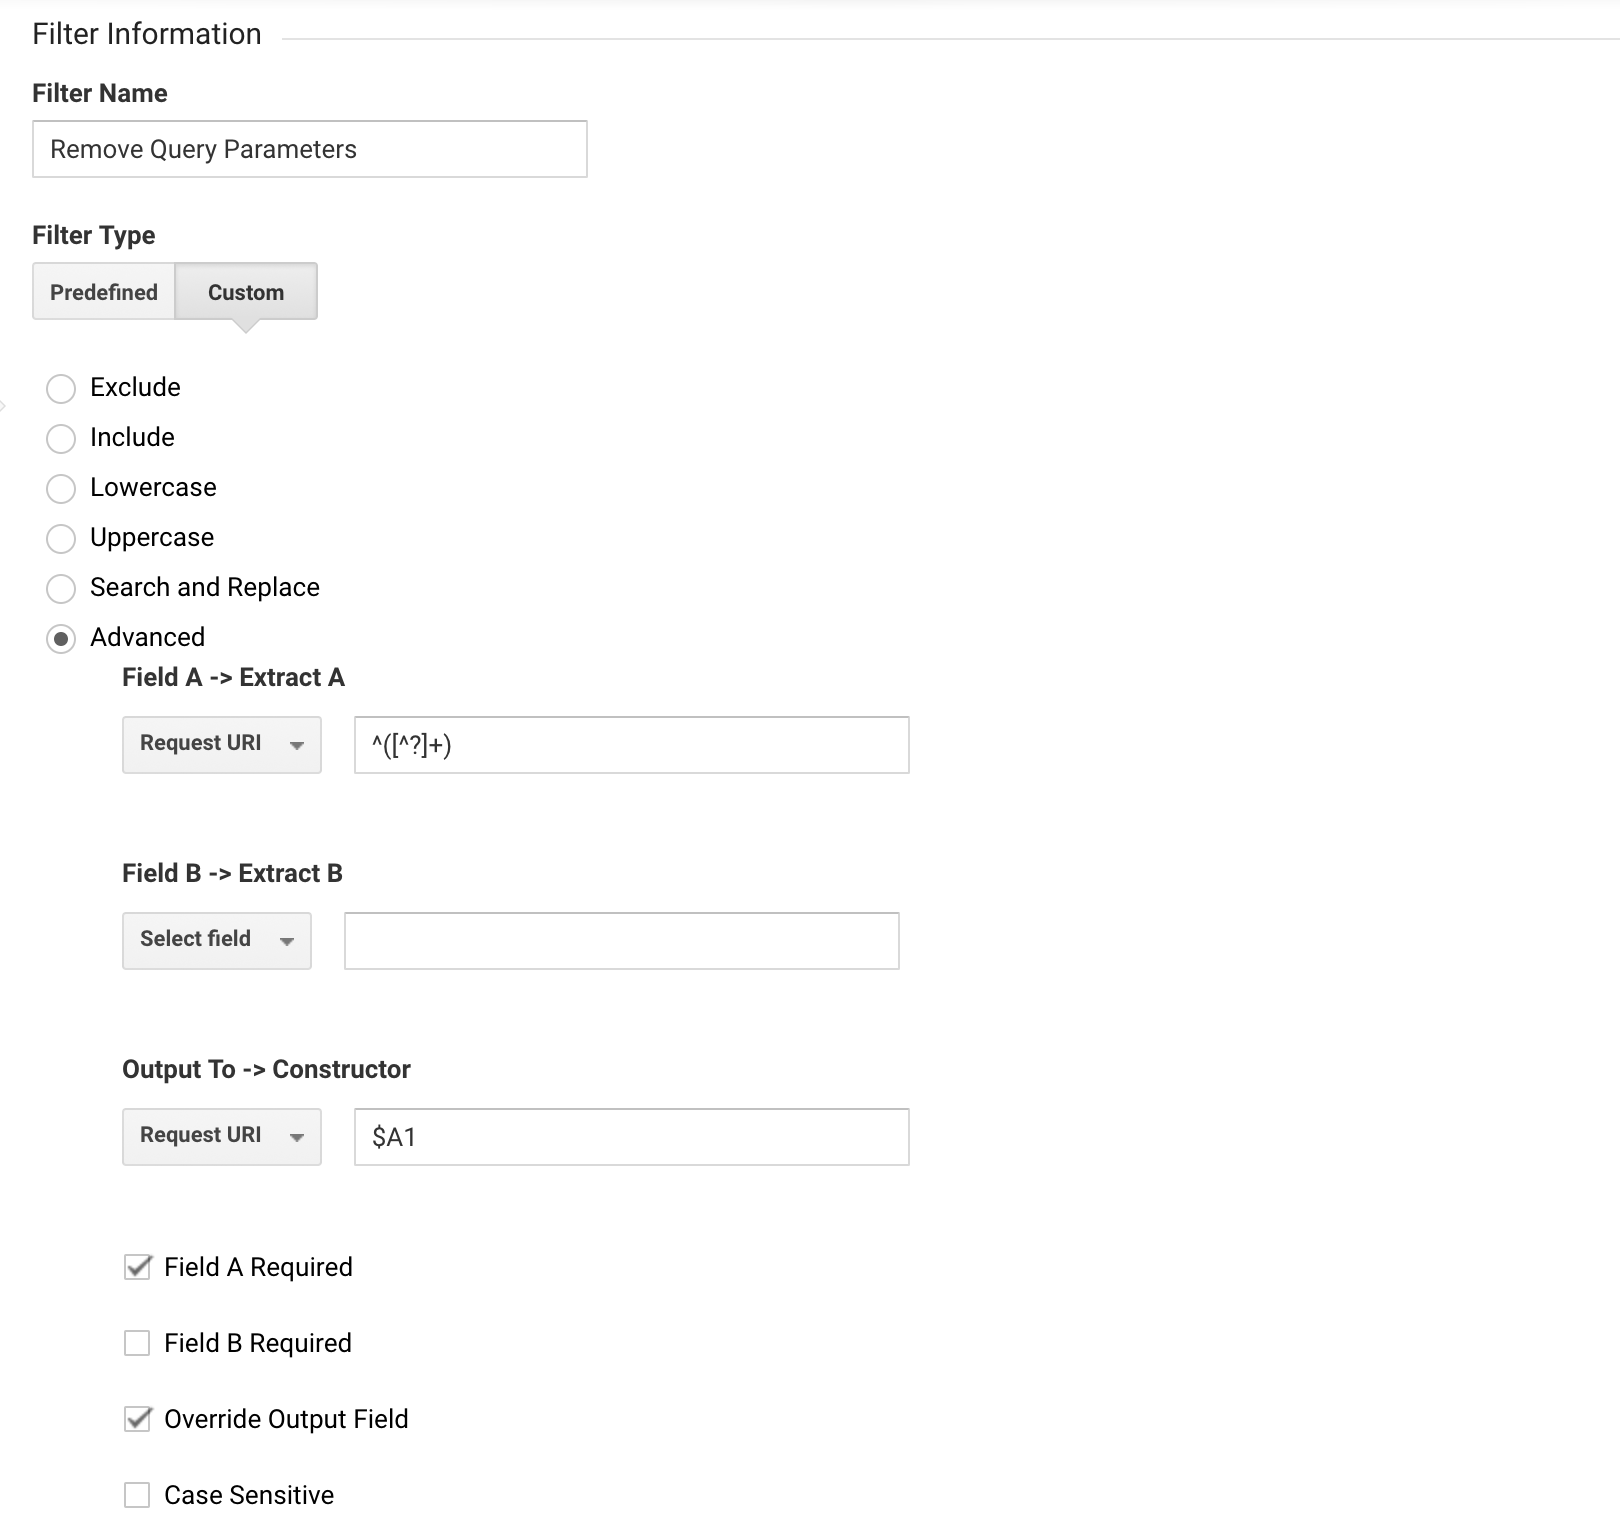
c. Exclude Query Parameters
This setting offers potential in cleaning up page URL reports that can sometimes get messy.
Have you ever looked at your Page URL reports and wondered why the same product page had so many variations listed individually?
If so, then you likely have query parameters appended to the end of your URLs even though it doesn’t change the content of the page.
For example: You send abandoned cart emails that two different users receive and click to enter your site.
The URLs they click are:
www.yourwebsite.com/checkout/payment?mc_cid=1234456
www.yourwebsite.com/checkout/payment?mc_cid=4567446
These will record as two unique URLs in GA and thus makes analysis of abandoned carts more difficult than it needs to be.
These two URLs are the same page (the payment step of checkout) and don’t need separate analysis.
But Mailchimp has appended mc_cid parameters to the end to help reporting within Mailchimp (not Google!).
It’s not that Mailchimp is doing anything wrong either, it’s just the way they’re able to provide you with more accurate email data.
So in this case we should add “mc_cid” to exclude from all reports.
Important Note: If not implemented carefully then this can result in losing out on key data. I suggest testing this on your test view first prior to implementing on your primary view(s).
If you find that you don’t want/need ANY query parameters in GA then the faster way to do this is through a custom filter that I’ve outlined below.
d. Bot Filtering
Always check this box, even from your raw data reports. This excludes known bot/spam traffic from counting as hits in your GA.
e. Site Search Tracking
This setting allows Google to report on:
- Visits that use site search
- Keywords that users search for
With this data at your helm you can begin optimizing your site search results, product data (e.g. are people searching for keywords that your product data does not have?), and segmenting across various dimensions (i.e. are more users utilizing site search on mobile?).
The easiest way to find out what this is for your site is to:
- Go to your website and use your own search
- Look at the URL – does it look something like this:
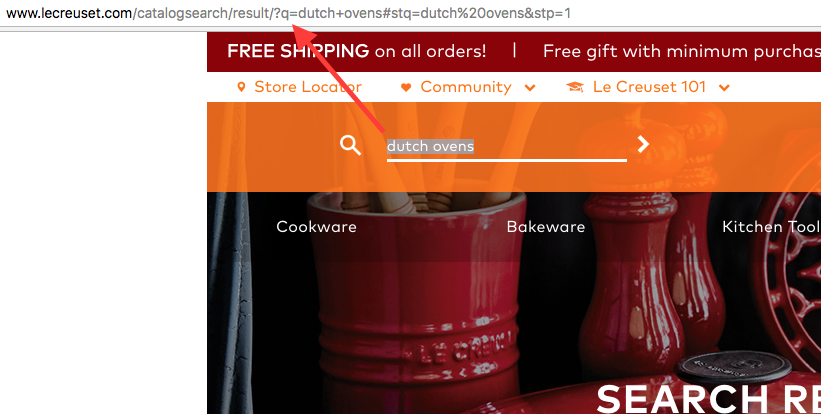
If so then grab the string after the “?” and before the “=” which in this example is q which is going to be the norm for Shopify.
Goals
If you’ve used Elevar before then you know we’re big fans of Goals and Milestones because it allows us to enable predictive forecasts!
At the bare minimum, you should implement a Checkout Complete goal in only a few quick steps:
Create new Goal:
- Type: Revenue > Checkout Complete
- Goal Description Type: Destination
- Goal Details: See the setup below
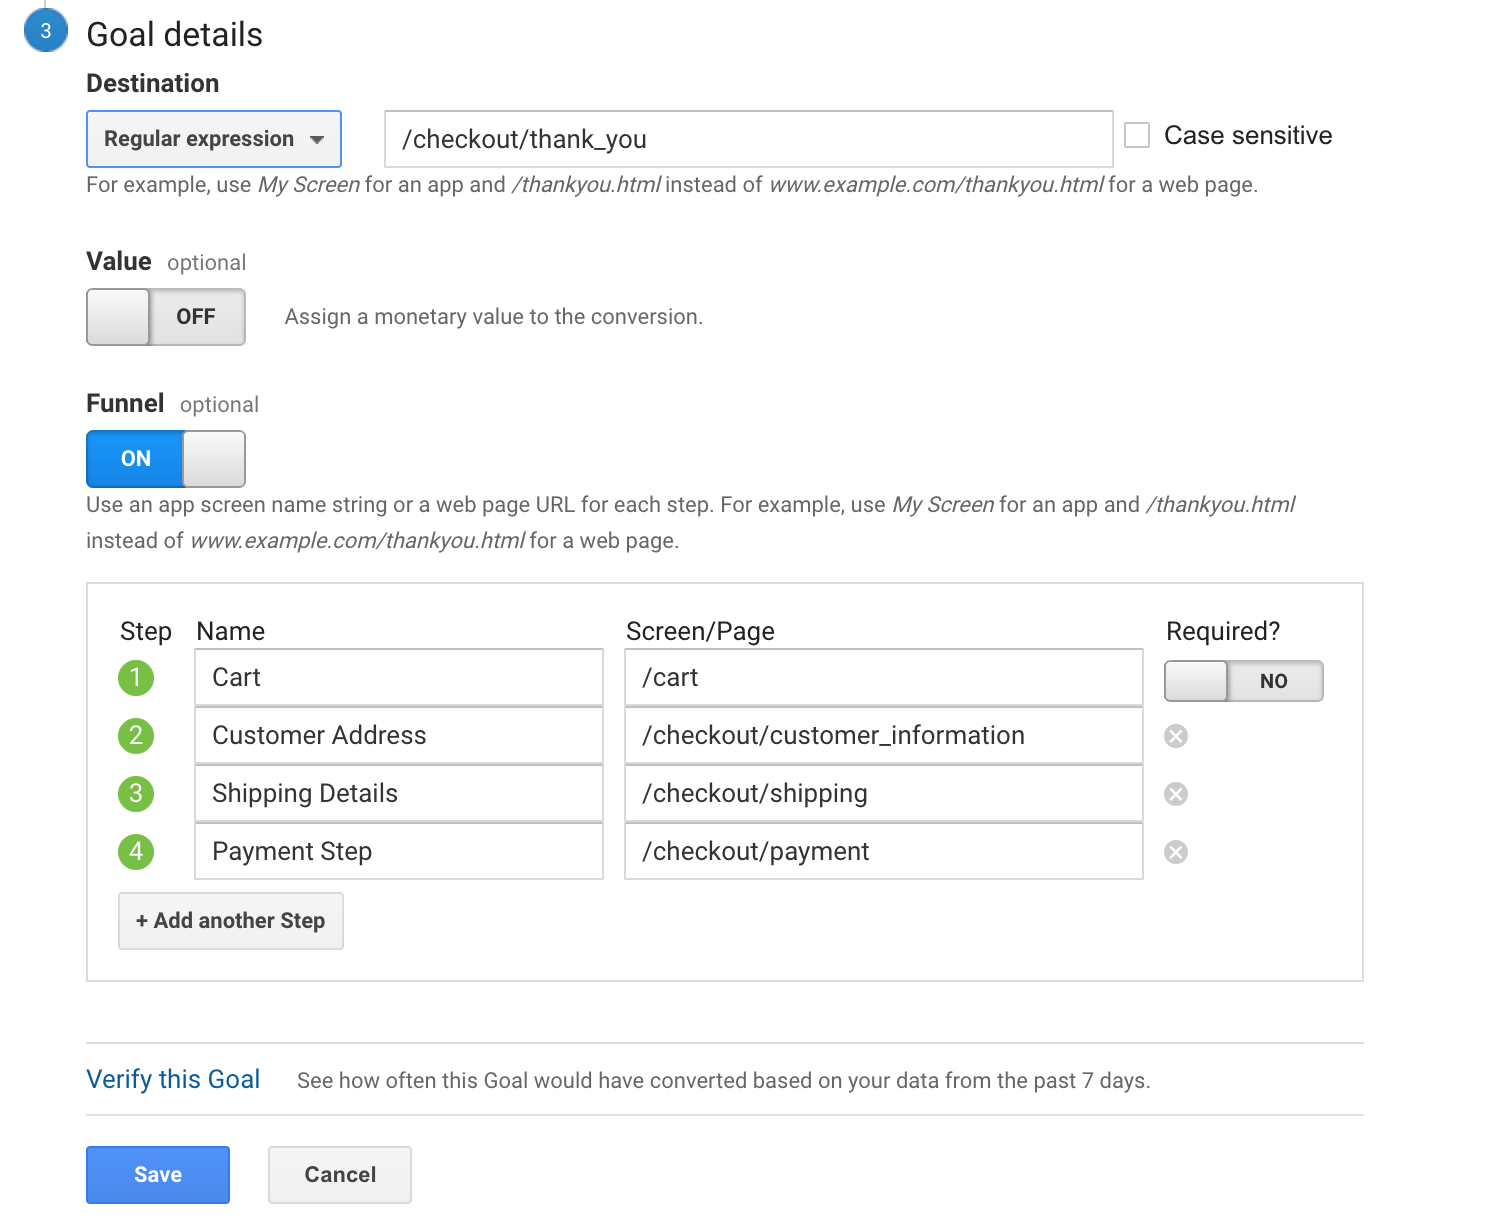
That’s it. Once you begin to build traffic with this goal live then you’ll see this goal data available for many reports. The best report for this new goal is your funnel visualization report which shows you step by step success rate for your checkout.
In my experience with eCommerce analytics, leveraging more sophisticated Goals are underutilized. This seems to be because:
- Reliance on conversion data only
- Lack of understanding in how to set up goals
- Existing goals that have gone untouched and are no longer reporting accurate data and thus a lack of trust in the feature
While conversions (i.e. transactions) are extremely important, they usually rely on smaller mico-conversions in order to achieve our ultimate goal of a purchase.
Goals are a great way to monitor and report on these micro-conversions. Here is an example to inspire:
a. Add to Cart Clicks
Baymard institute has a benchmark of 37 abandoned cart rates as reported by a multitude of large platforms across thousands of retailers. The average is ~ 70% abandonment.
Here’s a graph of some of the top reasons:

Now visualize a report of all of your product page landing pages and seeing add to cart conversion rates where your top products convert far worse than your average in add to cart click conversions?
Don’t you think seeing these types of insights would be helpful?
Content Grouping
This is another nifty but sometimes underutilized feature on eCommerce sites. Content Grouping lets you create logical collections of site content, and use those as primary dimensions in your reports. Categories are the most logic place to start. Blog or CMS content are other areas that make sense with this feature.
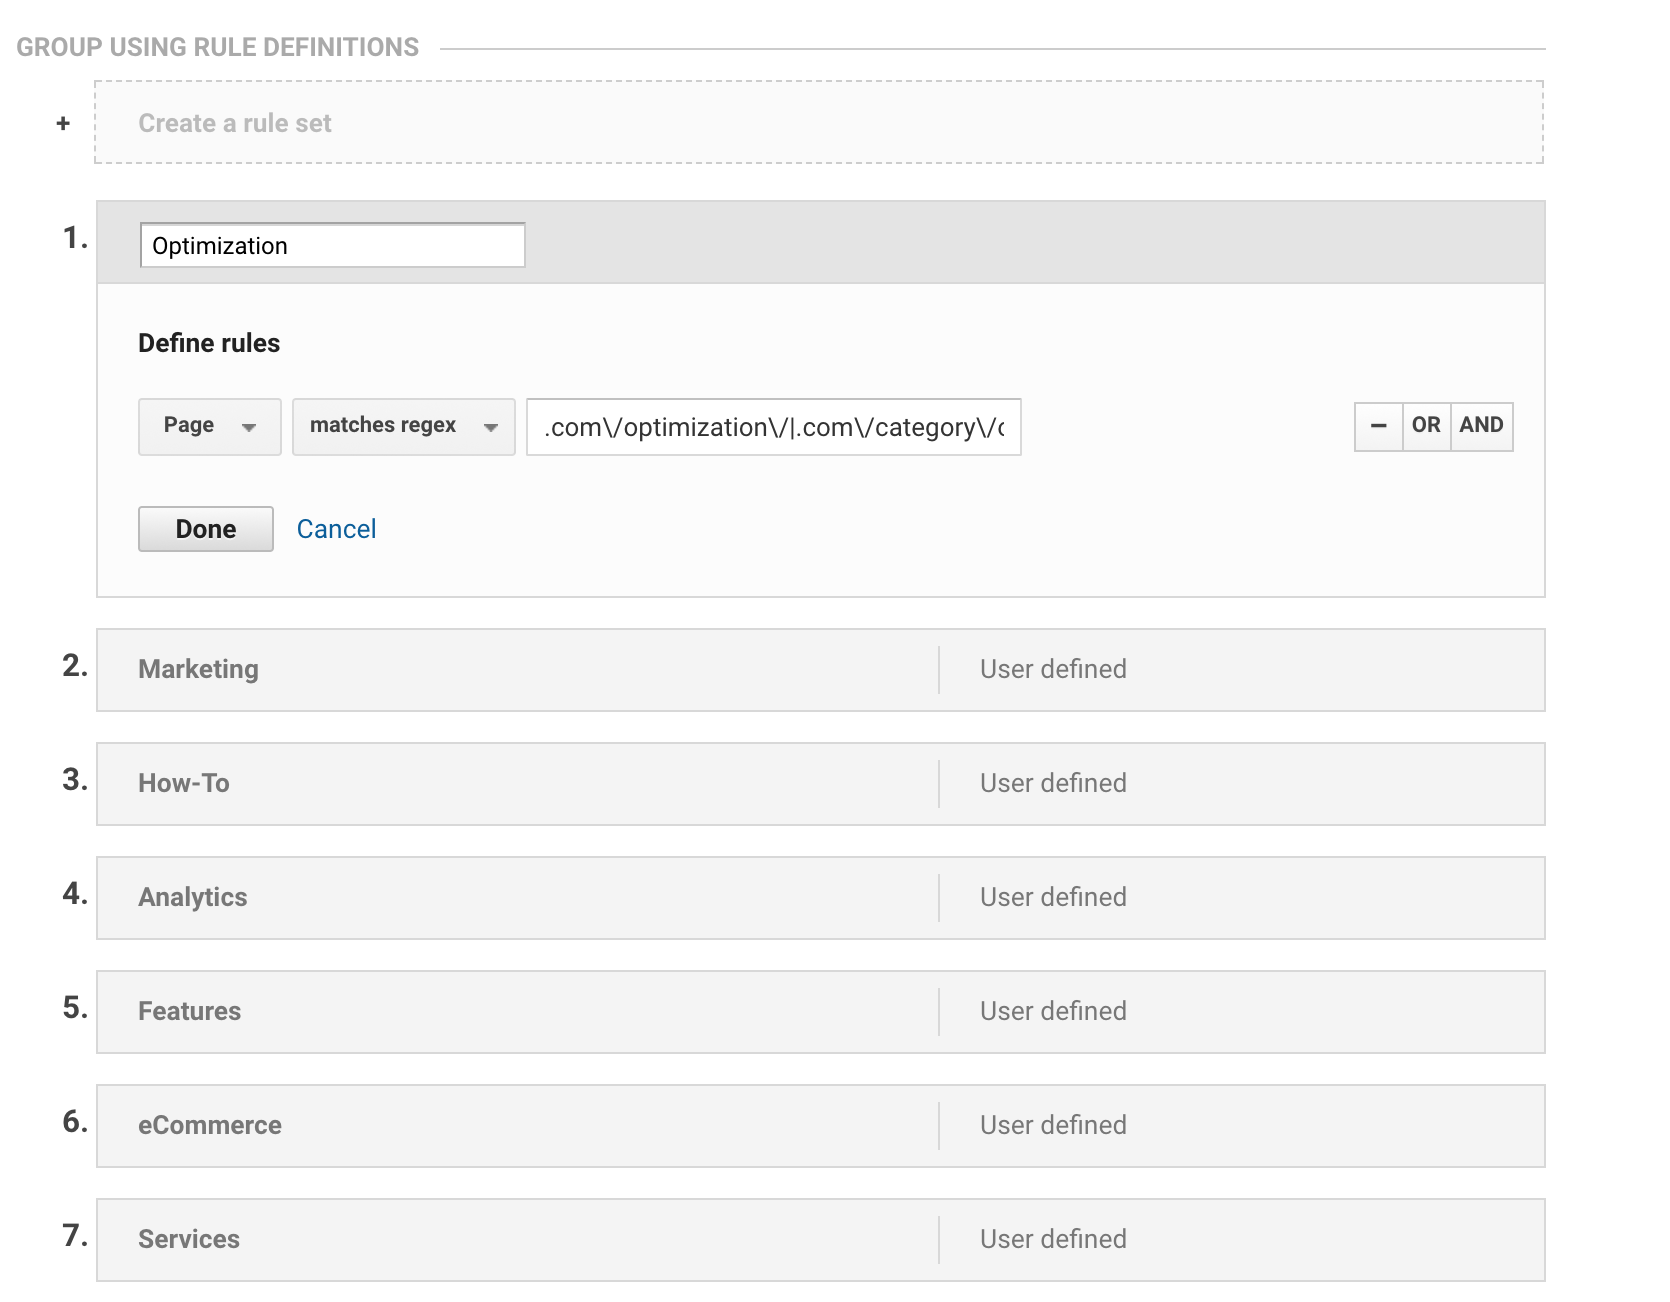
There are three ways to implement content groups:
- Via tracking code
- Via extraction
- Via rule definitions
This requires a post on it’s own – here is an intro video that helps explain the concept in a bit more detail.
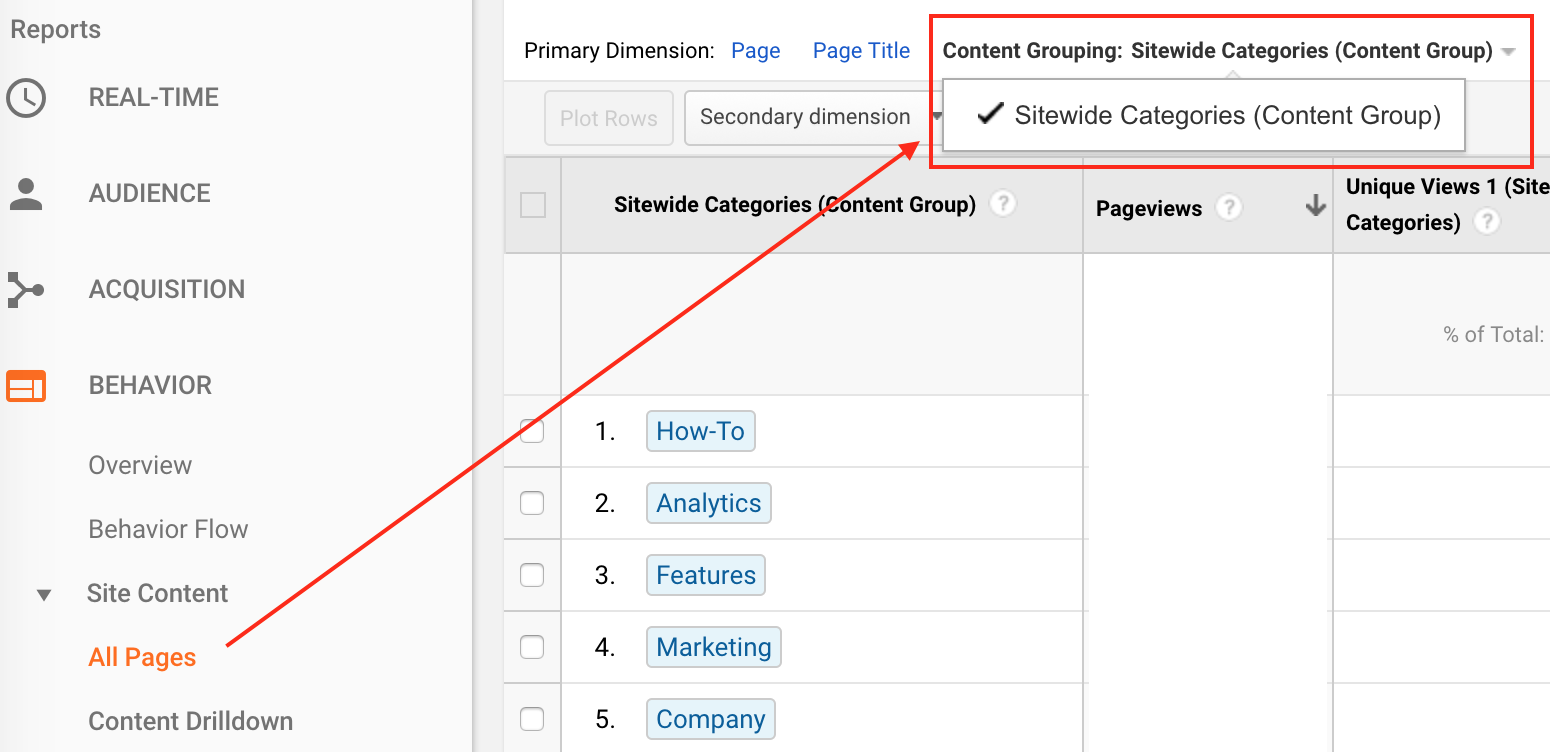
If you’re curious, here is how I have this site setup:
And now I can start to see how category topics are performing against each other:
Filters
This section has a lot of elbow grease – but it pays off with cleaner data. These are my most common filters that I always look to first:
- IP filtering
- Hostname URL updates
- Appending trailing / to URLs
- Lowercase filters for data consistency
- Removing query parameters
- Combine Facebook source traffic
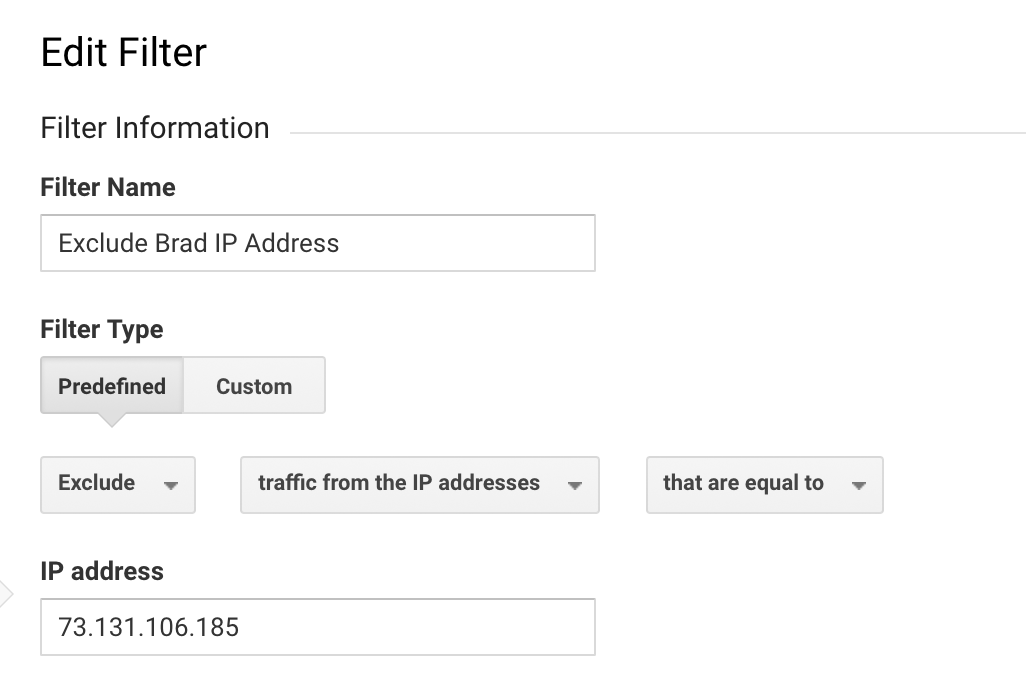
IP Filtering:
Exclude IP addresses of your home and office to exclude your visits from being included in site reports. Google “what is my IP address” if you’re unsure what yours is
Include hostname URL
This is subjective however I prefer to include this in my filters especially if starting from scratch and/or if multiple subdomains are being tracked under the same UA property #. Basically this includes the “www.yourwebsite.com” in the reports with page URLs. Keep in mind this is not retroactive so if you make this change then you are likely to end up with the same page reporting as:
- /product-page
- www.mywebsite.com/product-page
Appending trailing slashes to URLs
This fixes an old issue that used to be more prevalent than it is now. I go into more detail on how to implement this trailing slash search & replace filter here.
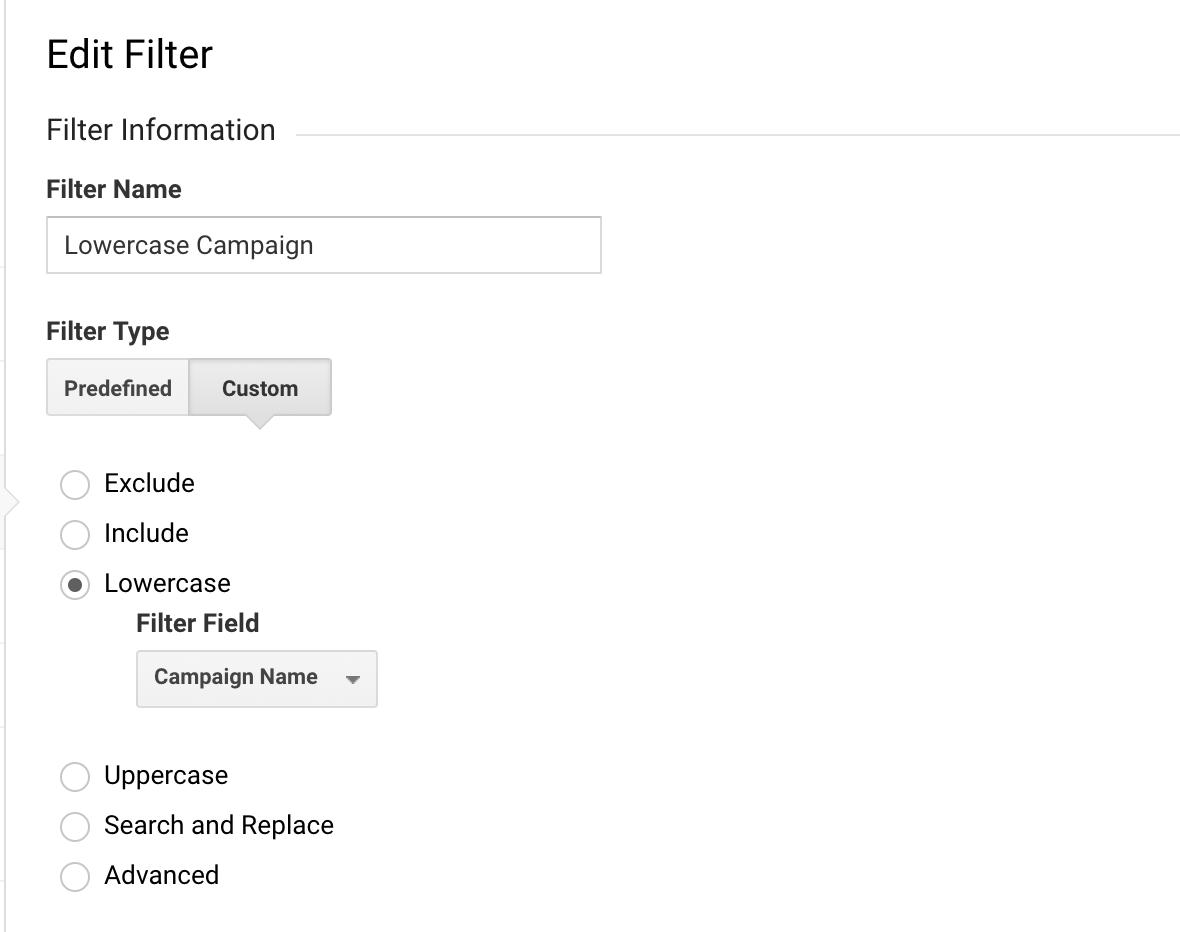
Lowercase filters
This is one that can help automate data cleanliness if you struggle with keeping consistent naming conventions for campaigns. I usually set this up for Campaign Name, Source, Medium, Content, Term:
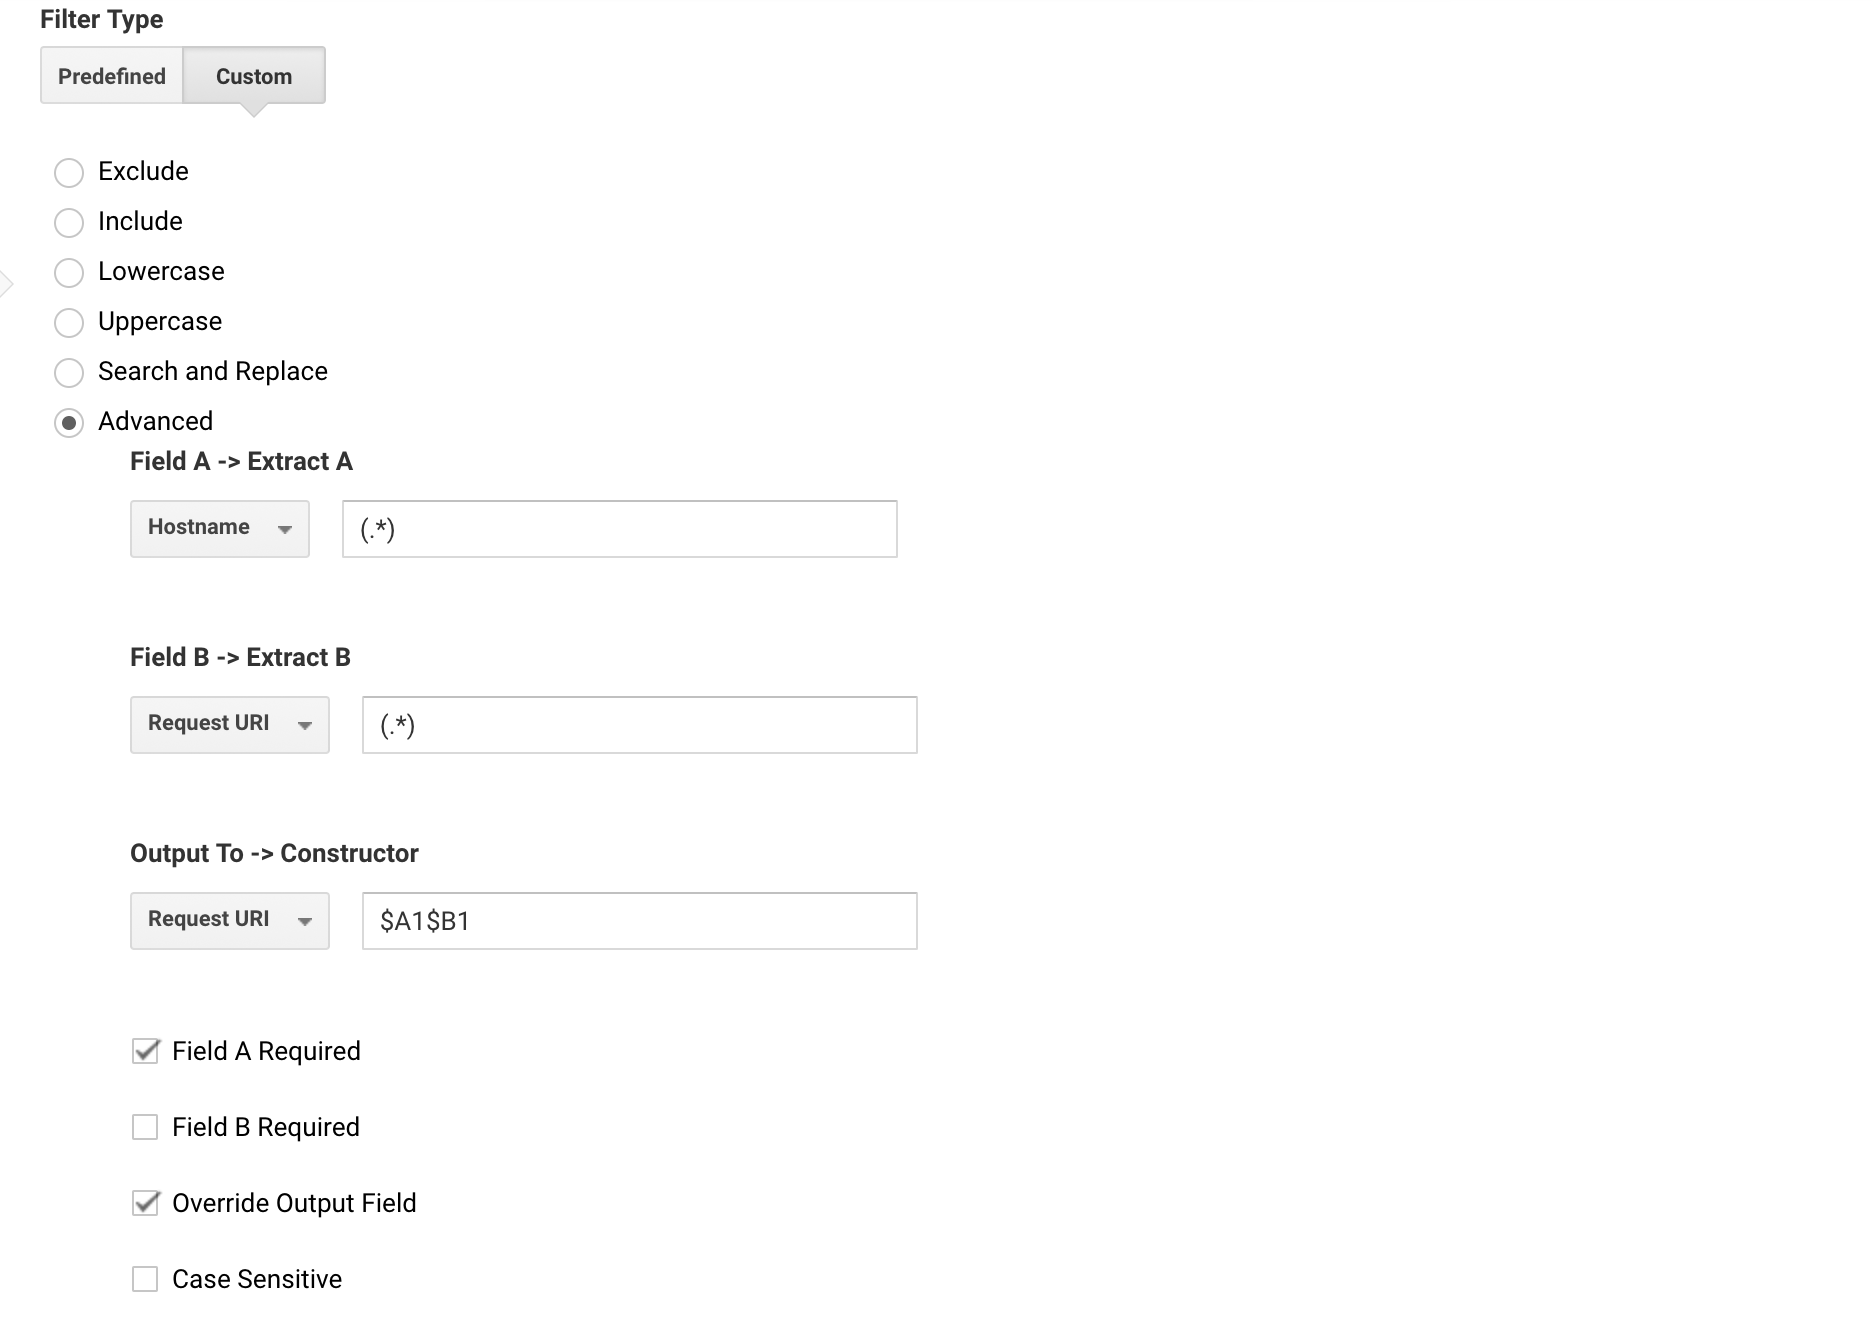
Remove Query Parameters
If you want to exclude all query parameters from URLs in one or more of your Views, then here is how to set this Advanced filter:
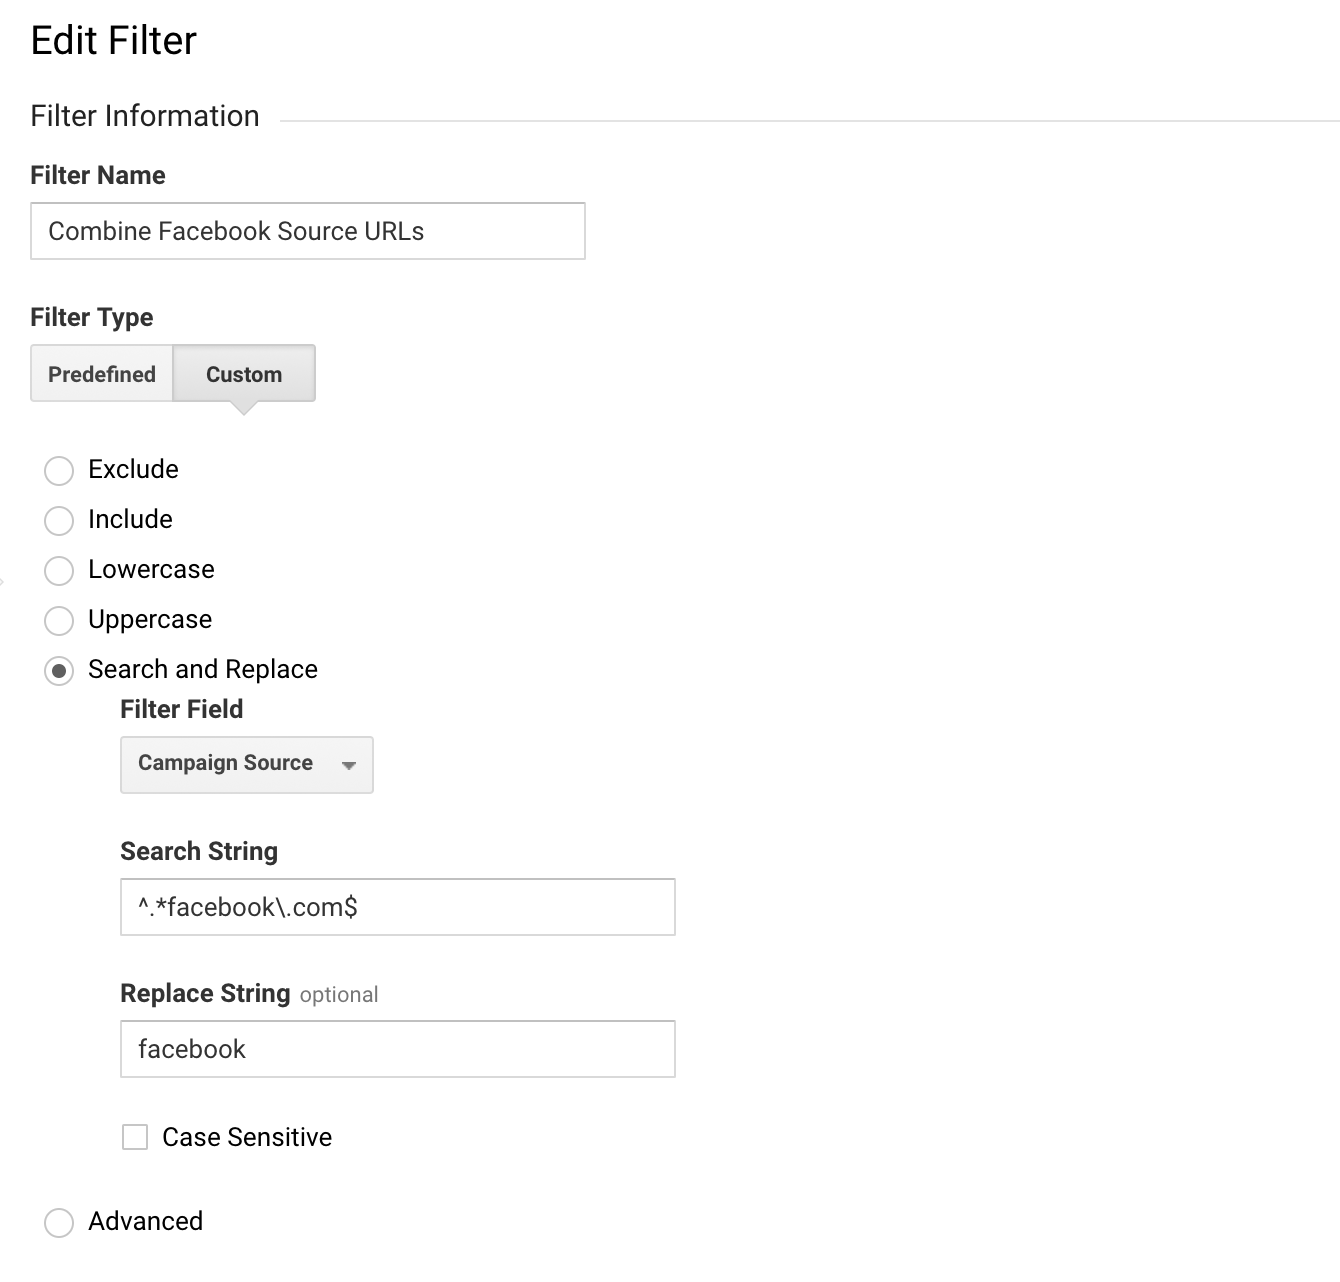
Combine Facebook Source Traffic
Have you ever looked at your Source / Medium report and saw facebook.com, m.facebook.com, l.facebook.com among others in their own rows? This filter helps clean this up so you can see your Facebook source data in aggregate and then segment by device or other dimensions as needed.
Channel Settings
a. Manage Brand Terms / Default Channel Grouping
I mention this one first since setting this will enforce a nice addition to your Default Channel Grouping.
If you have not configured brand terms yet then here is where you include terms that someone would use to find your business.
A few tips:
- These terms are not case sensitive and don’t require pluralizations since this feature uses matching Example: “amazon” matches “amazons” and “shop amazon”.
- Include common misspelling of your brand name.
- Don’t include generic terms if they aren’t specific to your brand name. Example: I don’t include “analytics” as a brand term even though our company “Elevar” is largely focused on analytics.
Once you’ve added these terms and click save you will be prompted with request to add Branded and Generic Paid Search to your Default Channel Groupings.
This is generally considered best practice especially if you are (or will be) utilizing Paid Search.
Branded Paid Search almost always outperforms Generic and these searches generally have a different user intent.
Example: a user searching for “Elevar” to find our site is much different than someone searching “analytics tools”.
I want to analyze their behavior and overall ROI through different lenses.
My branded searches might be returning users or someone closer to converting while the analytics tools query is someone I’d consider higher up in my conversion funnel that may require more nurturing (and time) to convert.
A more advanced Default Channel Grouping setup (or Custom Channel Groupings) is not covered in this guide but will be in a future one.
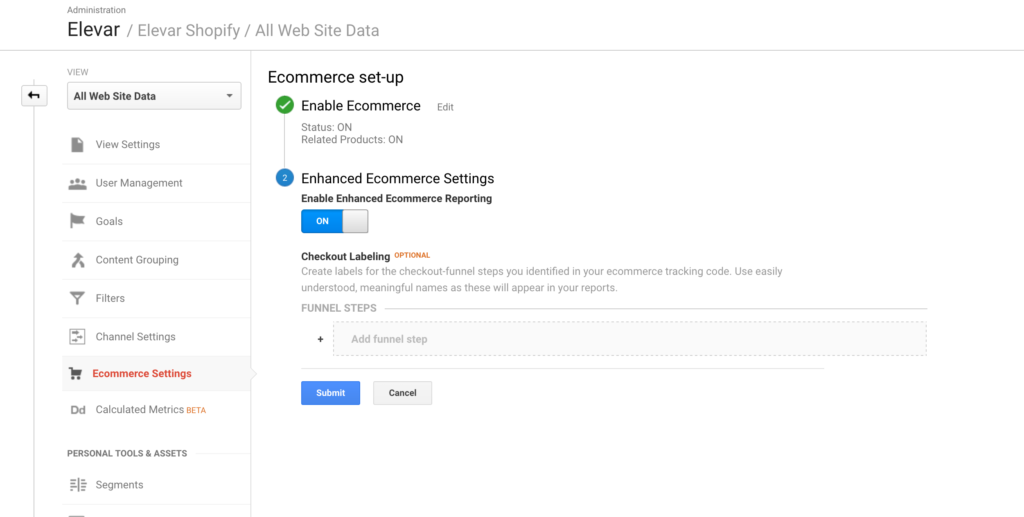
eCommerce Settings
If you accept money online (through selling merchandise, services, donations, etc) then configuring this is a must.
Luckily if you’re using a major platform like Shopify, Magento, BigCommerce, etc then there isn’t much you need to do to enable the basic eComm reporting.
- Change the status to “On”.
- The Related Products feature is deprecated as of June 2017 so you can ignore this setting.
- Enable the Enhanced eCommerce setting
- Click Submit
Word to the wise: ensure you configure this on all of your views, including your raw data view.
Calculated Metrics
There are two calculated metrics that are easy to set up and unlock nice insights for you:
Gross Profit
This is a simple formula that can help surface more accurate ROIs across your dimensions. The calculation is:
{{Revenue}} * 0.40 where 0.40 is your own Gross Margin %.
Example: if you’re selling a shirt for $100 but it costs you $60 then your margin is 40%.
Visualizing landing page revenue (especially when margins are thin) with this metric can help prevent tunnel vision when deciding on action to take. Learn how to create these reports in my guide here.
Net Profit
This is one more addition to the above metric. In this case we’re simply going to subtract our Ad Cost as well:
( {{Revenue}} * 0.40 ) – {{Cost}}
Note: This metric is only useful under one of the following conditions:
- You are utilizing AdWords and have connected to GA so our advertising cost automagically imports into GA
- You are uploading cost data into GA from other marketing sources (ex Facebook or Instagram advertising)
Otherwise this cost metric won’t change anything in your reports.
An example report where this is helpful is looking at your Keyword Performance per Ad Group/Campaign. If you have a high Net Profit for keyword(s) that aren’t receiving as much traffic then you might consider increasing your maximum bid to try and boost traffic and top line revenue.
Conclusion
If you’ve made it this far then I’ll spare you a lengthy conclusion :).
Let me know if you have any questions or suggestions on this guide by chatting us below or tweeting us!

Thanks for a super post Brad, really appreciate your posts. Keep up the good work!
Thank you for your efforts and post. It was my first time setting Shopify up with GA and your step by step explanation really helped!
Thank you for sharing your thoughts. I truly appreciate your efforts and I will be waiting for your
further post thank you once again.
Amazing things here. I am very glad to see your post.
Thanks a lot and I am taking a look forward to touch
you. Will you please drop me a e-mail?
Check out my web site https://sozdanie-saytov1.ru
bookmarked!!, I like your blog!
My homepage reduslim
Hello to all, since I am really eager of reading
this web site’s post to be updated daily. It contains good material.
My blog post: redu slim
Курсы предлагаются онлайн и охватывают такие темы,
как история архитектуры, теория цвета, дизайн мебели и освещения, история искусства и многое другое.
Курсы дизайна интерьера имеют множество преимуществ.
Например, они могут помочь вам развить глубокое понимание основ дизайна интерьера.
Они также предлагают больше, чем просто теорию: студенты
учатся применять полученные згде учиться на дизайнера интерьерания в реальных
условиях, работая с клиентами, нуждающимися в их услугах.m
Good post. I learn something new and challenging on sites I
stumbleupon everyday. It’s always exciting to read through articles from other writers and
practice something from other web sites.