Google Tag Manager Tutorial for Shopify
Learn how to create custom triggers, Shopify’s data layer, and custom event behavior examples.
Brad Redding
Brad Redding is the Founder & CEO of Elevar. Specializing in analytics, tracking, GTM, and conversion optimization.
Harnessing the power of Google Tag Manager (GTM) can be difficult, confusing, and time-consuming if you don’t regularly spend time in it. But the power and efficiency it provides for platforms like Magento, Shopify, WordPress and others like them is too strong to ignore.
In this article, I’ll cover the following:
- The Basics of GTM
- Data Layer + Shopify: How to Manage?
- Example Tags for eCommerce
- Conversion Tracking
Related Guides: How to Install Google Tag Manager in Shopify, Google Analytics Best Practices with Shopify
Also I should point out that after 6+ months of helping thousands of Shopify stores with GTM we decided to launch an app that contains GTM + dataLayer + all of the Enhanced eCommerce functionality required to unlock some amazing insights! We’re always here if you need help with the installation or troubleshooting – just send us a chat.
On to the good stuff of GTM!
The Basics
a. Benefits of GTM
The primary benefits of utilizing GTM with Shopify:
- Configure digital marketing script tags that are native to GTM — i.e., it takes 10 seconds to set up (ex. Hotjar, Twitter, LinkedIn, Criteo, AdRoll, etc.).
- Manage and deploy 3rd-party tags (ex. affiliate tracking pixels) in one place without having to go through a formal code deployment.
- Integrate custom Google Analytics event data based on user-specific behavior (e.g., Add to Cart clicks, Video plays, Scroll Depth, etc.).
- Capture form submission data and exceptions.
- Simplify advanced analytics implementations with custom metrics & dimensions, content groupings, etc.
- Version control, easy debugging, and user/role permissions.
Additionally, the amount of built-in features continues to grow at a rapid rate with things like scroll depth tracking, video tracking, viewport content visibility, and more.
So once you’ve taken the time to implement an ongoing process, then you’ll reap the rewards of new features.
GTM Suite for Shopify
Install our GTM app that comes with the complete Google dataLayer and pre-built containers.
Learn Moreb. Tags, Triggers, and Variables
Understanding how tags, triggers, and variables relate to one another is another concept that can trip up even the most seasoned marketing & analytics veterans.
I’ll try to explain with a weather analogy…
Take this scenario: Let’s say you manage the Department of Transportation in Charleston, SC. It’s a cold, rainy day — about 37 degrees — and it’s forecasted to drop below freezing. Based on history, you understand that when the temperature drops to 32 degrees, then roads become hazardous, and you will need snow plows to put salt on the road to try and improve safety.
So, when the temperature finally drops to 32 degrees, the snow plows hit the roads and begin dropping salt.
In this example:
- the variable = temperature
- the trigger = the temperature hitting 32 degrees
- the tag = the snow plow
If the temperature never hits 32 degrees, then the snow plow just sits in a garage, and the roads never see the salt.
But when the temperature trigger is met, the snow plow “tag” is fired and Charlestonians drive on safer salt-soaked roads.
That’s the best I can do for an analogy!
c. How to Cheat … I mean … Build Your Triggers & Variables Fast!
Most of us don’t want and/or don’t have the time to dig through HTML to figure out what CSS we should be targeting to help build our triggers & variables (Captain Obvious here).
So, here is a little trick I use to help make this process go faster (you need to have the basic GTM code installed on your site):
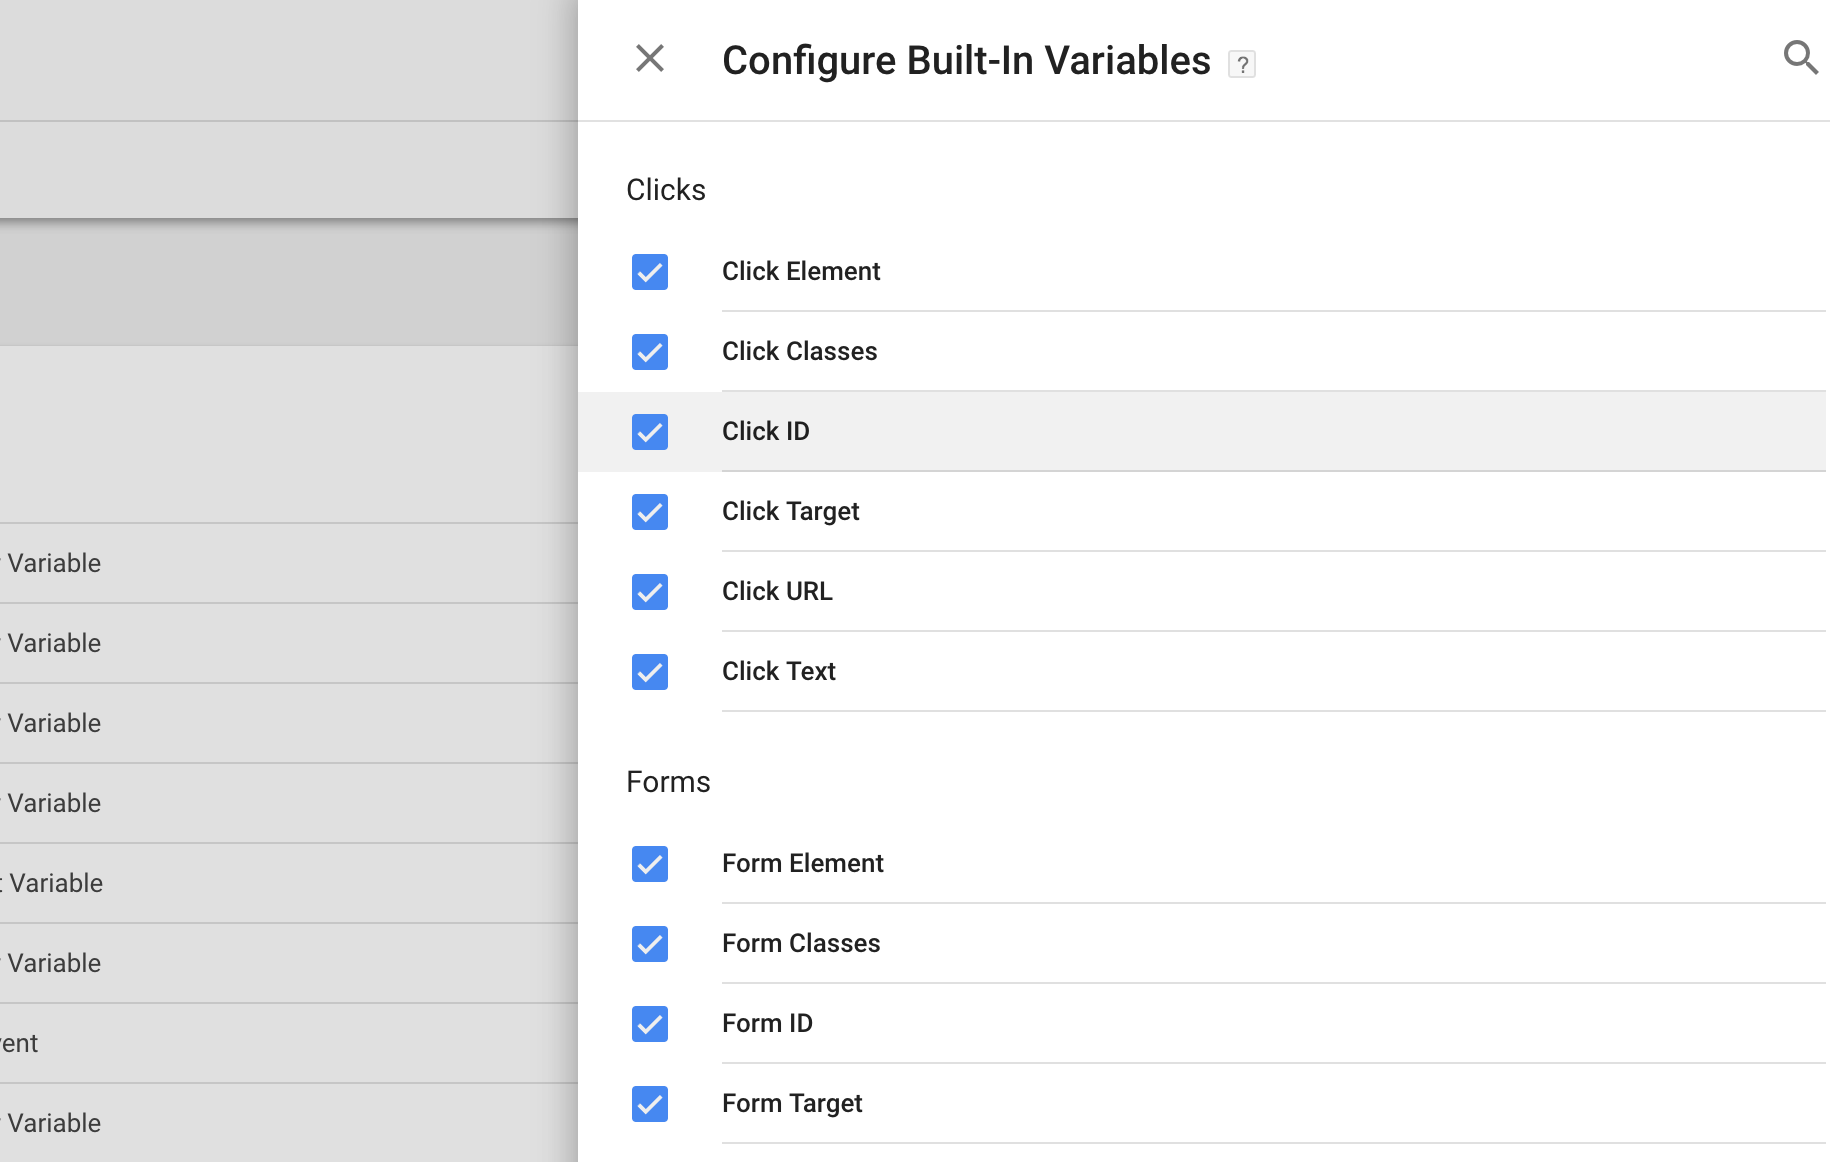
In GTM > Variables > Built-In Variables > enable all of the “Clicks” variables shown here:
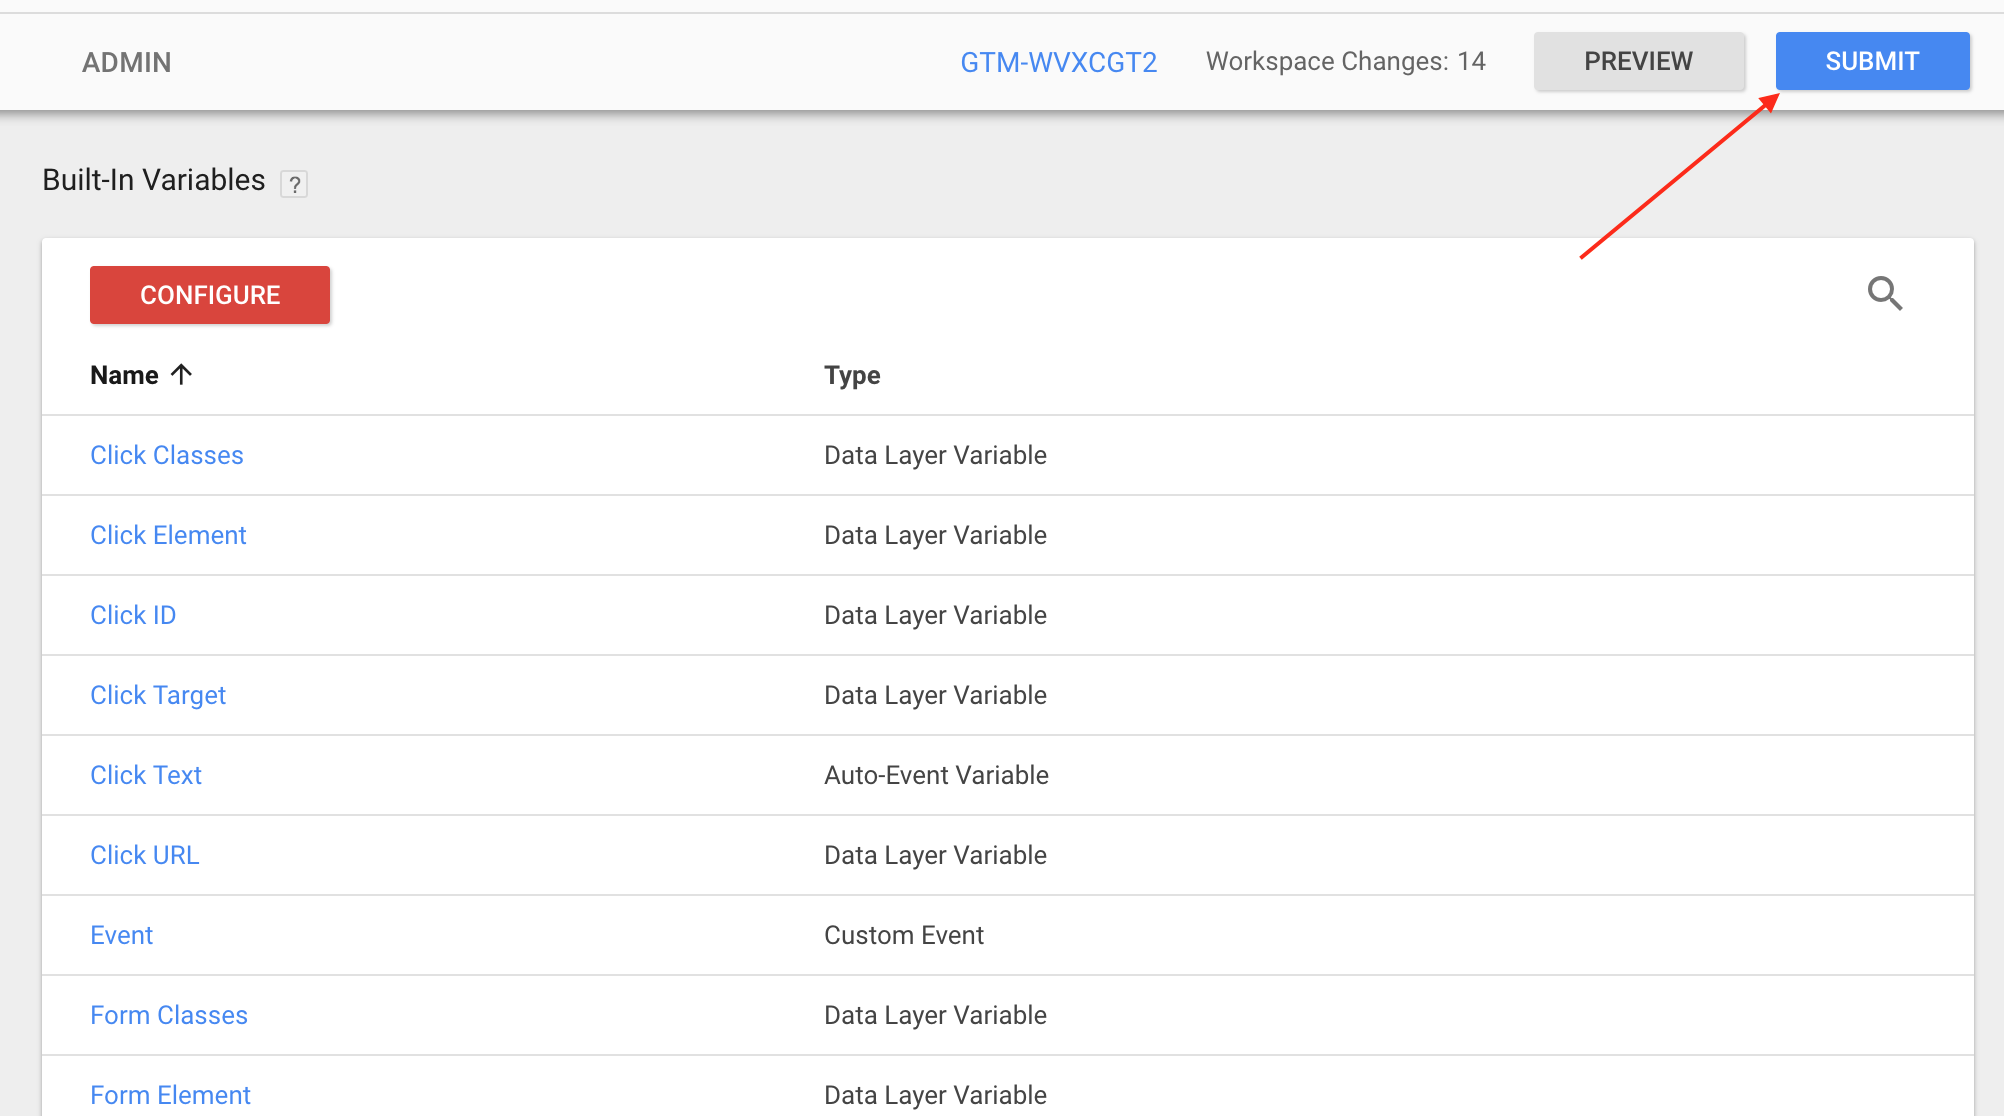
If you don’t have a tag deployed via GTM, then create a new tag with a dummy Click Element Trigger Type (it can be anything, really) and Publish this workspace by clicking Submit:
Then click Preview (next to the Submit button), which enables the GTM Debug console, and navigate to the website where you have this GTM container installed.
Now click anywhere on the page that doesn’t send you to a new page URL. You should see a gtm.click event trigger in the Summary column … see it yet?
Now click on the Variables tab shown in my screenshot below and you’ll see GTM has already done the hard work filling out the built-in variables for Click Classes, etc.
In my example below, I clicked on the Get Started button on our blog home page:
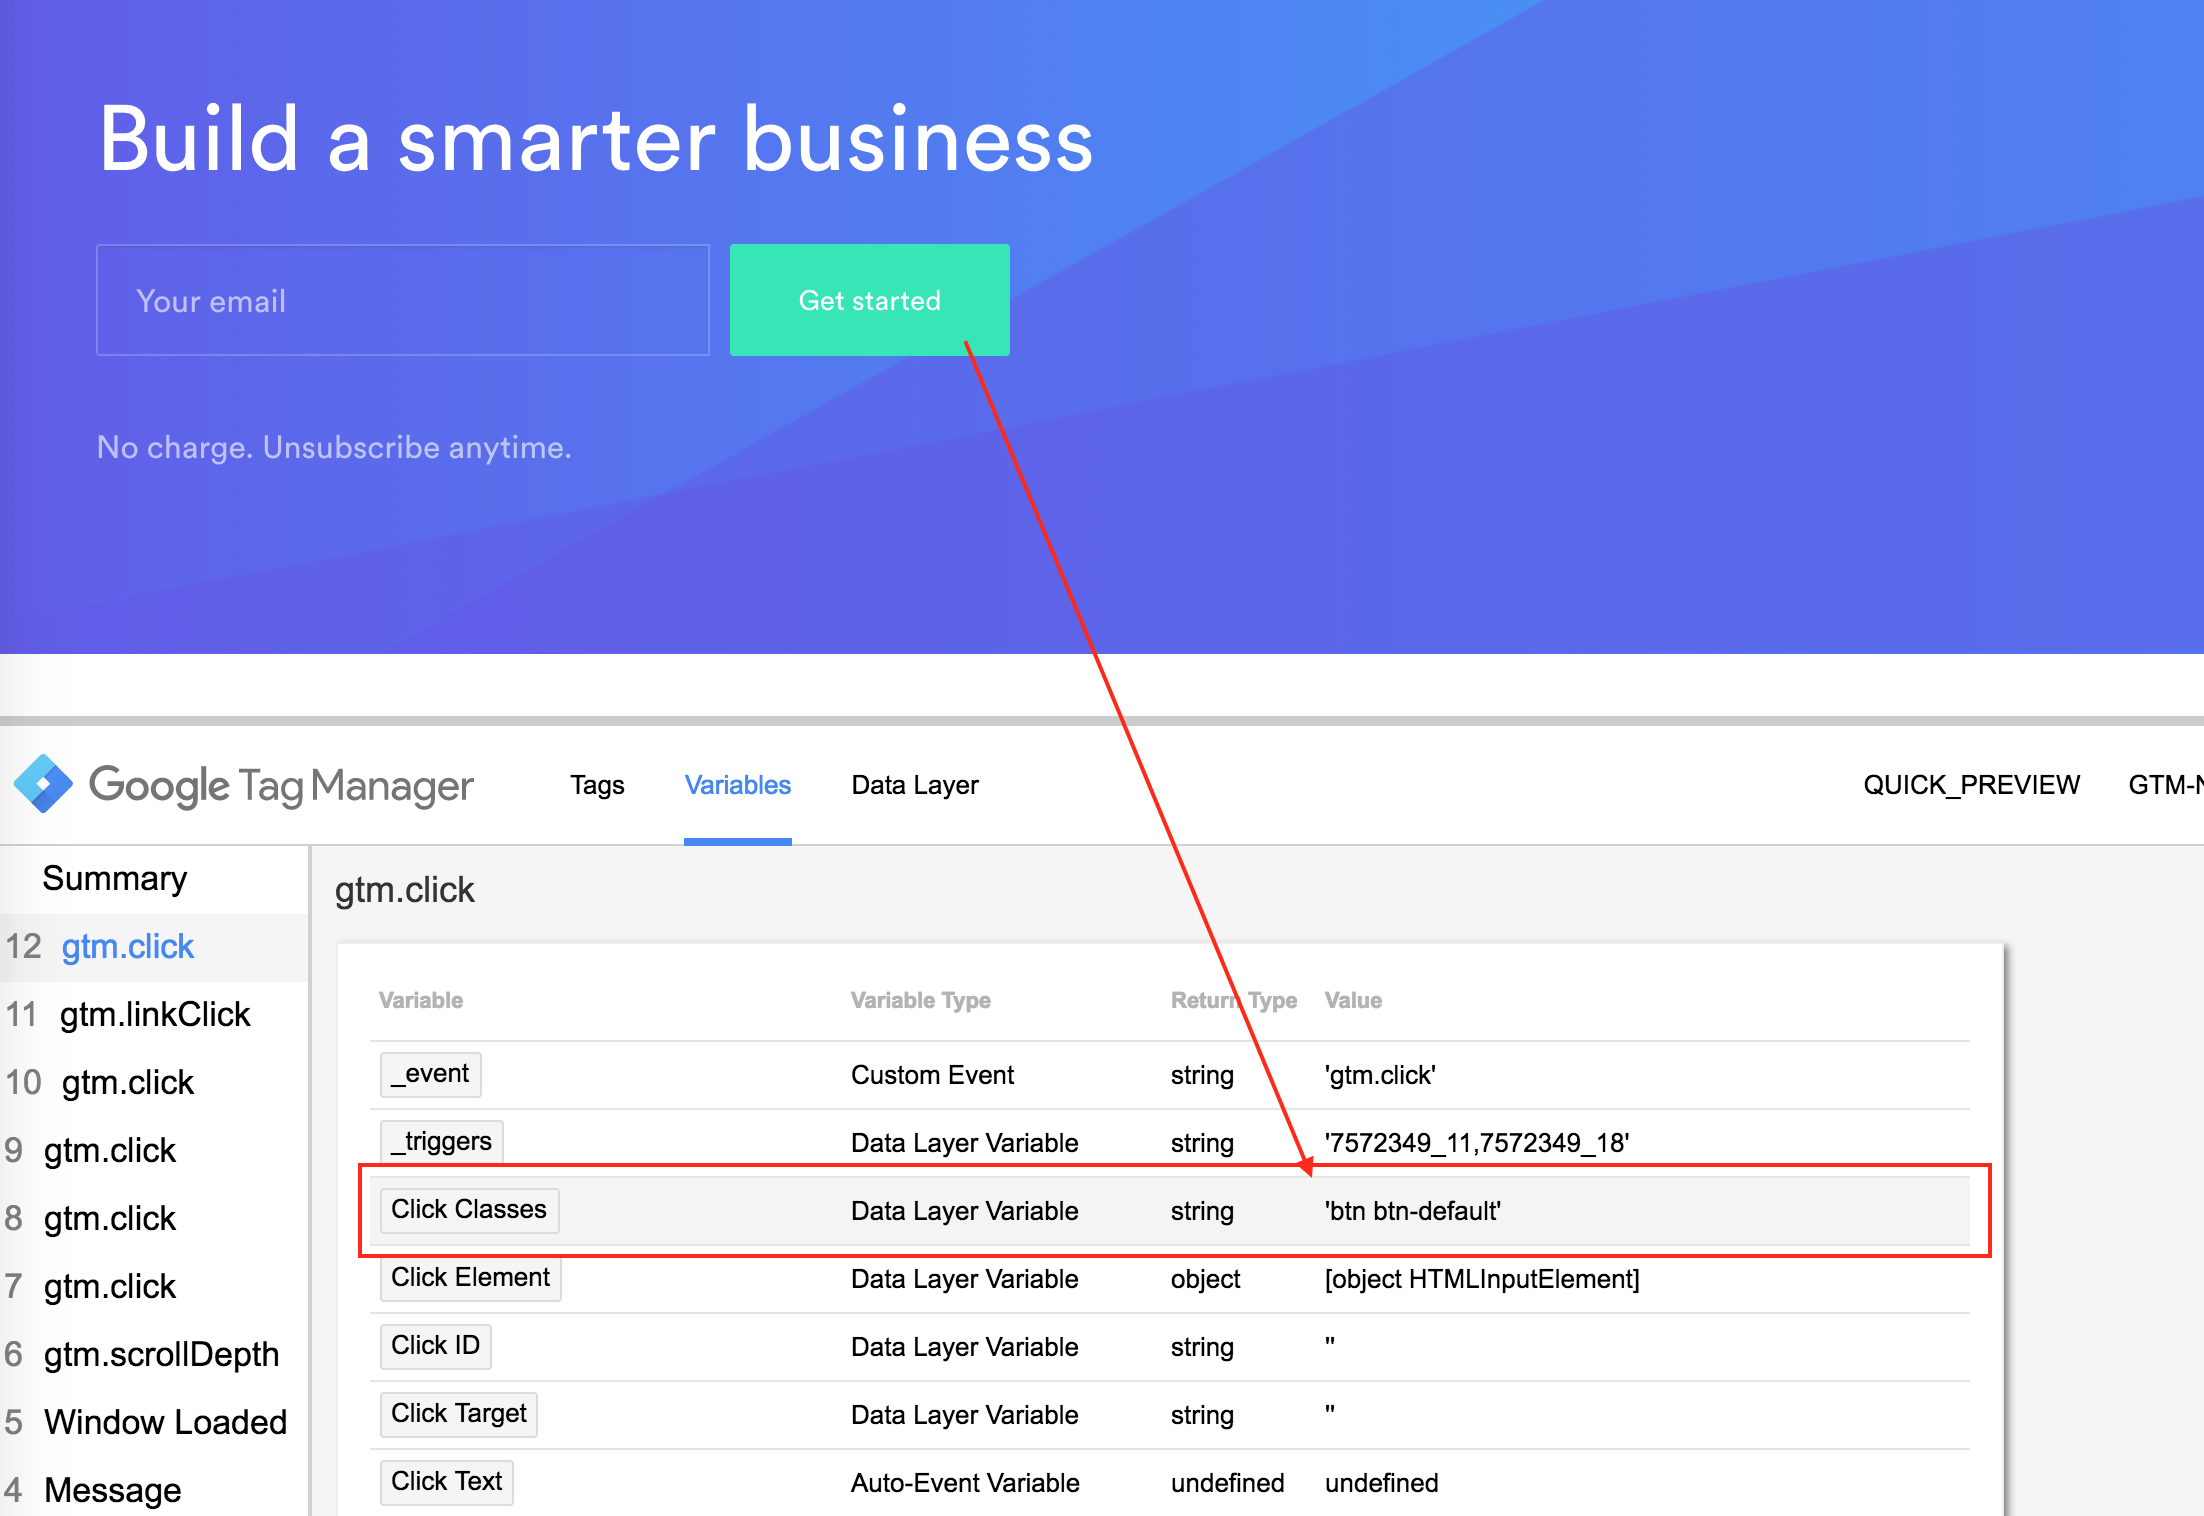
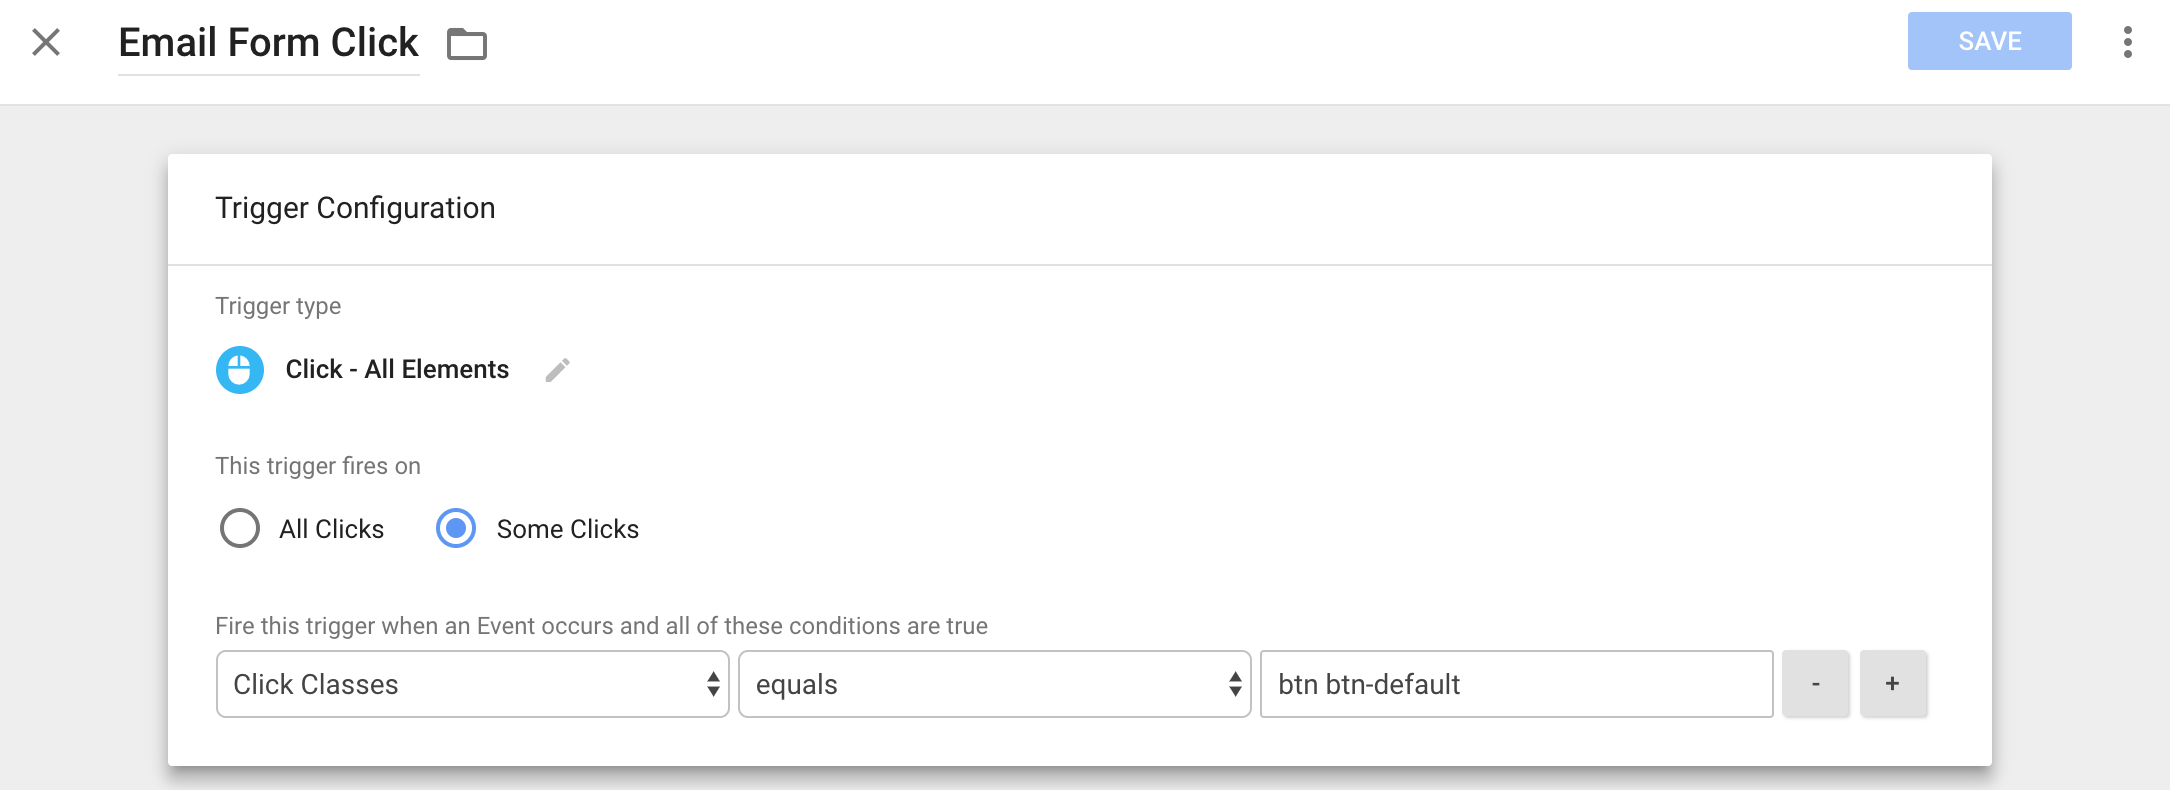
Now, if I wanted to create a trigger for events when a user clicks this button, I’d create a new Click > All Elements Trigger and set my Click Class to equal btn btn-default:
Once you have your own routine down then you can run through a site pretty quickly with this approach.
There are ways to create a single click trigger that captures this type of interaction across an entire site but I won’t go into too much detail on that process.
I prefer to start small, targeting interactions I believe are important and will actually be analyzed/put to use in making decisions vs. trying to data vomit everything into GA without an analysis plan.
If you still have questions around the basics of GTM, here is a nice FAQ from Google.
Data Layer + Shopify – How to Manage?
If you haven’t read my overview on GA + Shopify best practice foundation, then take a look.
Implementing a custom GTM dataLayer script is not mandatory in order to take advantage of existing onsite variables.
You can leverage what is already built into Shopify’s onsite analytics and push this into GTM to achieve nearly the same result.
Additionally, the “dataLayer” and/or variables isn’t just about the checkout success page. You can create variables of all types to utilize in marketing tags or behavior event tags across the site!
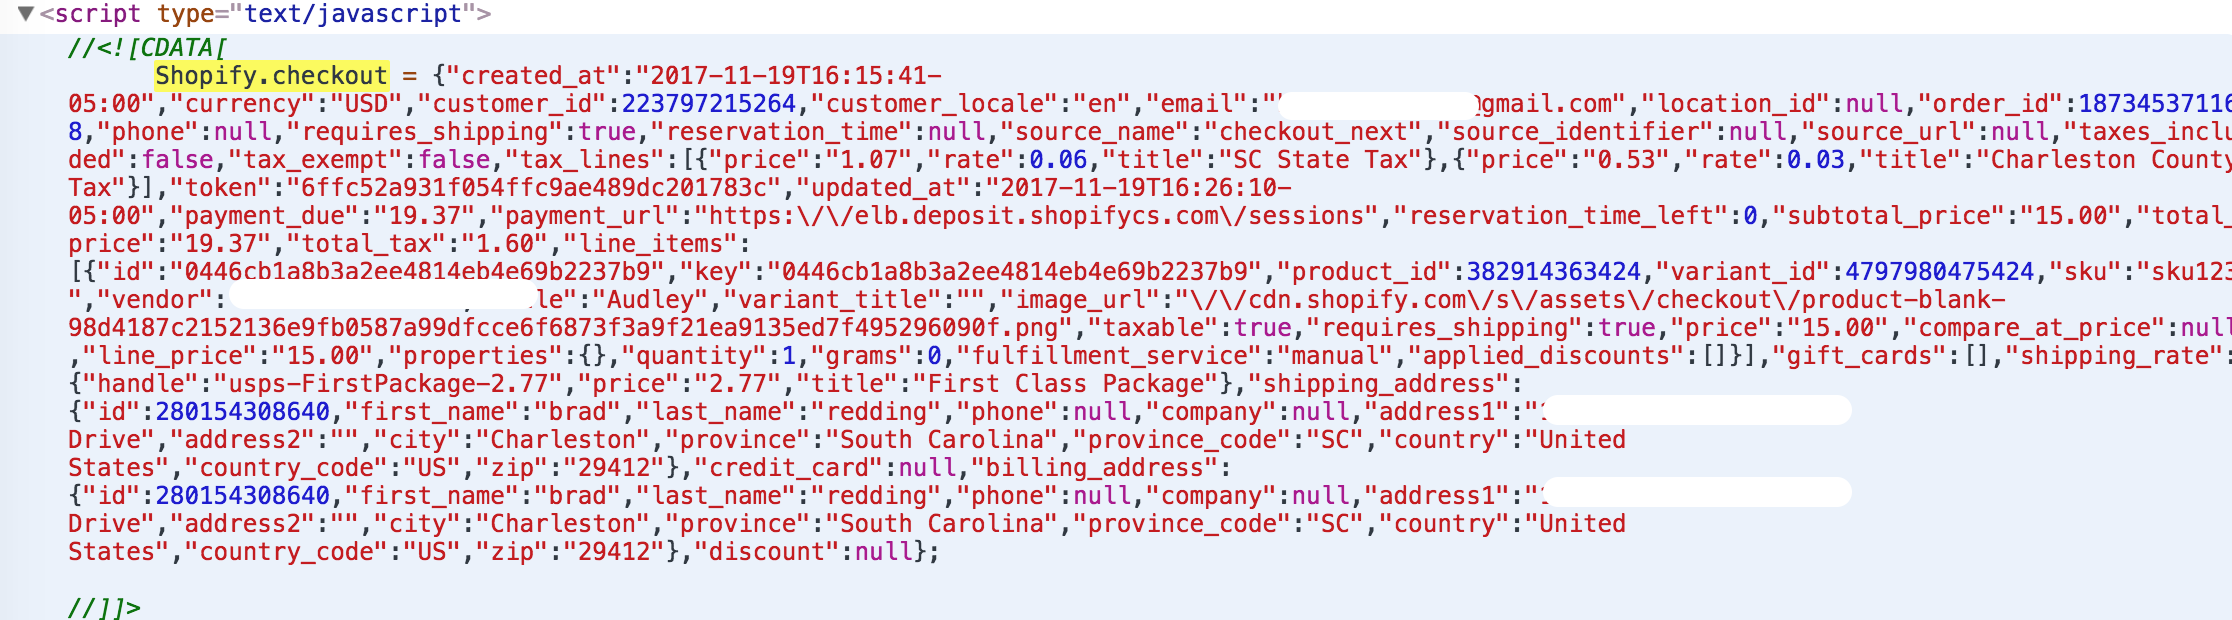
But, if you are dying to get conversion data variables into GTM, then try using the JavaScript variable type using Shopify’s native analytics.
Here’s the script on the checkout page that contains this data:
Here’s an example of a GTM variable:
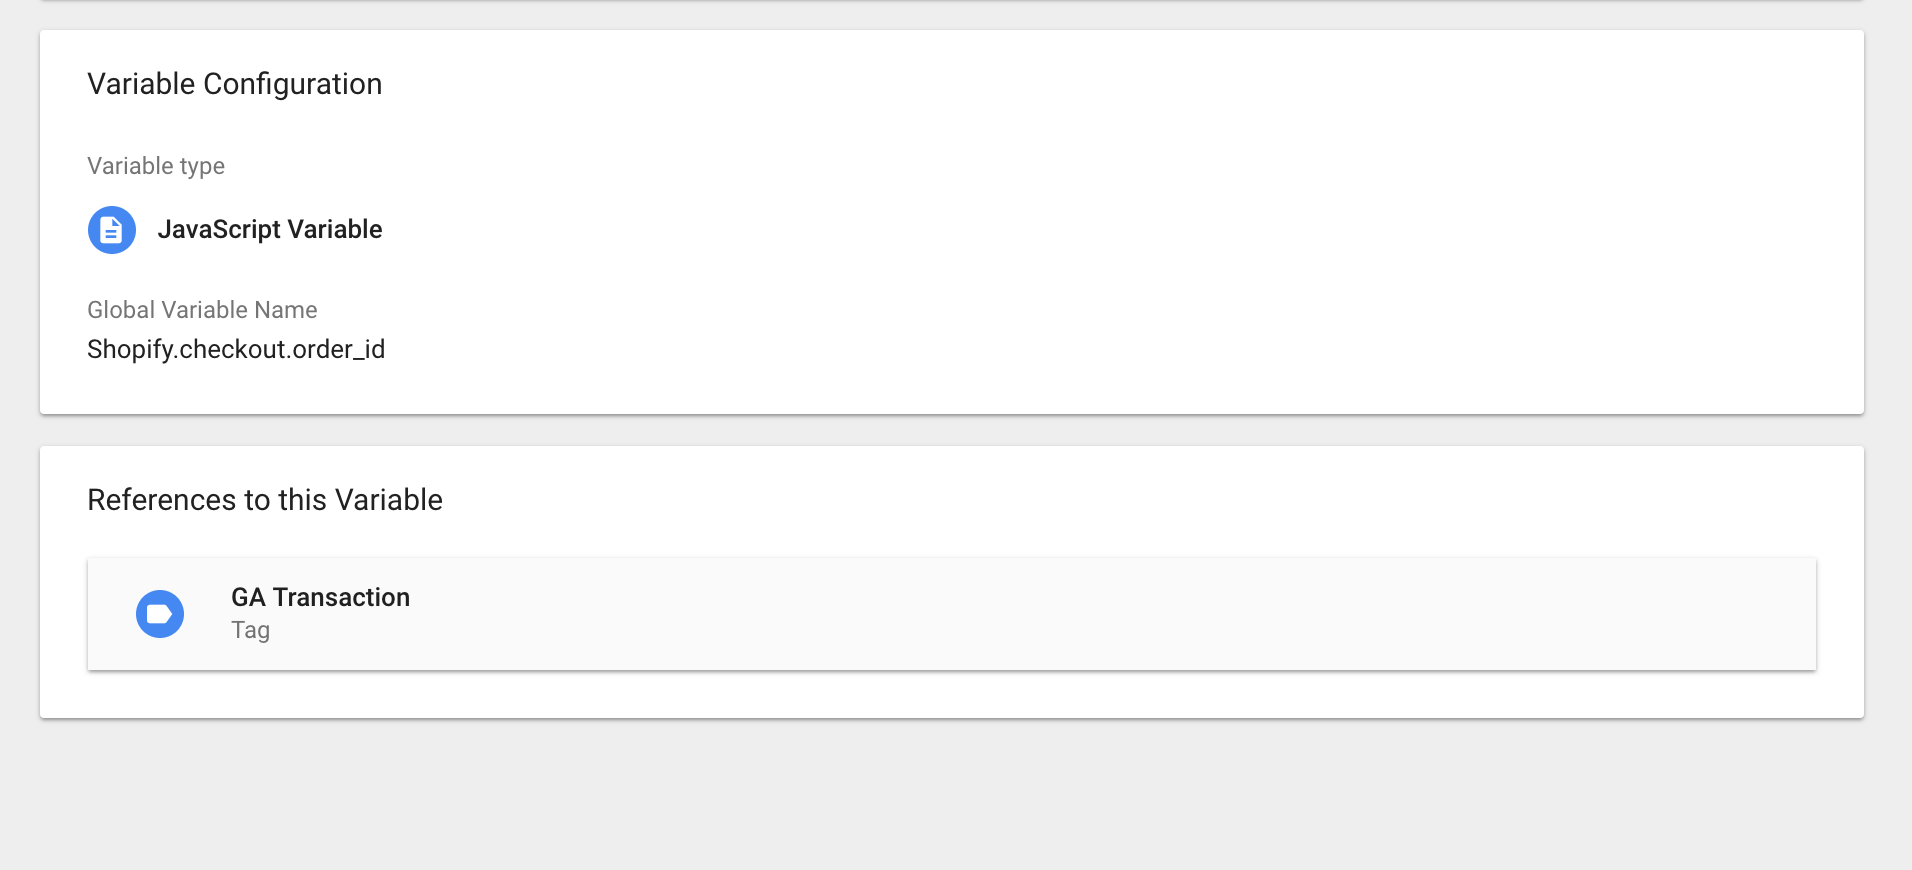
Here’s a tag showing this data populating for an AdWords Conversion Tracking on the checkout complete page (NOTE: this is a different tag than shown above as a GA transaction tag):
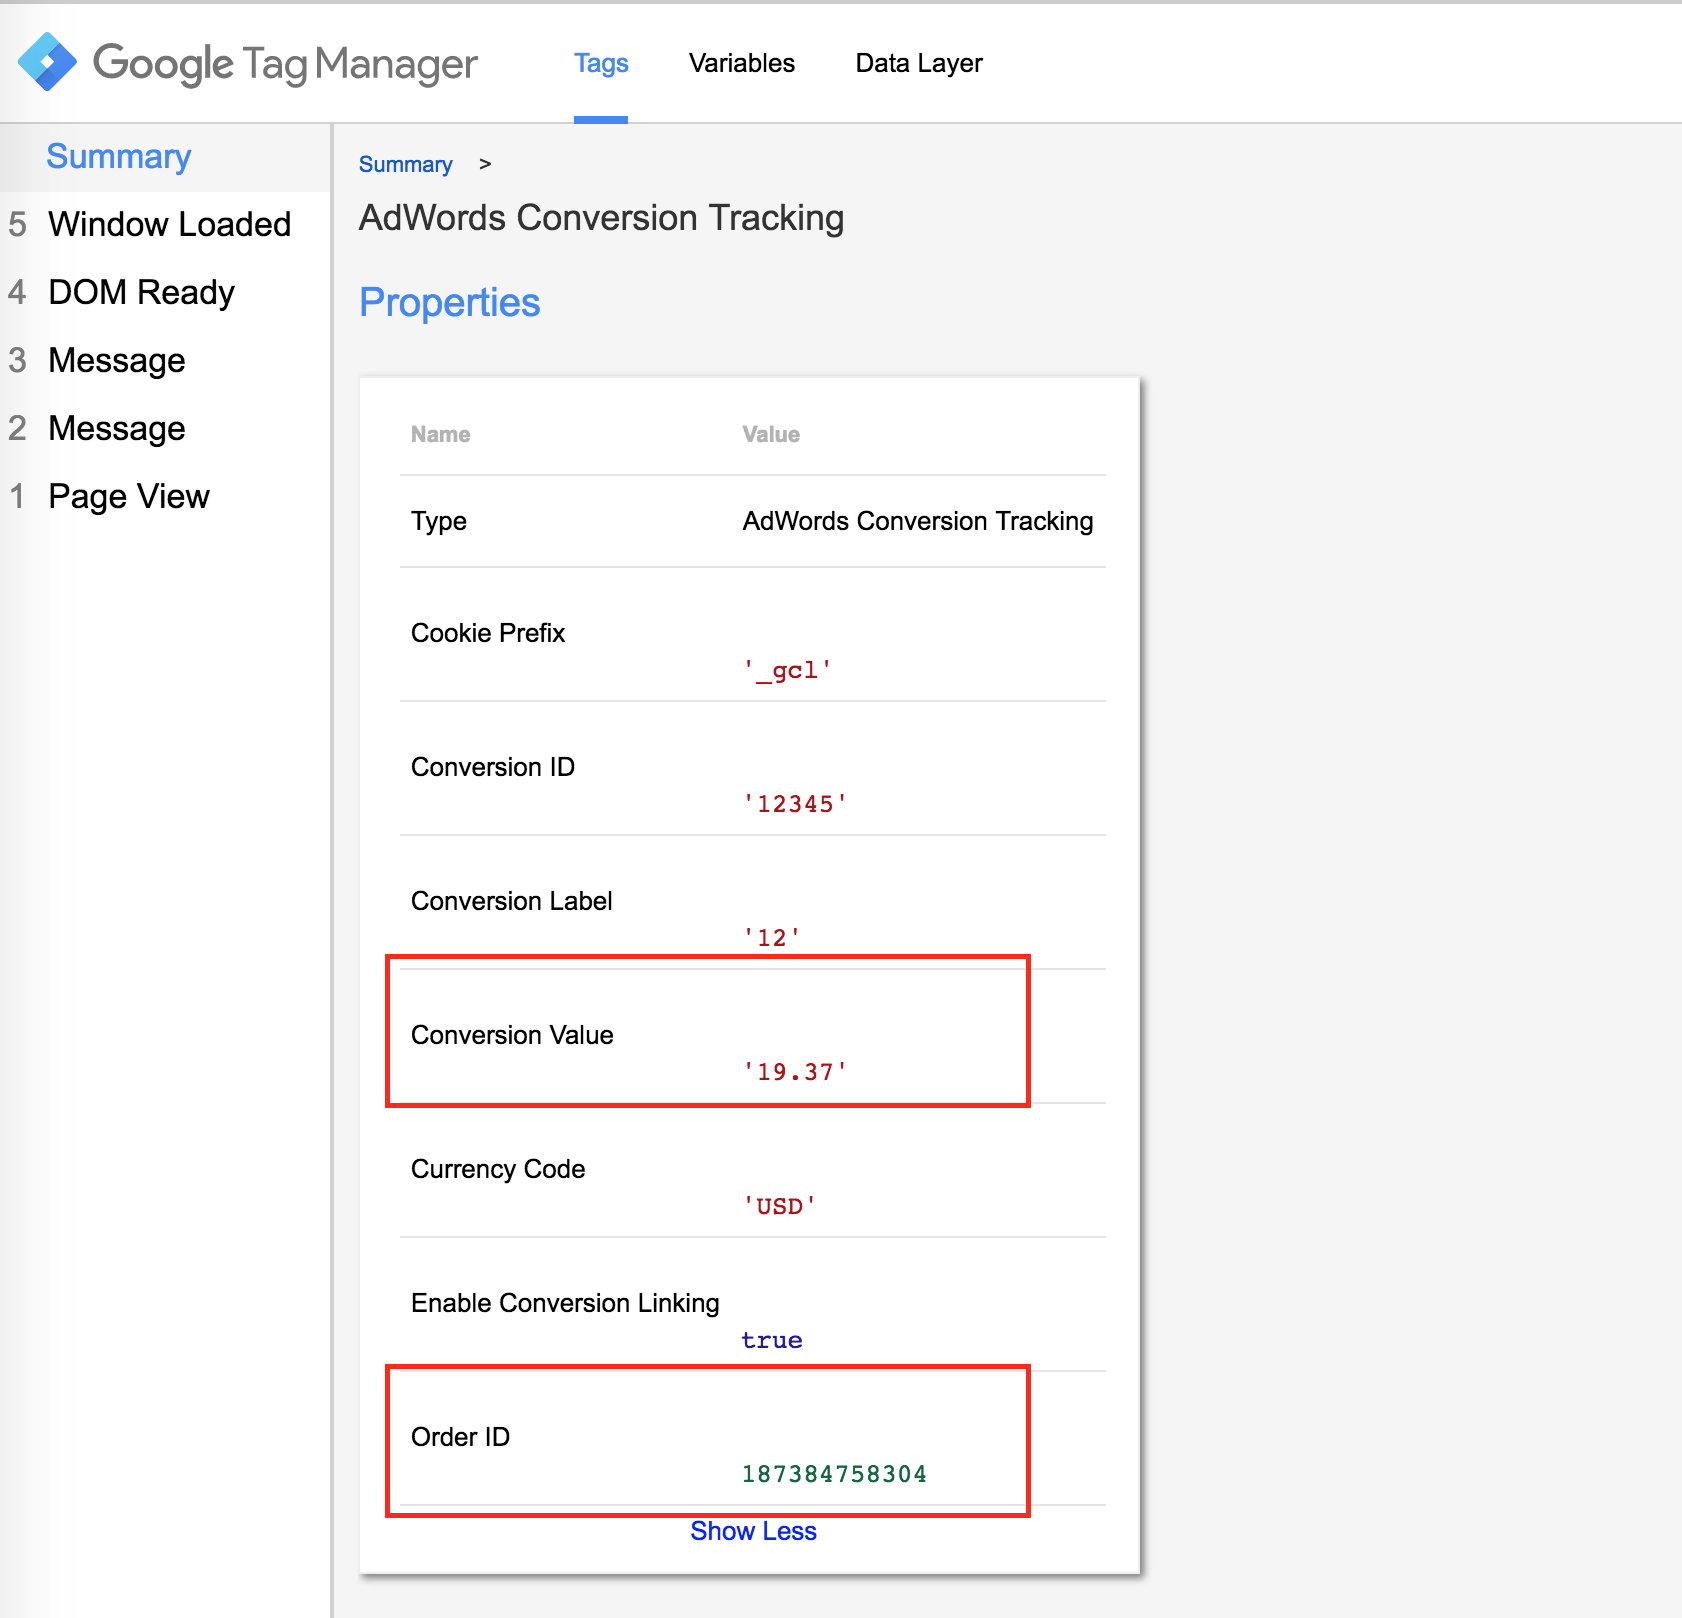
So, the moral of the Data Layer story: It’s not all about the GTM dataLayer.js that you have to have configured in order to take advantage of custom variables.
Utilize the JavaScript variable type to capture key order details that give you the same end result above for conversion tags.
If you’re still not convinced then there are other guides out there like this that provide great in-depth tutorials on doing more with the Data Layer.

Automated Google Analytics Insights
See how Elevar automates insights, forecasting, and custom reports.
Example Tags for eCommerce
Alright, now let’s look at some non-conversion tag examples:
- Main Navigation Clicks
- Product Tab Clicks
- Layered Navigation Filtering
- Email Signup/Modal Interaction
Since most sites have unique CSS/HTML, please follow section c) above in “The Basics” section that shows you how to find your own variable details.
“GTM
Get GTM + dataLayer installed on your store in minutes!
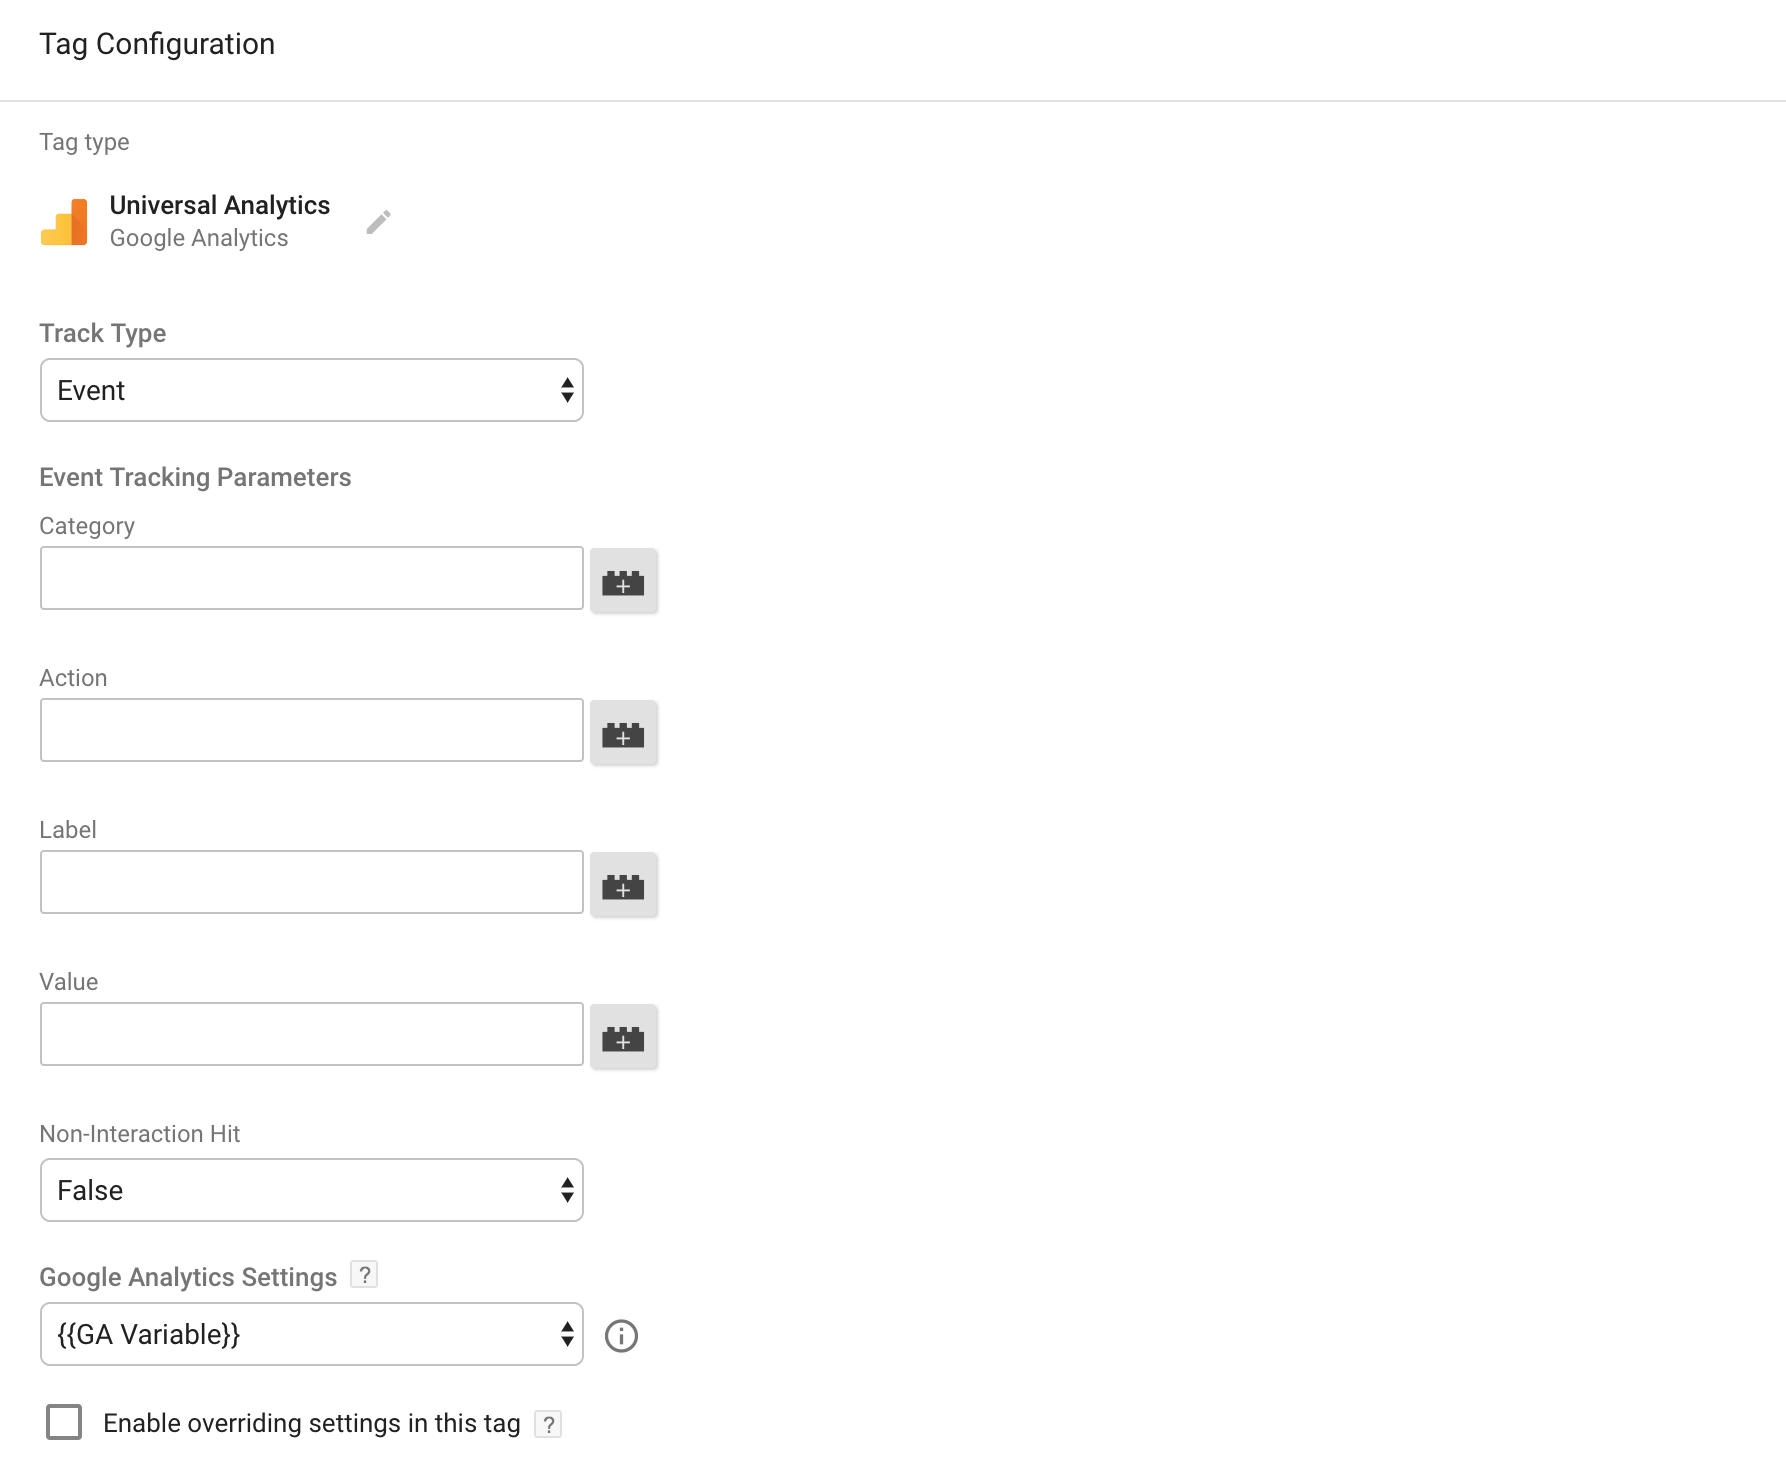
All references below to “GA” mean Google Analytics (in case that wasn’t obvious 🙂 ). Unless otherwise noted, all tags have the following properties:
- Tag Type: Universal Analytics
- Track Type: Event
- Google Analytics Setting: GA Variable
1. Main Navigation Click Events
What it is: This creates custom behavior events (found in Google Analytics > Behavior > Events) for your main navigation menu and sub-menu/mega menu clicks.
How it can help: If you have a mega menu, then clicks on your menu don’t always lead to pageviews in GA. So your main navigation and content curation can be left to gut feel decisions. Does “SALE” perform better on the right or left? What links are getting 0 clicks in the dropdown?
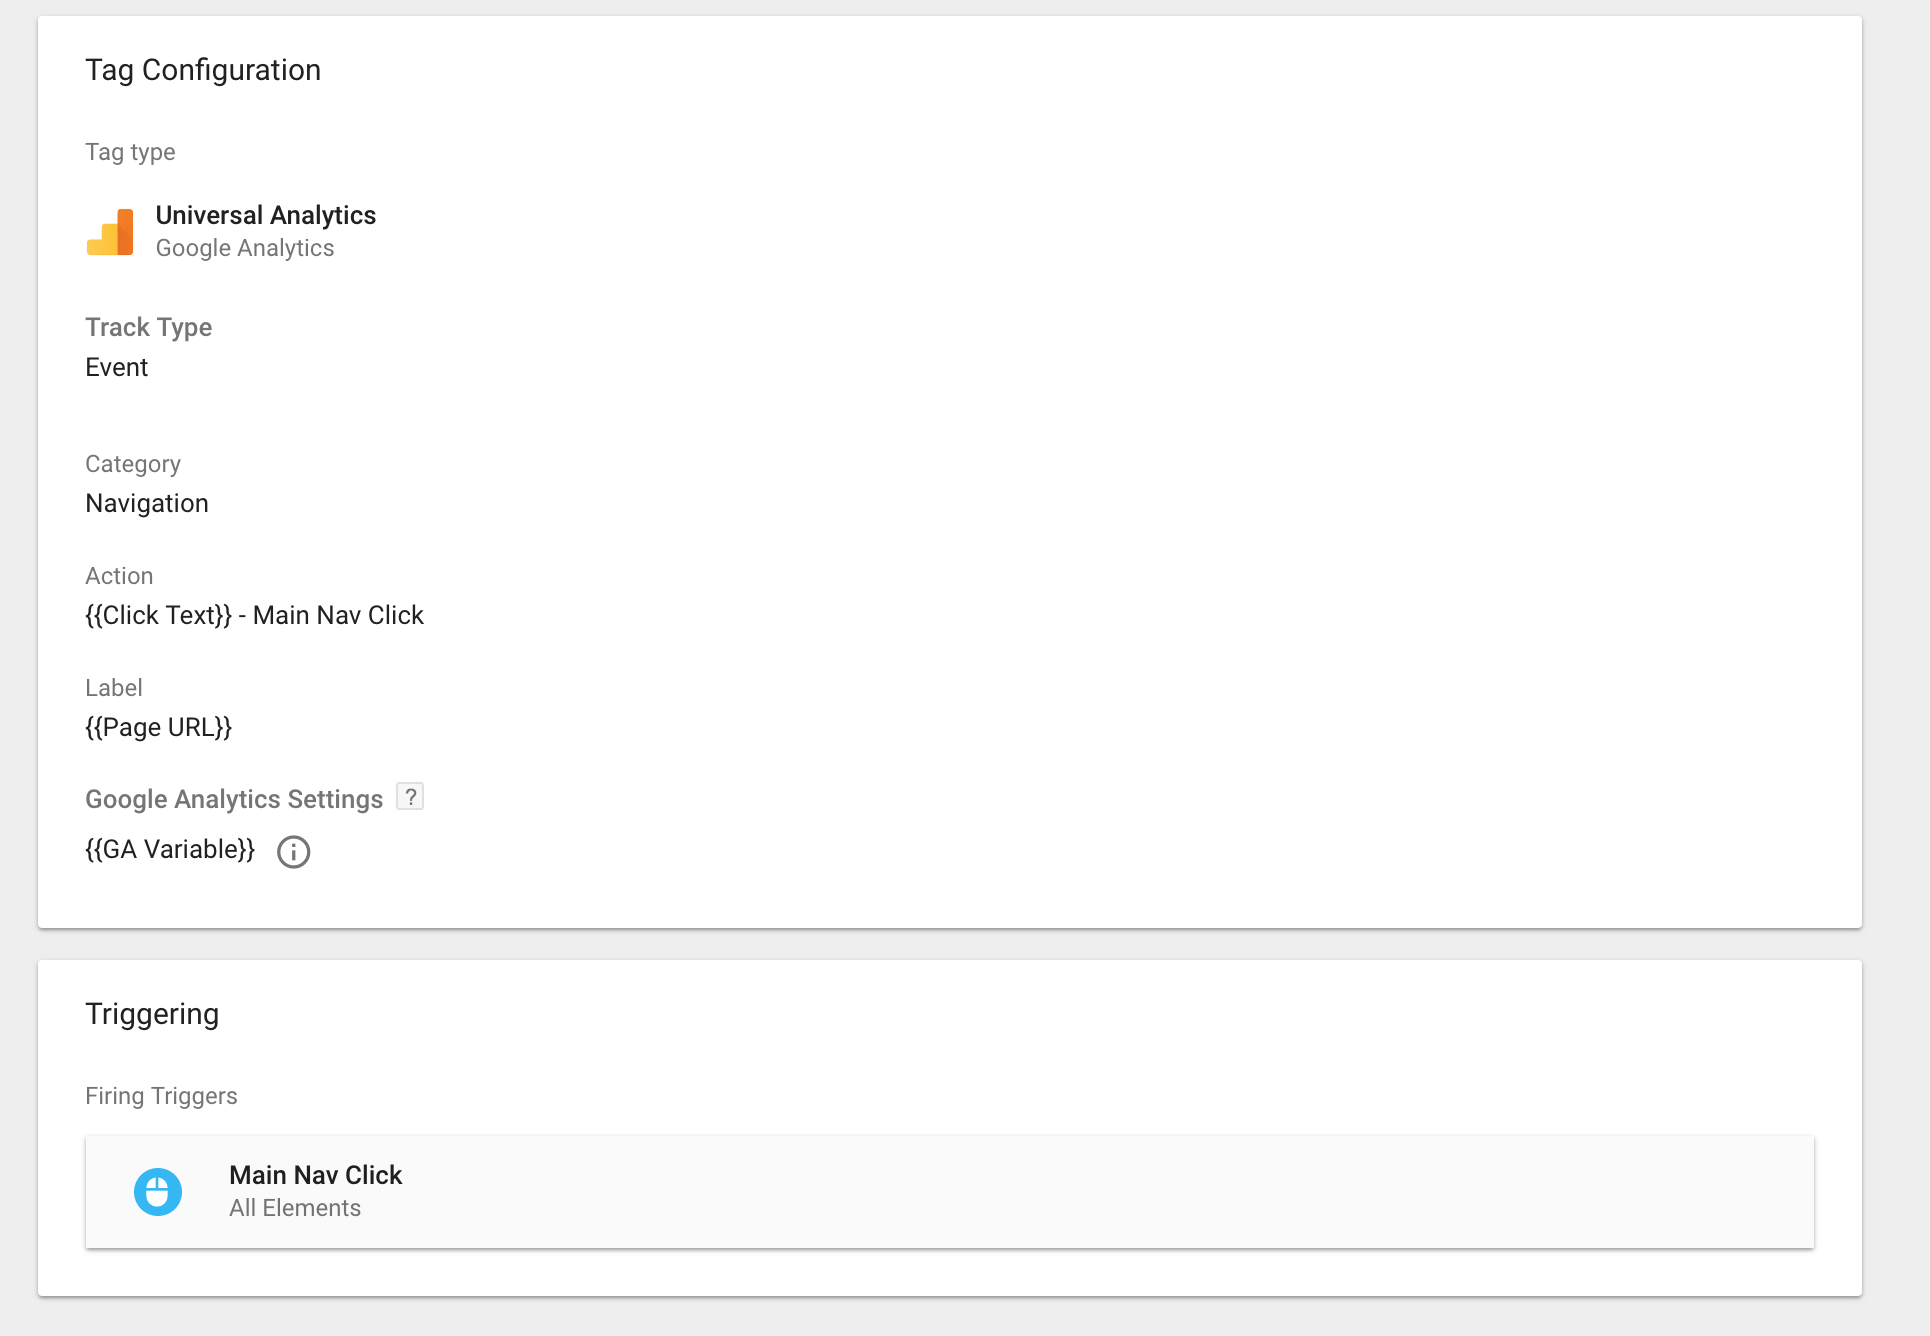
The setup: If you have a main navigation with a dropdown or mega menu style (most all sites do), then this is the likely setup:
- One trigger targeting clicks on main navigation links
- One tag with the ^ trigger applied
- One trigger targeting clicks on sub-nav links*
- One tag with the ^ trigger applied
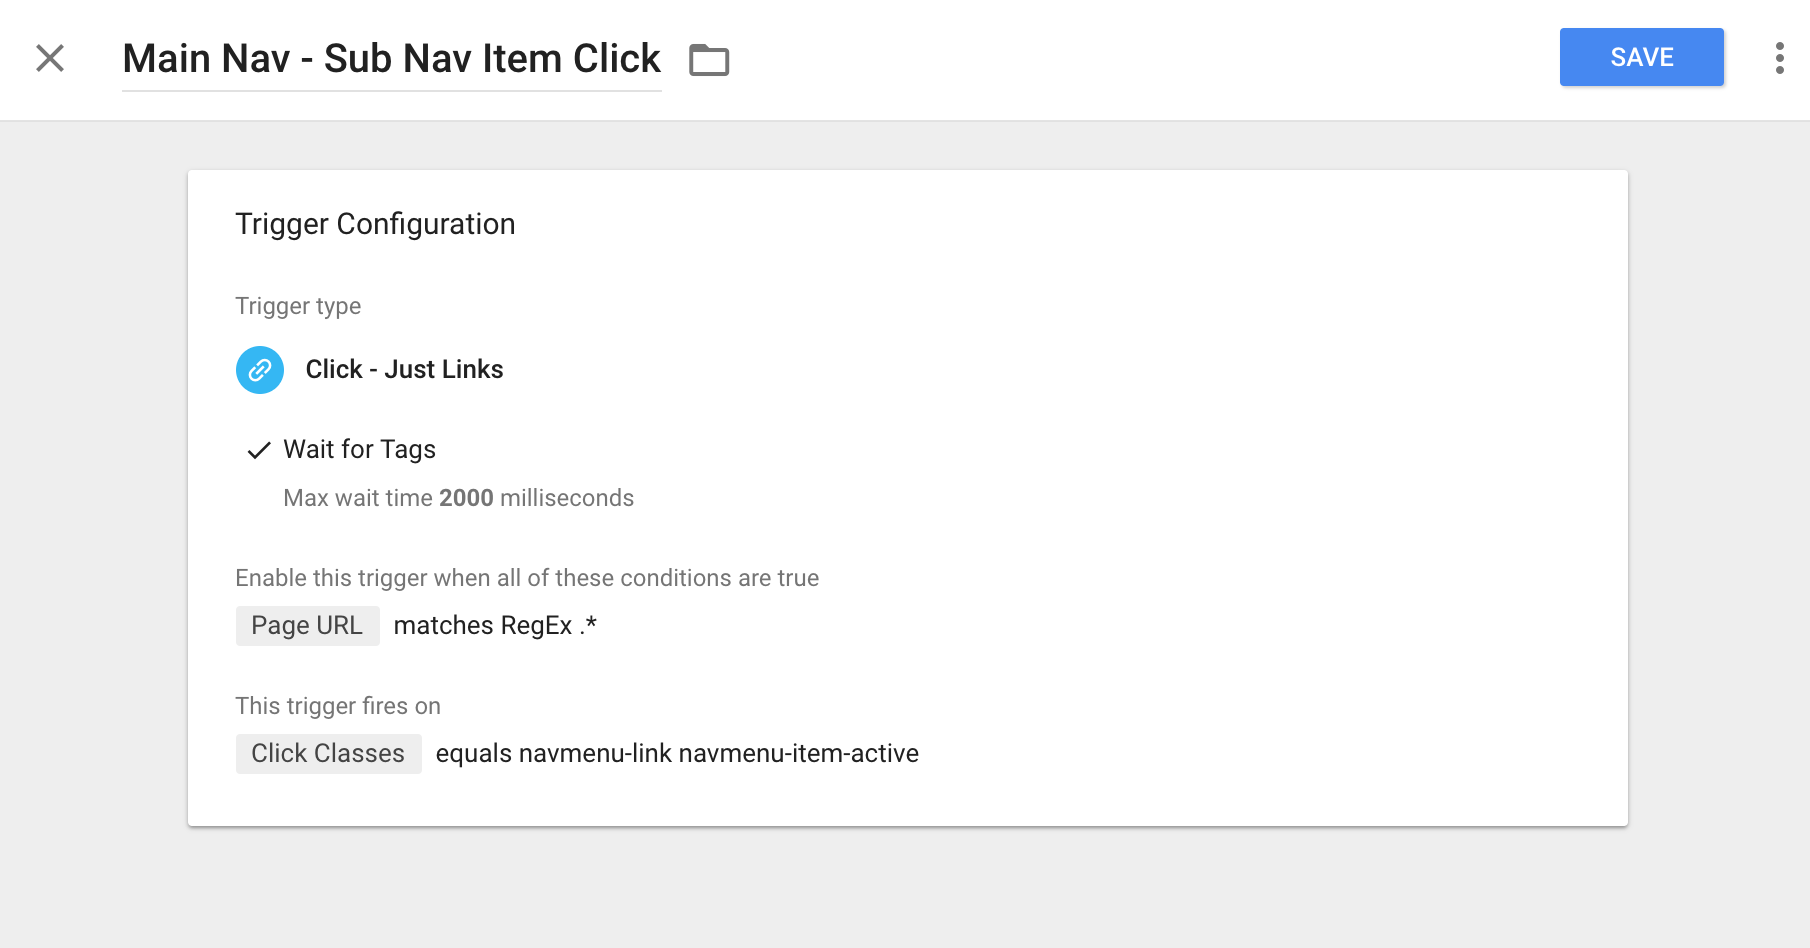
*Since your sub-nav link is likely taking a user to another page then your trigger setup will likely need to use the “Click – Just Links” trigger type:
2. Product Tab Clicks
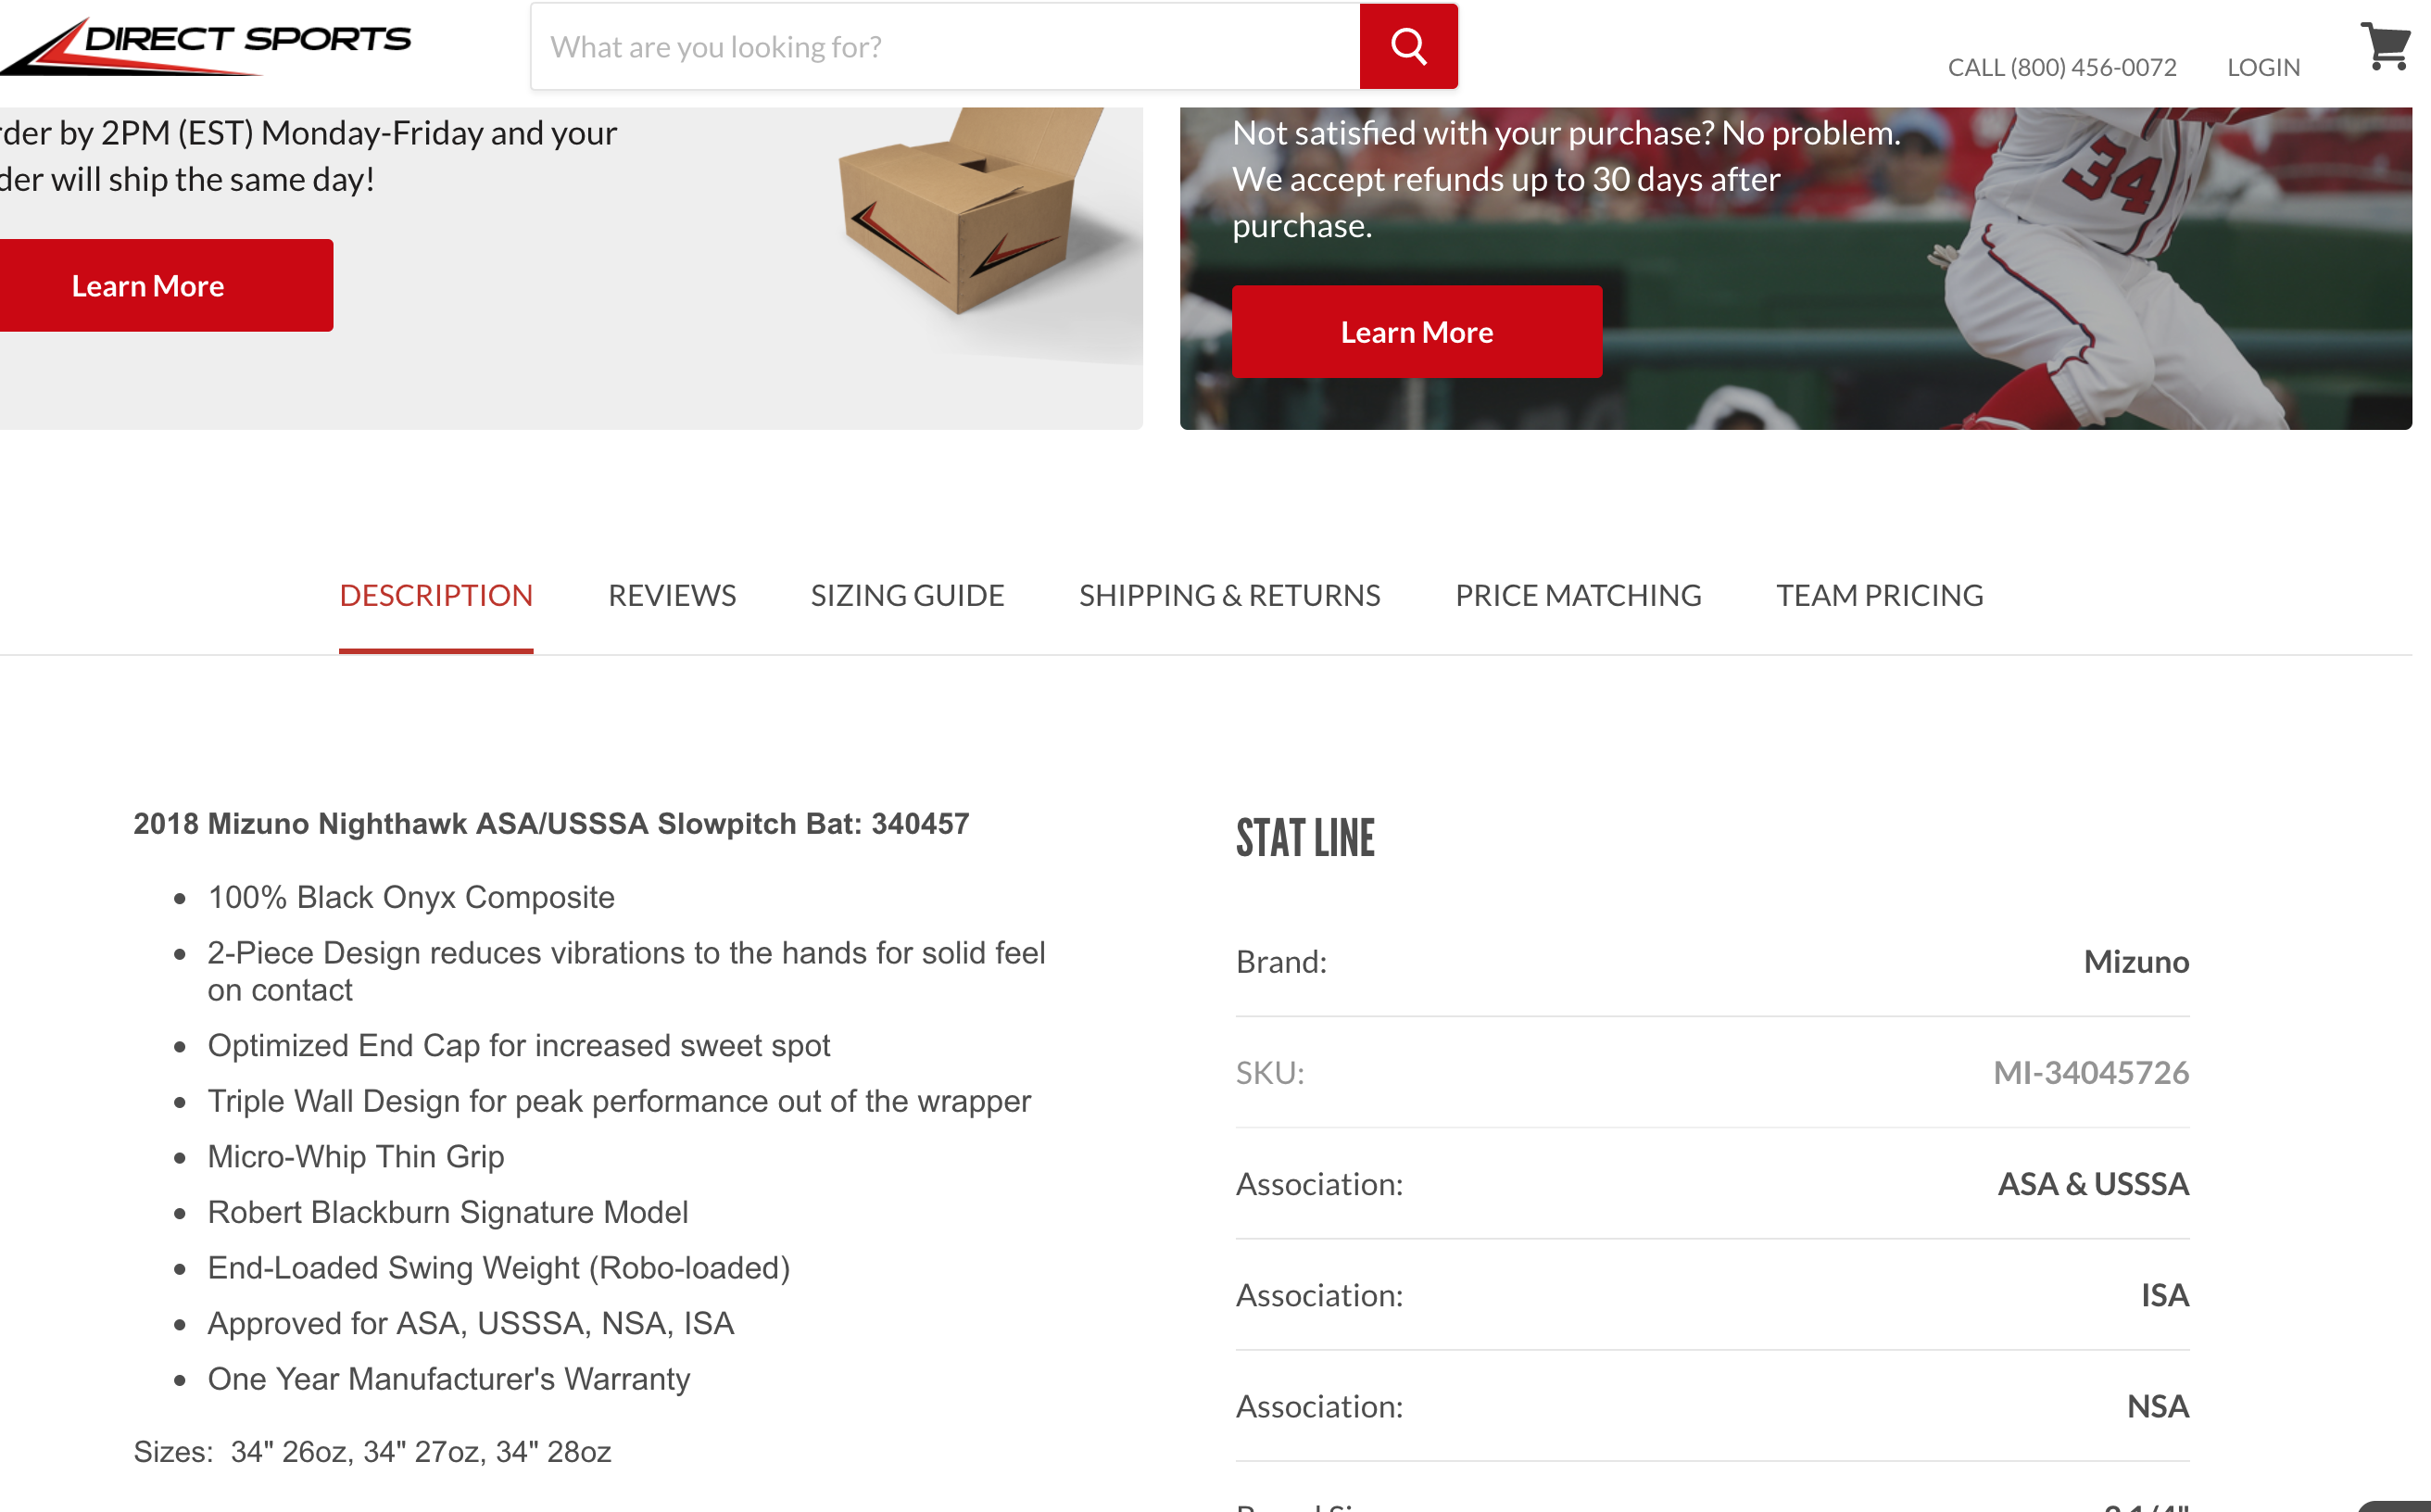
What it is: This creates custom behavior events (found in Google Analytics > Behavior > Events) for clicks on product tabs found on product pages that display different content to a user.
How it can help: Let’s assume you have some sort of product tabs on your product pages that shows/hides unique content for users (see example above). You might wonder if you should have more/less tabs to evaluate distraction or want to see if a segment of users who do click on a specific tab (e.g., shipping & returns) convert more than others. Without custom event event tracking set up, you will miss out on these insights.
The setup: This may vary based on your type of tabs, but if the styling is consistent on all tab headers then it should be:
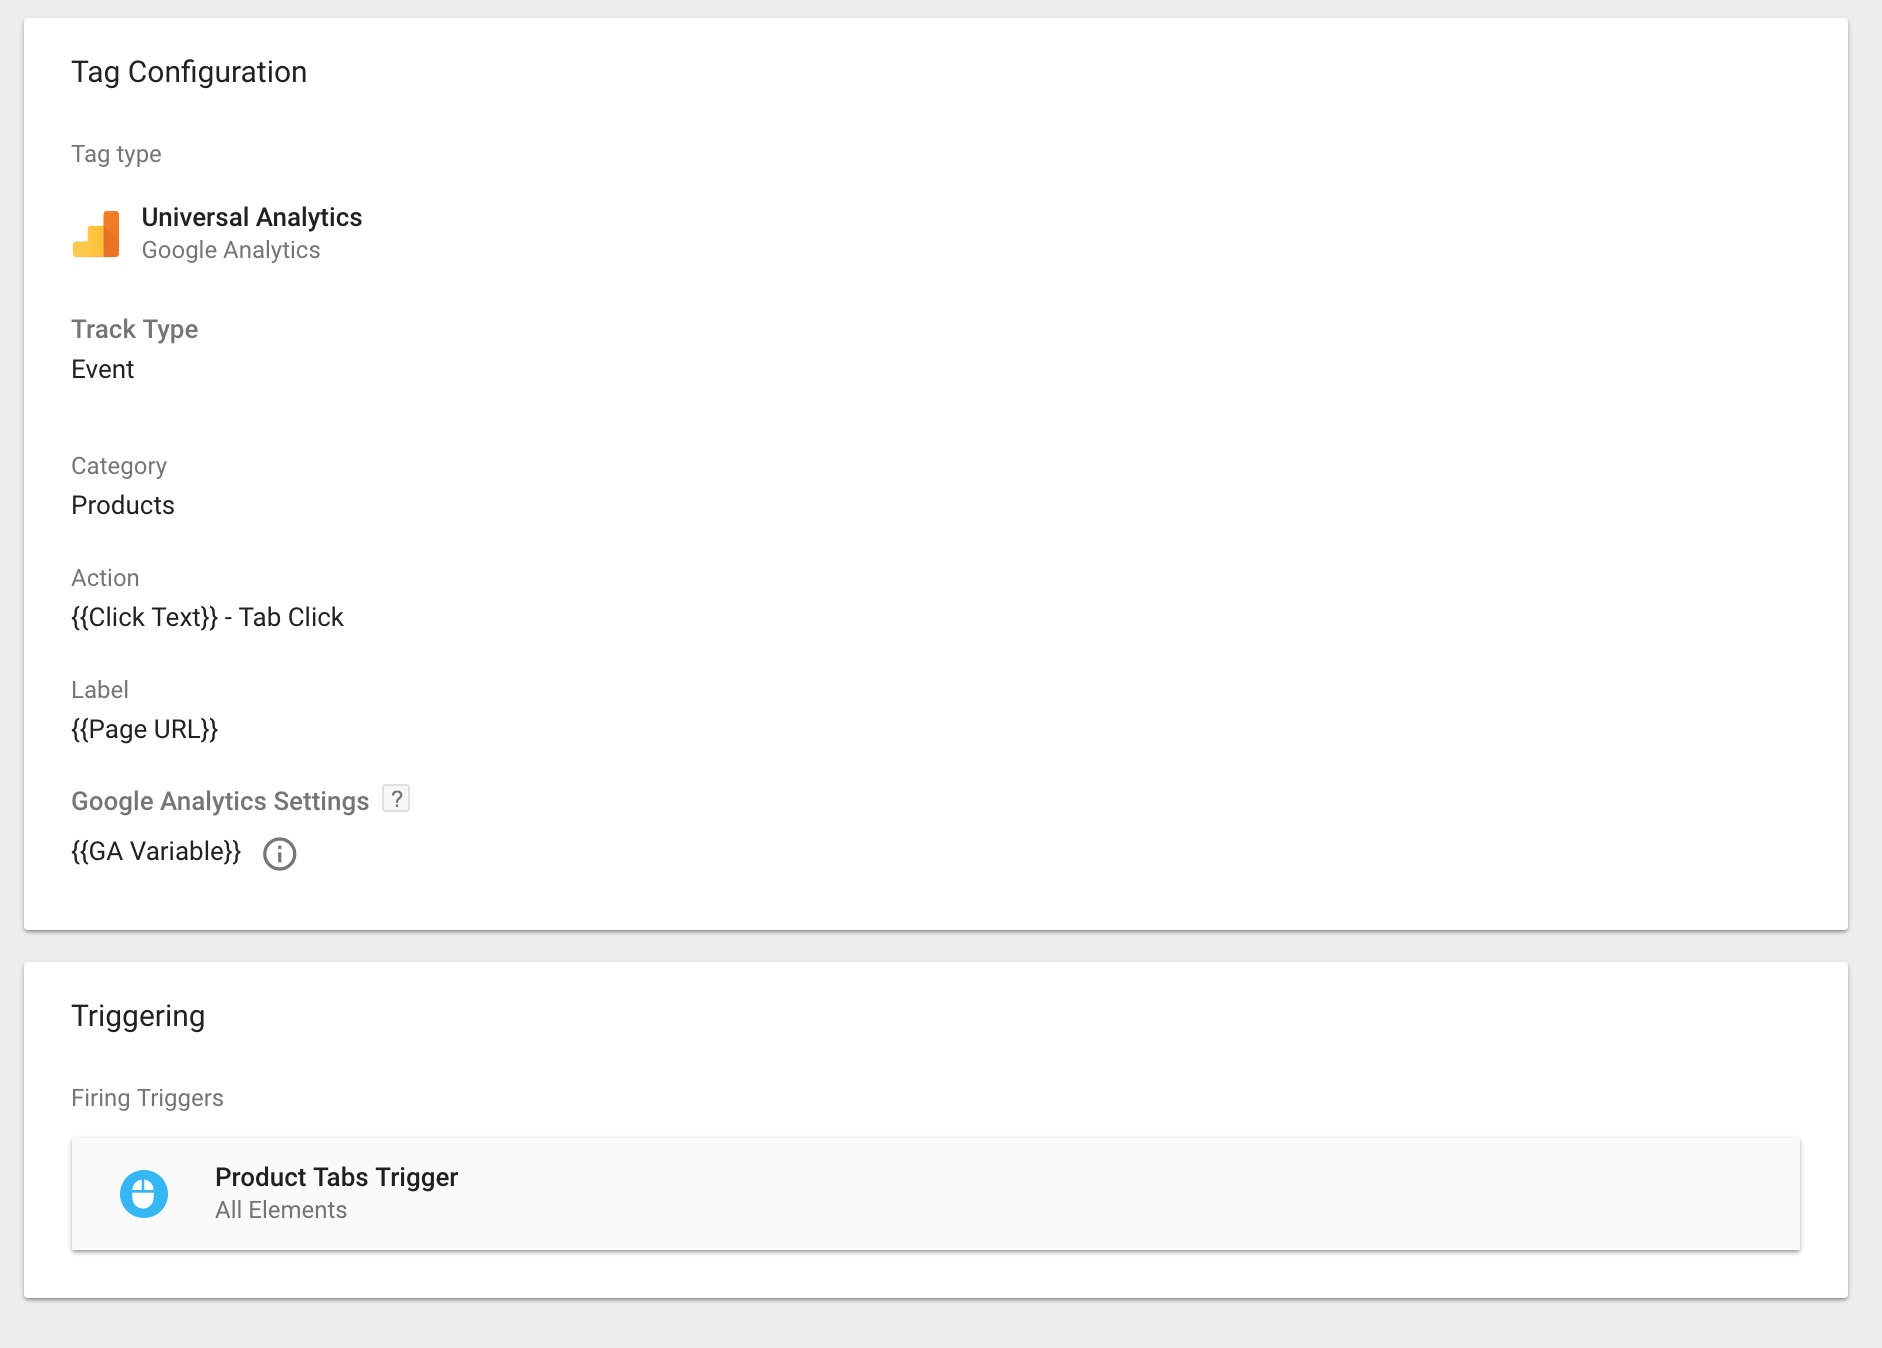
- One trigger targeting the click of a tab name
- One tag with the ^ trigger applied
3. Layered Navigation Filter Clicks
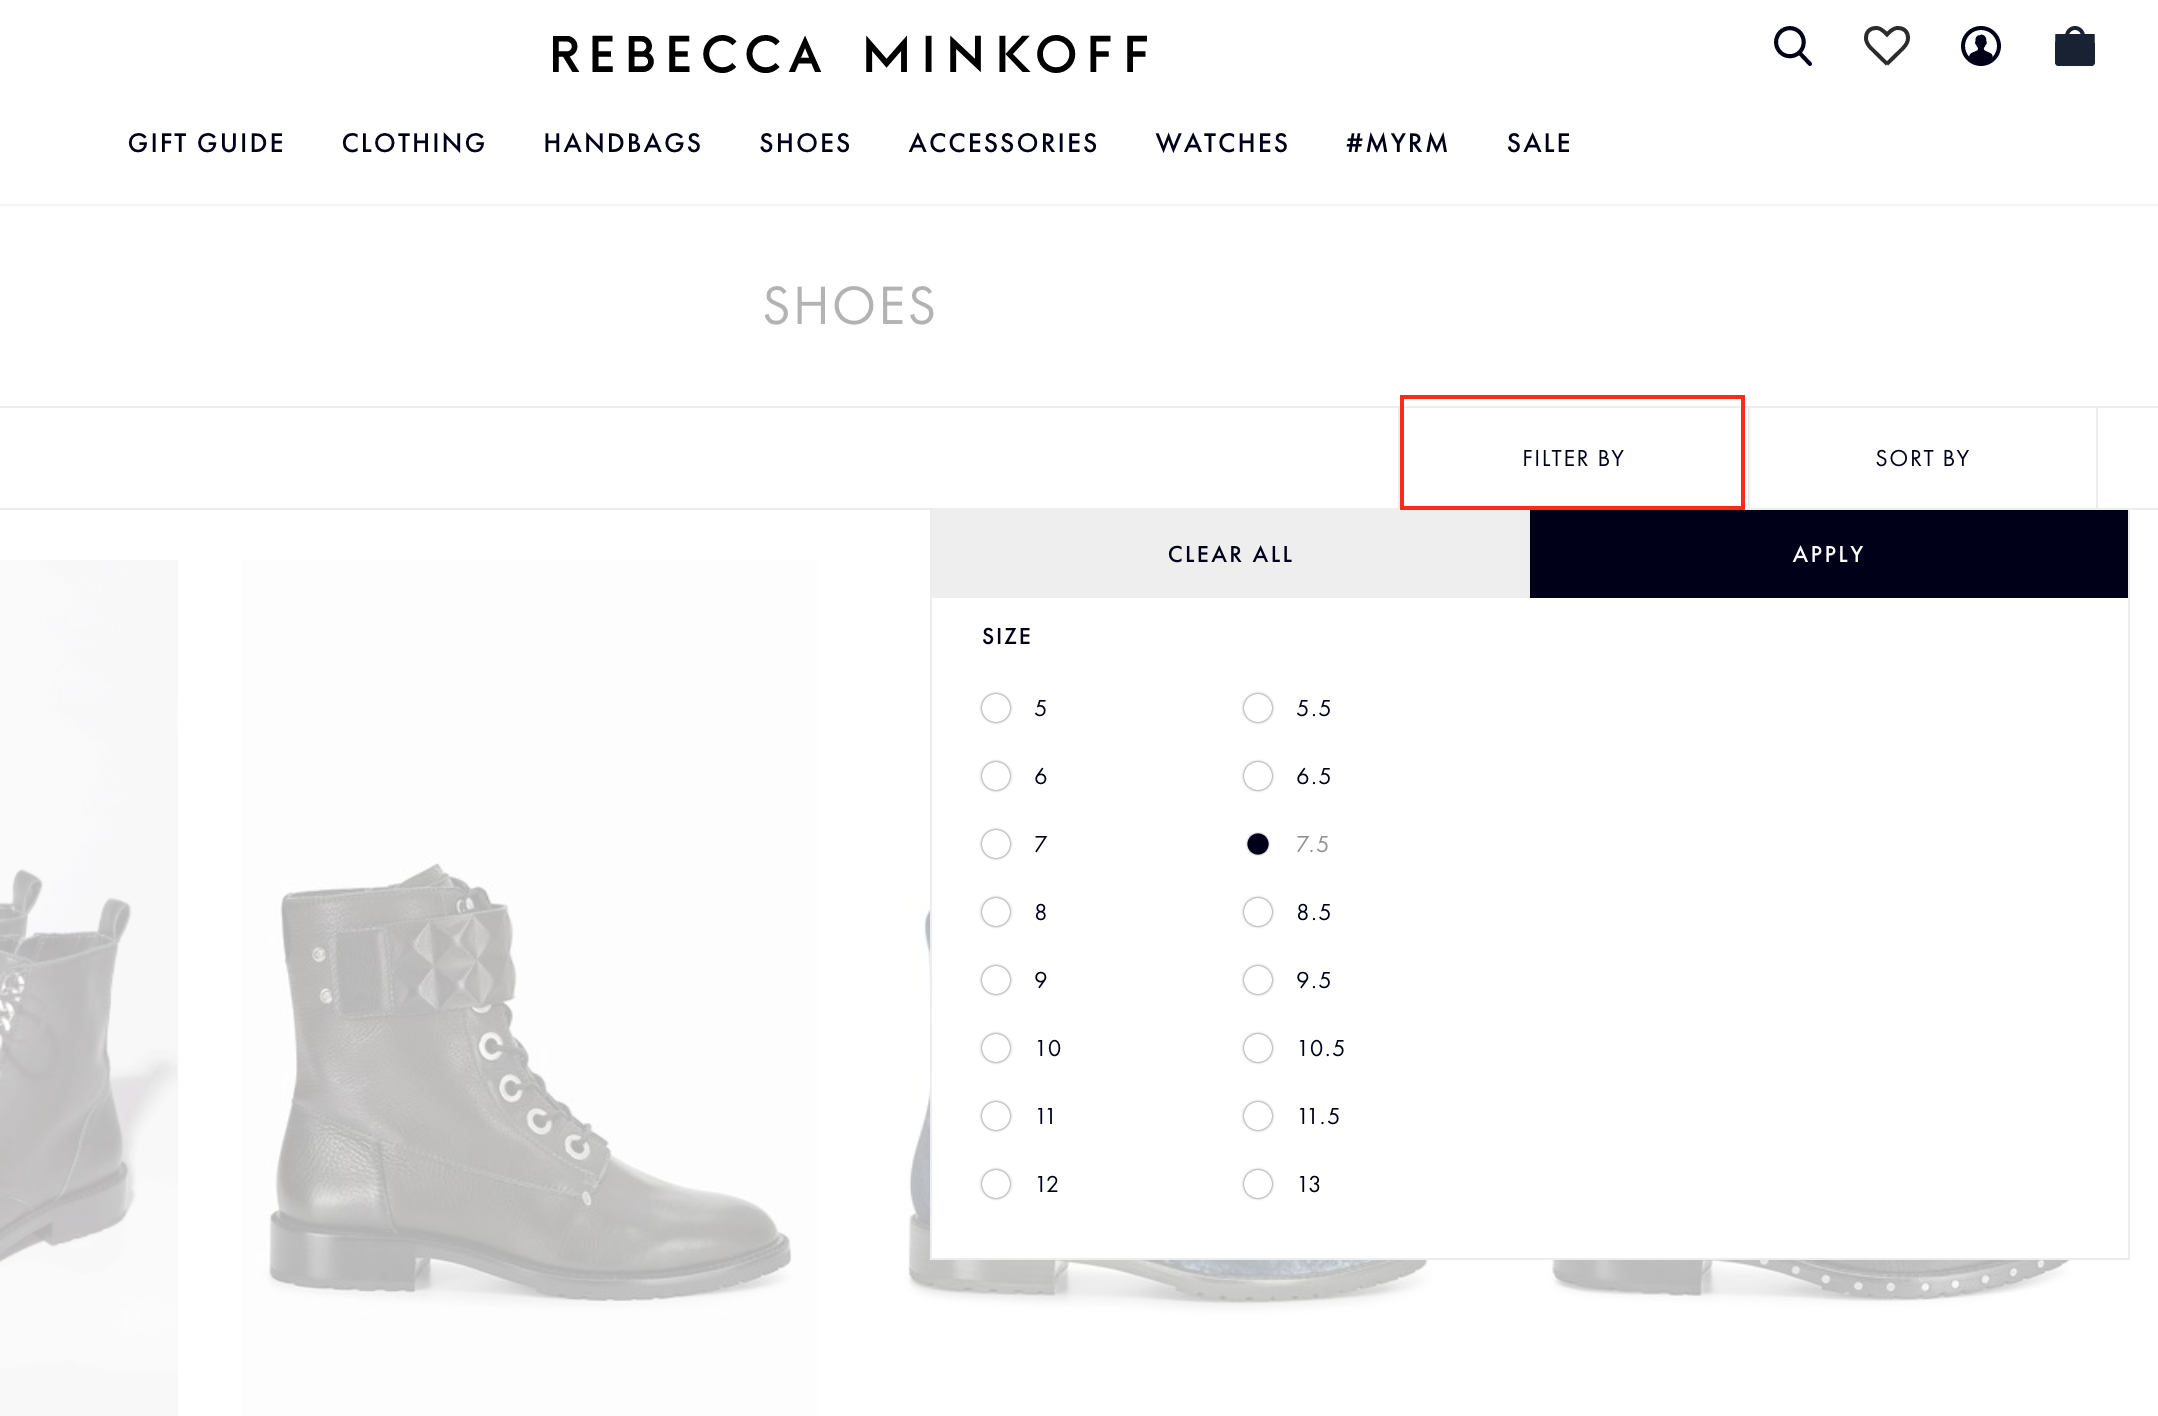
What it is: This creates custom behavior events for filtered a.k.a. layered a.k.a. faceted navigation on category and/or search results pages.
How it can help: Implementations of layered navigation vary widely across many Shopify stores. Some filter actions require a page reload whereas others do not, updating the product list via Ajax or other pushstate events. Regardless of the implementation you have, understanding how users are filtering your products is paramount to effective merchandising optimization and marketing.
For example: If you sold shirts, and you saw a high # of users filtering on the color “white” on your shirts category page, then you might considering adding a quicklink in your main navigation to white shirts to save your users one click.
Or if you saw some filters not being used at all then you might consider removing these completely to reduce potential distractions. There are so many insights you could pull from this data!
The setup:
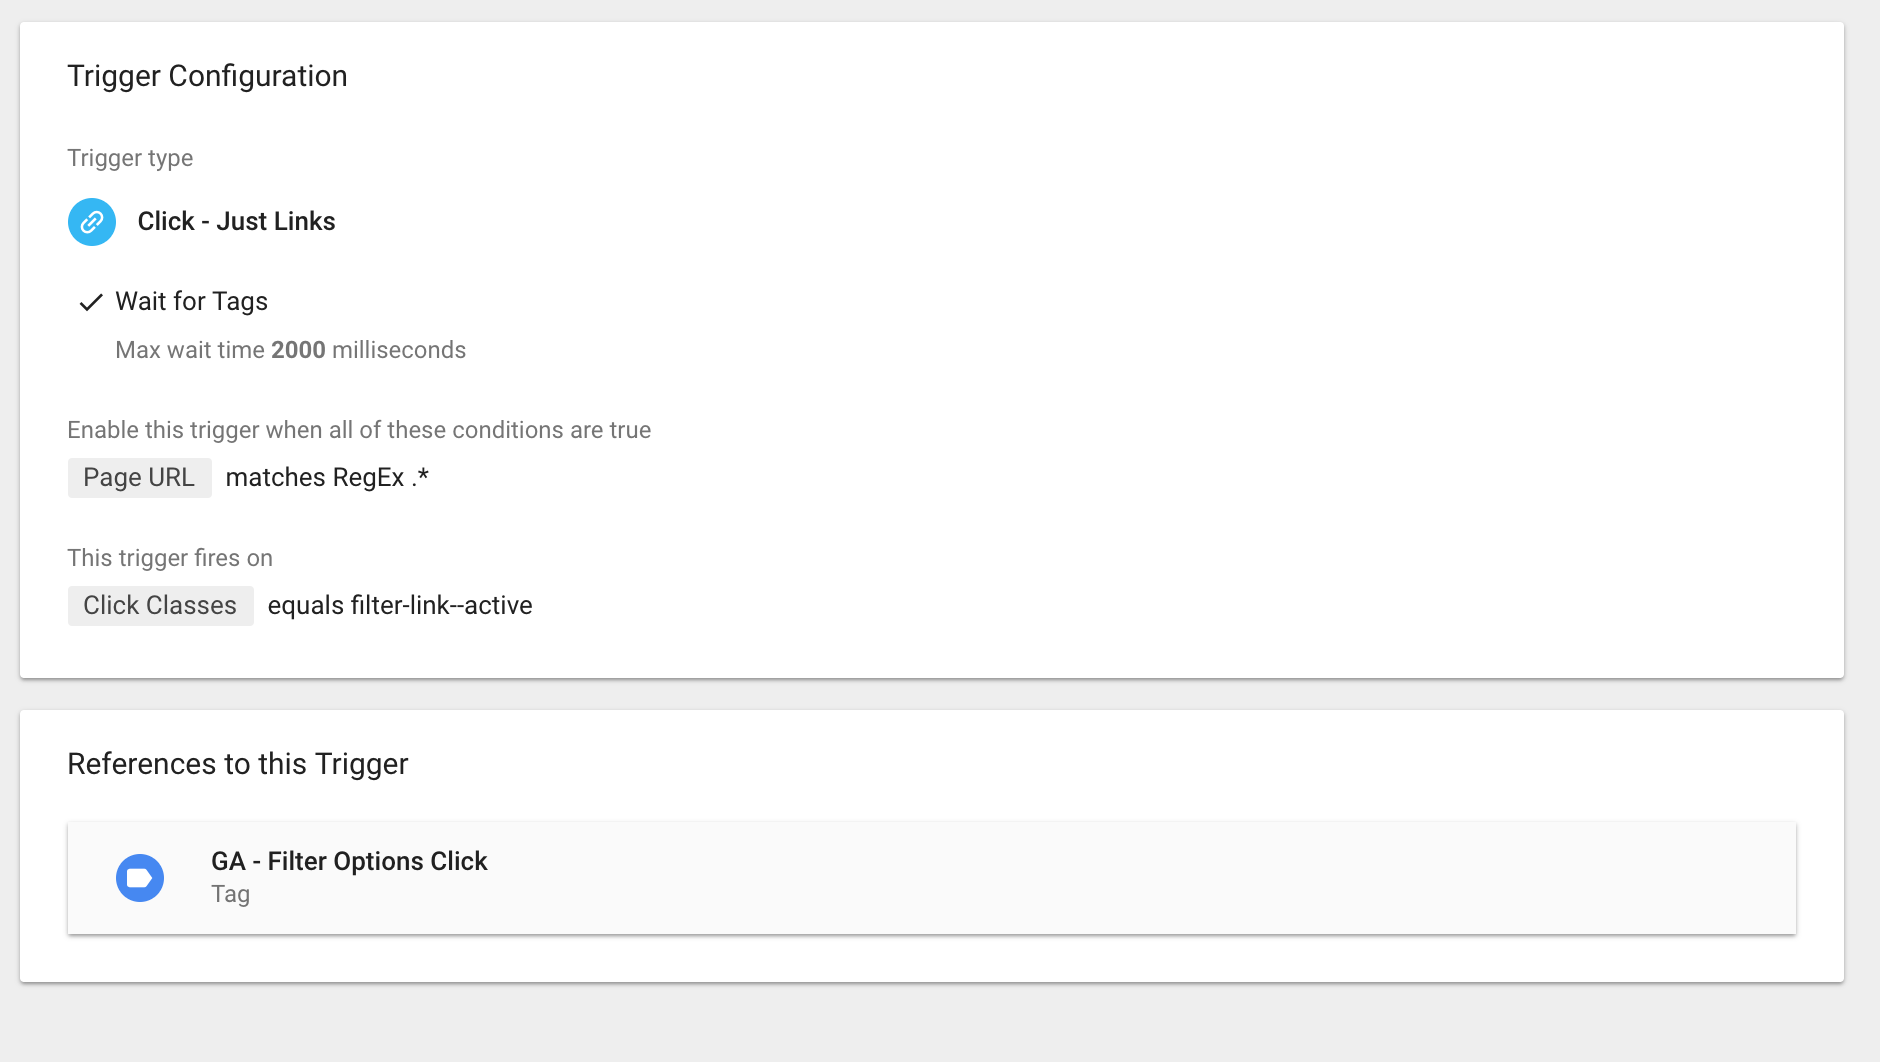
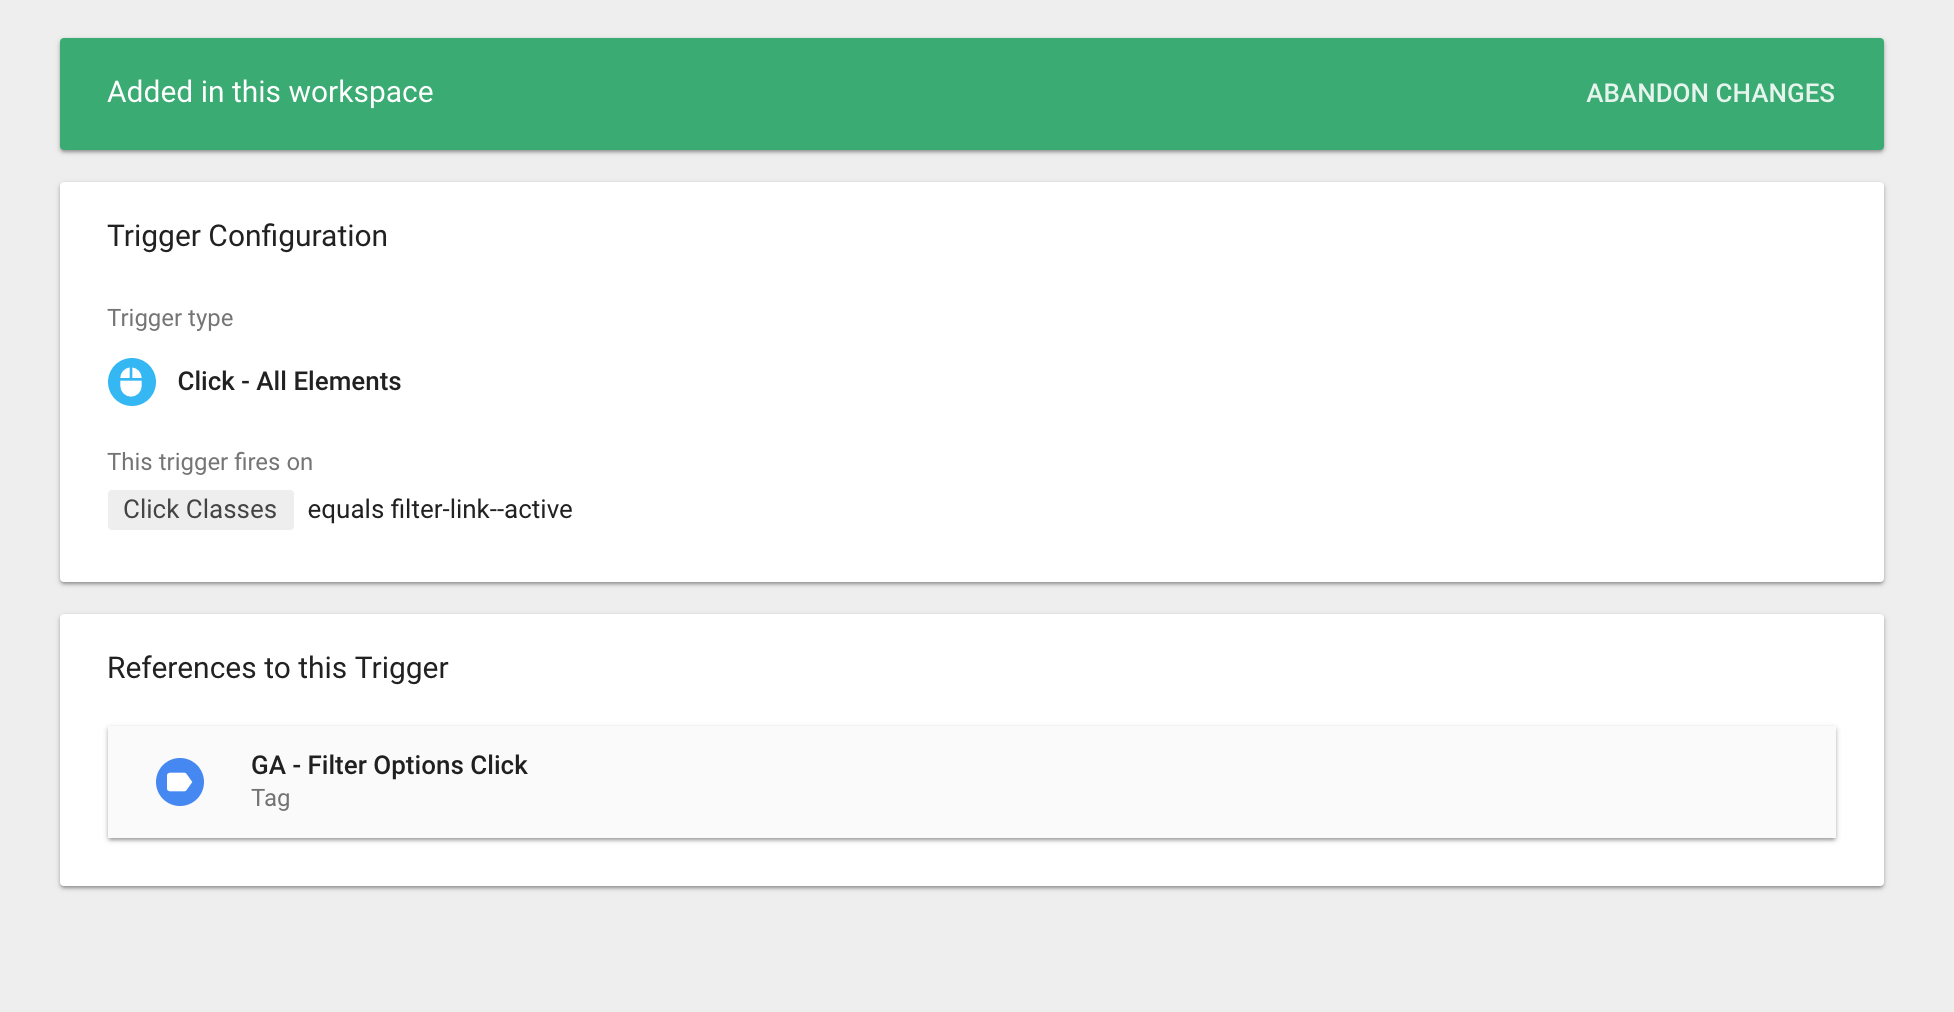
If you have a page reload on a filter click:
- You’ll need to set up a trigger as a “Click – Just Links” trigger type so the tag fires even with a page URL update, similar to this:
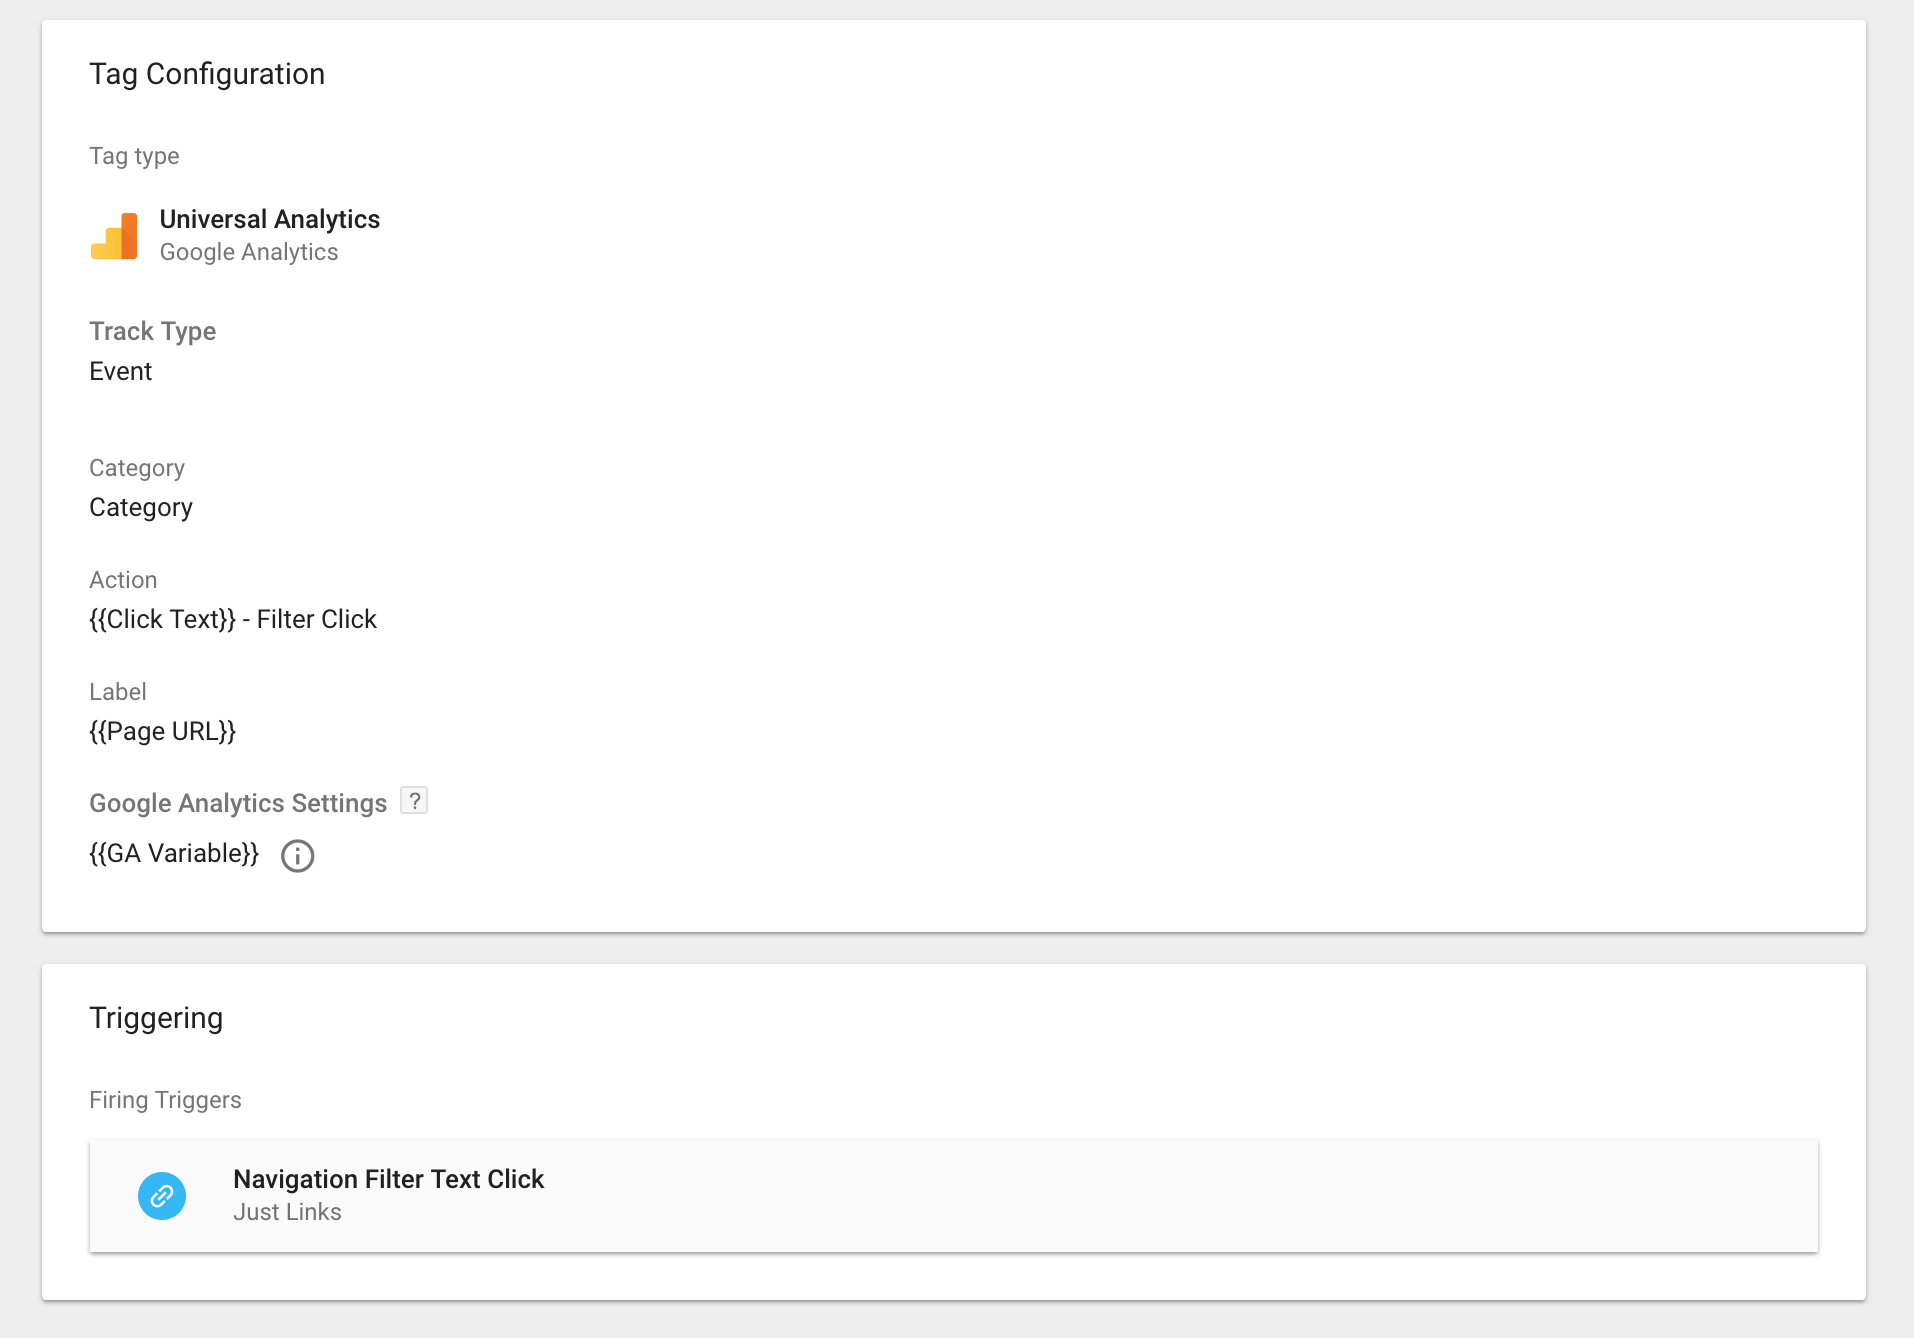
If you do not have a page reload on a filter click:
- it will be a “Clicks – All Elements” trigger type like this:
Then you can apply both of these triggers to a new event tag setup that may look like something like this:
4. Email Signups
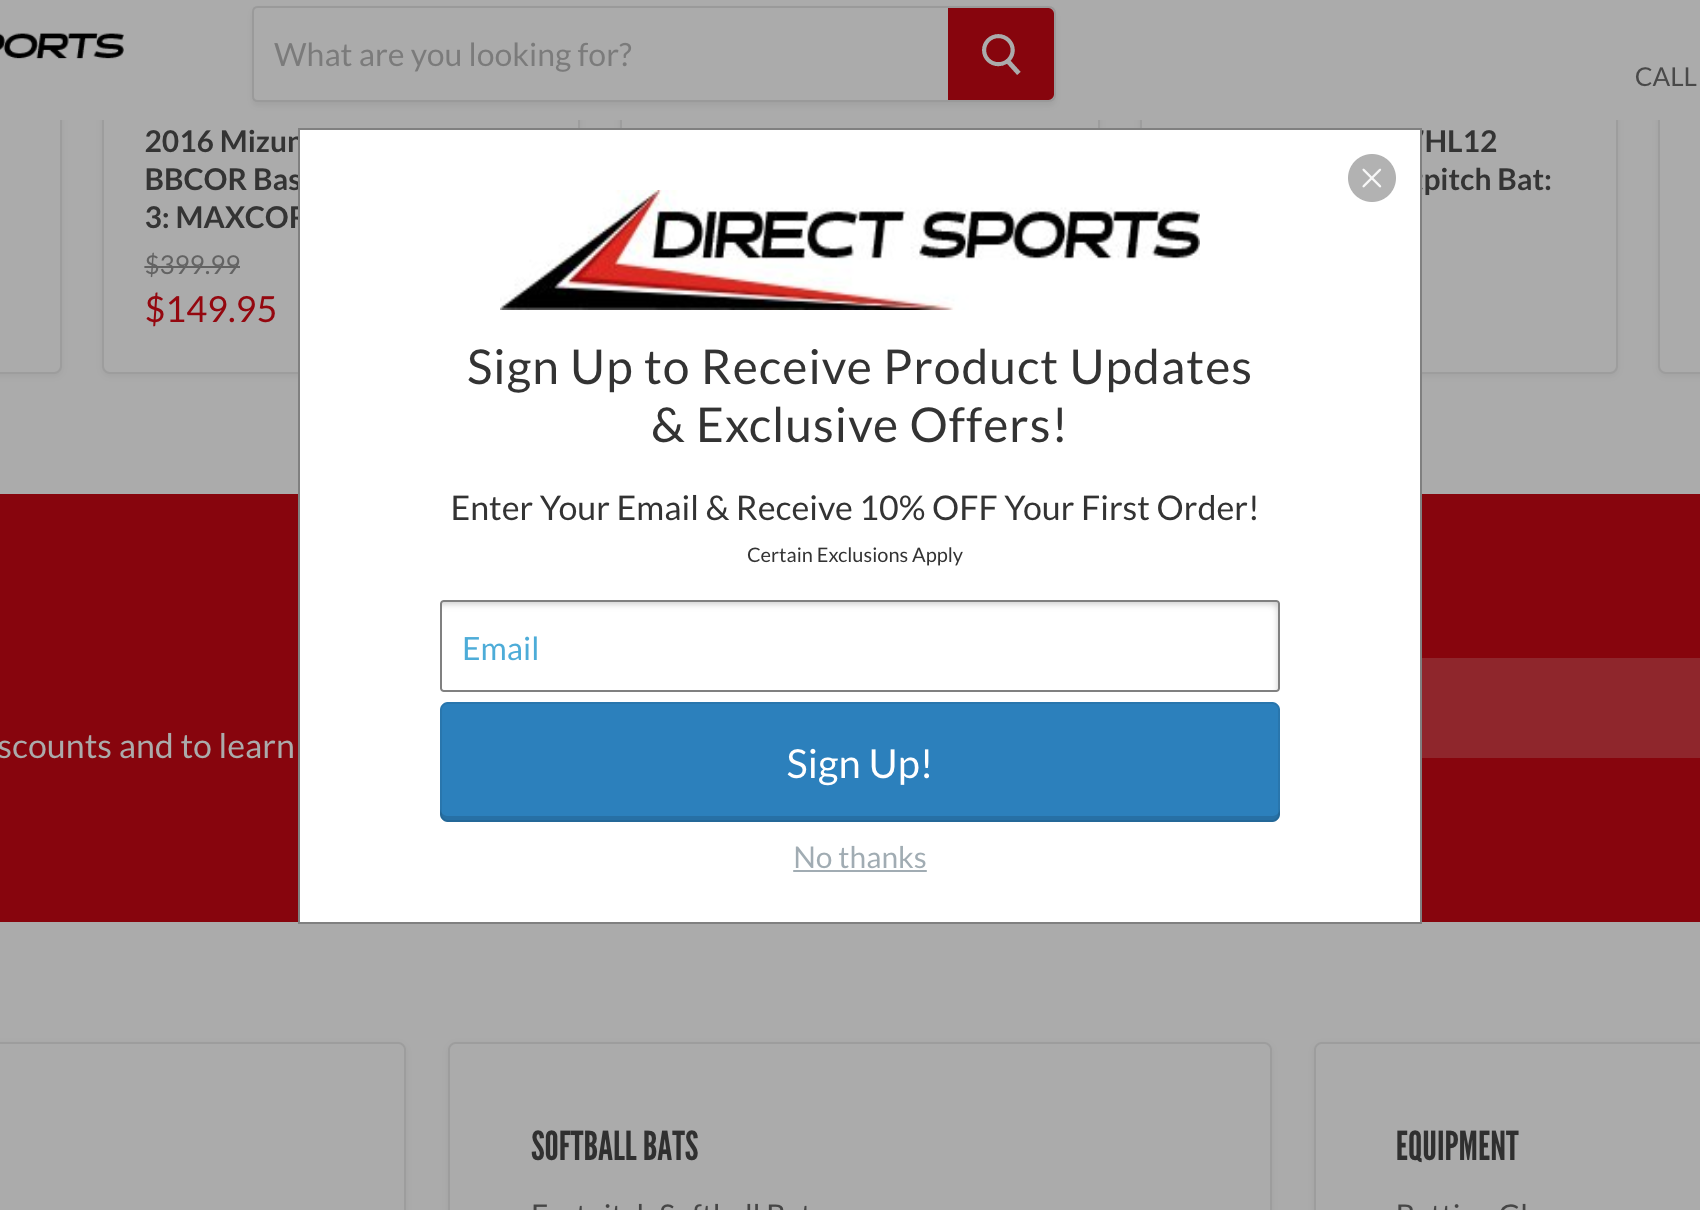
What it is: This creates a custom event in Google Analytics that captures the action of a user clicking on a newsletter signup button.
How it can help: Wondering how those email signup modals or your embedded email signup forms are working throughout the site? Understand what pages/paths are driving email signups that lead to your nurtured email marketing campaigns. Depending on your email provider, you could use some of this data you’re capturing to push into the customer profile to help improve personalization.
The setup: You may need to clear your domain browser cookies in order to trigger your own newsletter modal but once you’re able to trigger, create triggers for two actions:
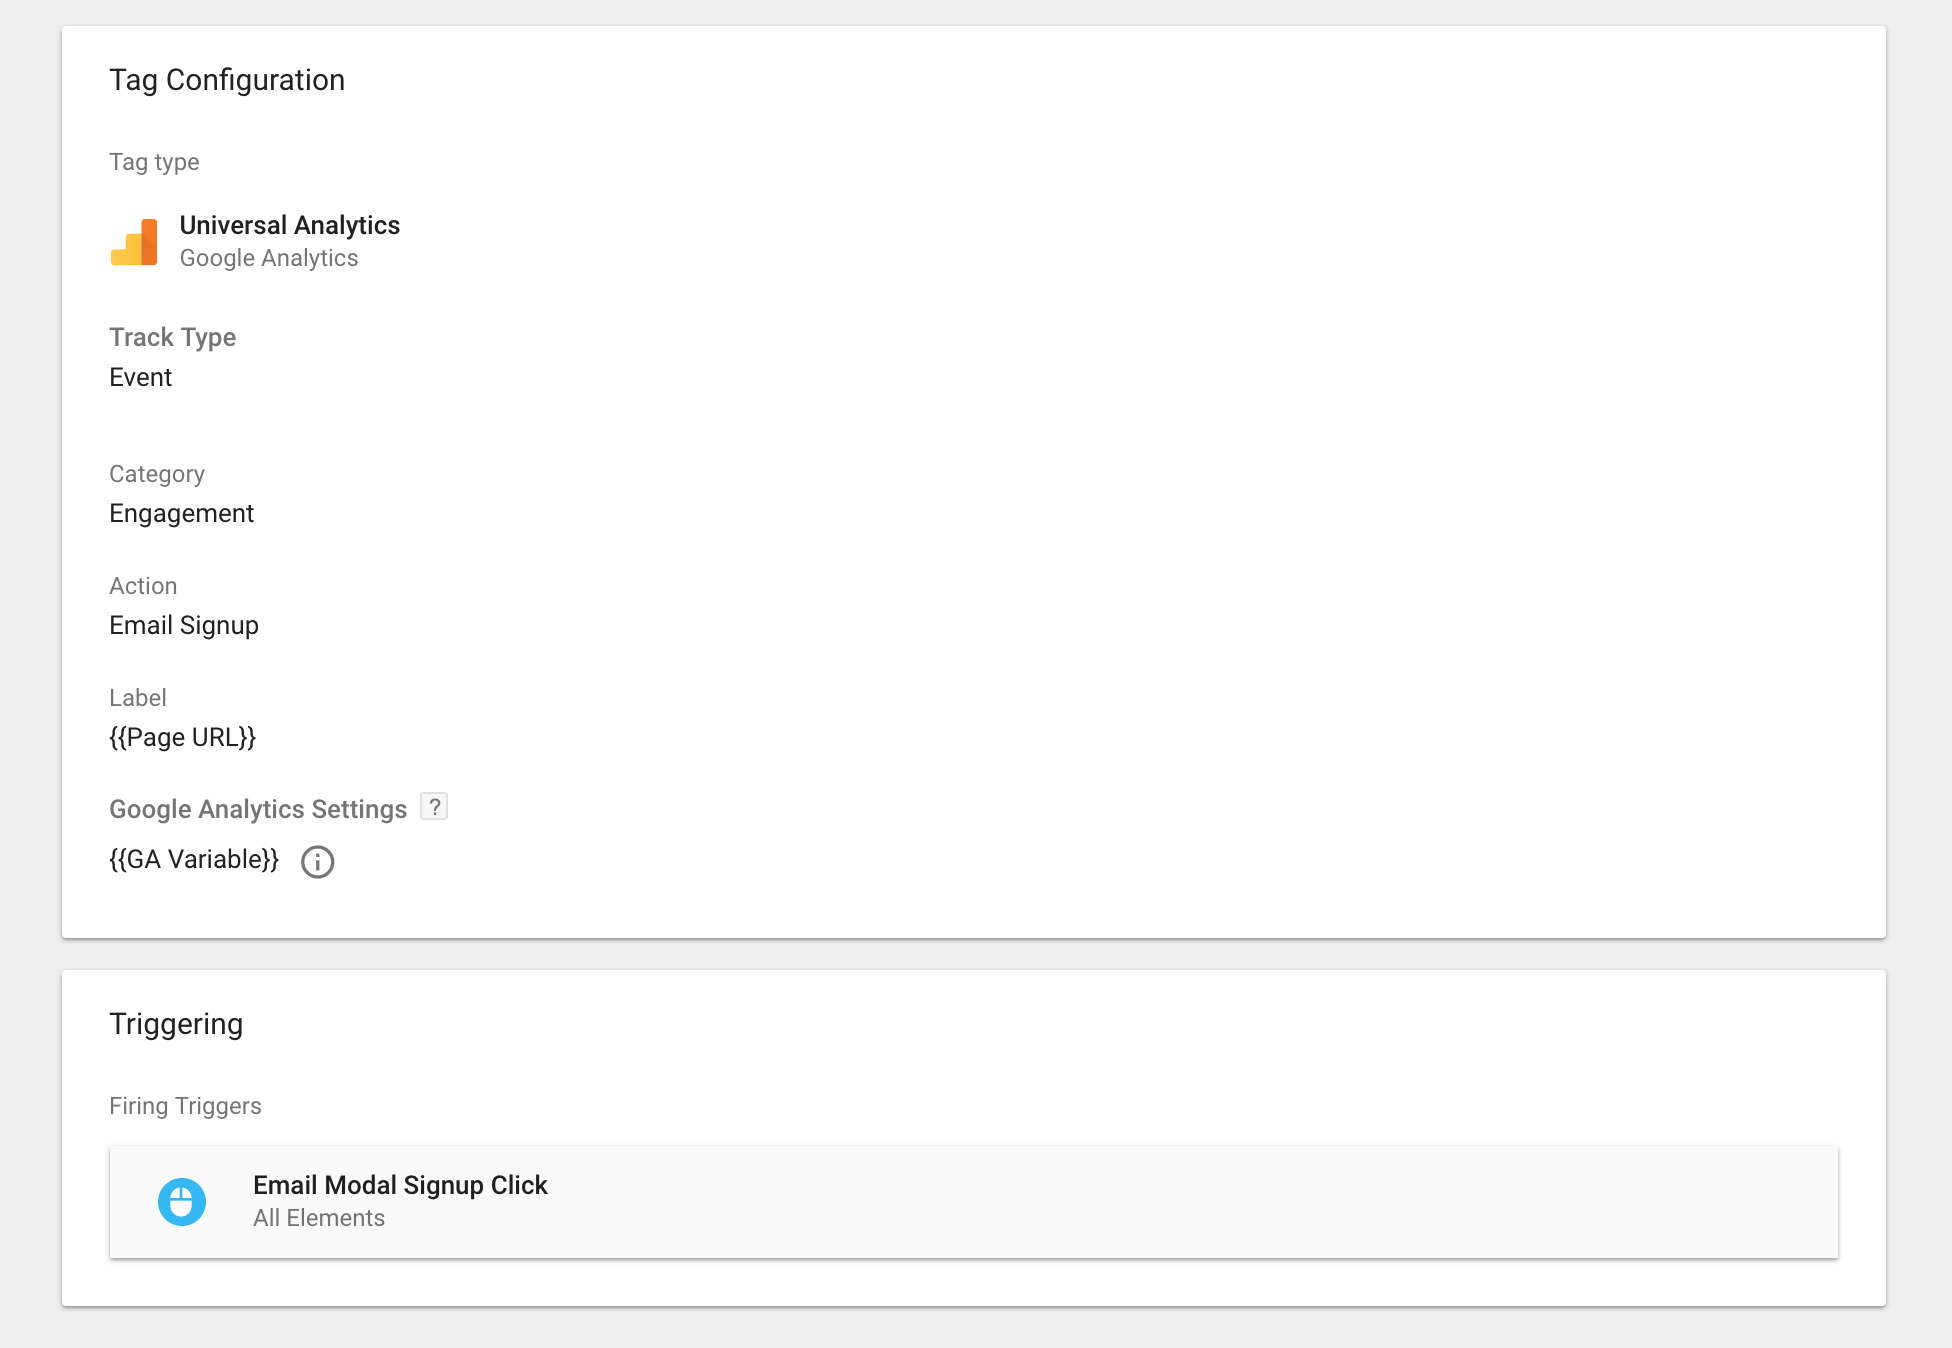
- Clicking Signup
- Closing out Modal
Once you have these triggers created, then create a tag for each, which could look something like this:
Conversion Tracking
If you’re selling online and actively marketing, you likely have requirements to track conversions for:
- Google AdWords
- Bing
- Criteo
- Commission Junction/Affiliates
- Among many more 🙂
If you’re like me, you REALLY want to implement all of your conversion tracking via GTM and dynamic variables.
But you can also save yourself the stress and utilize the additional scripts setting in Admin > Settings > Checkout > Additional Scripts:
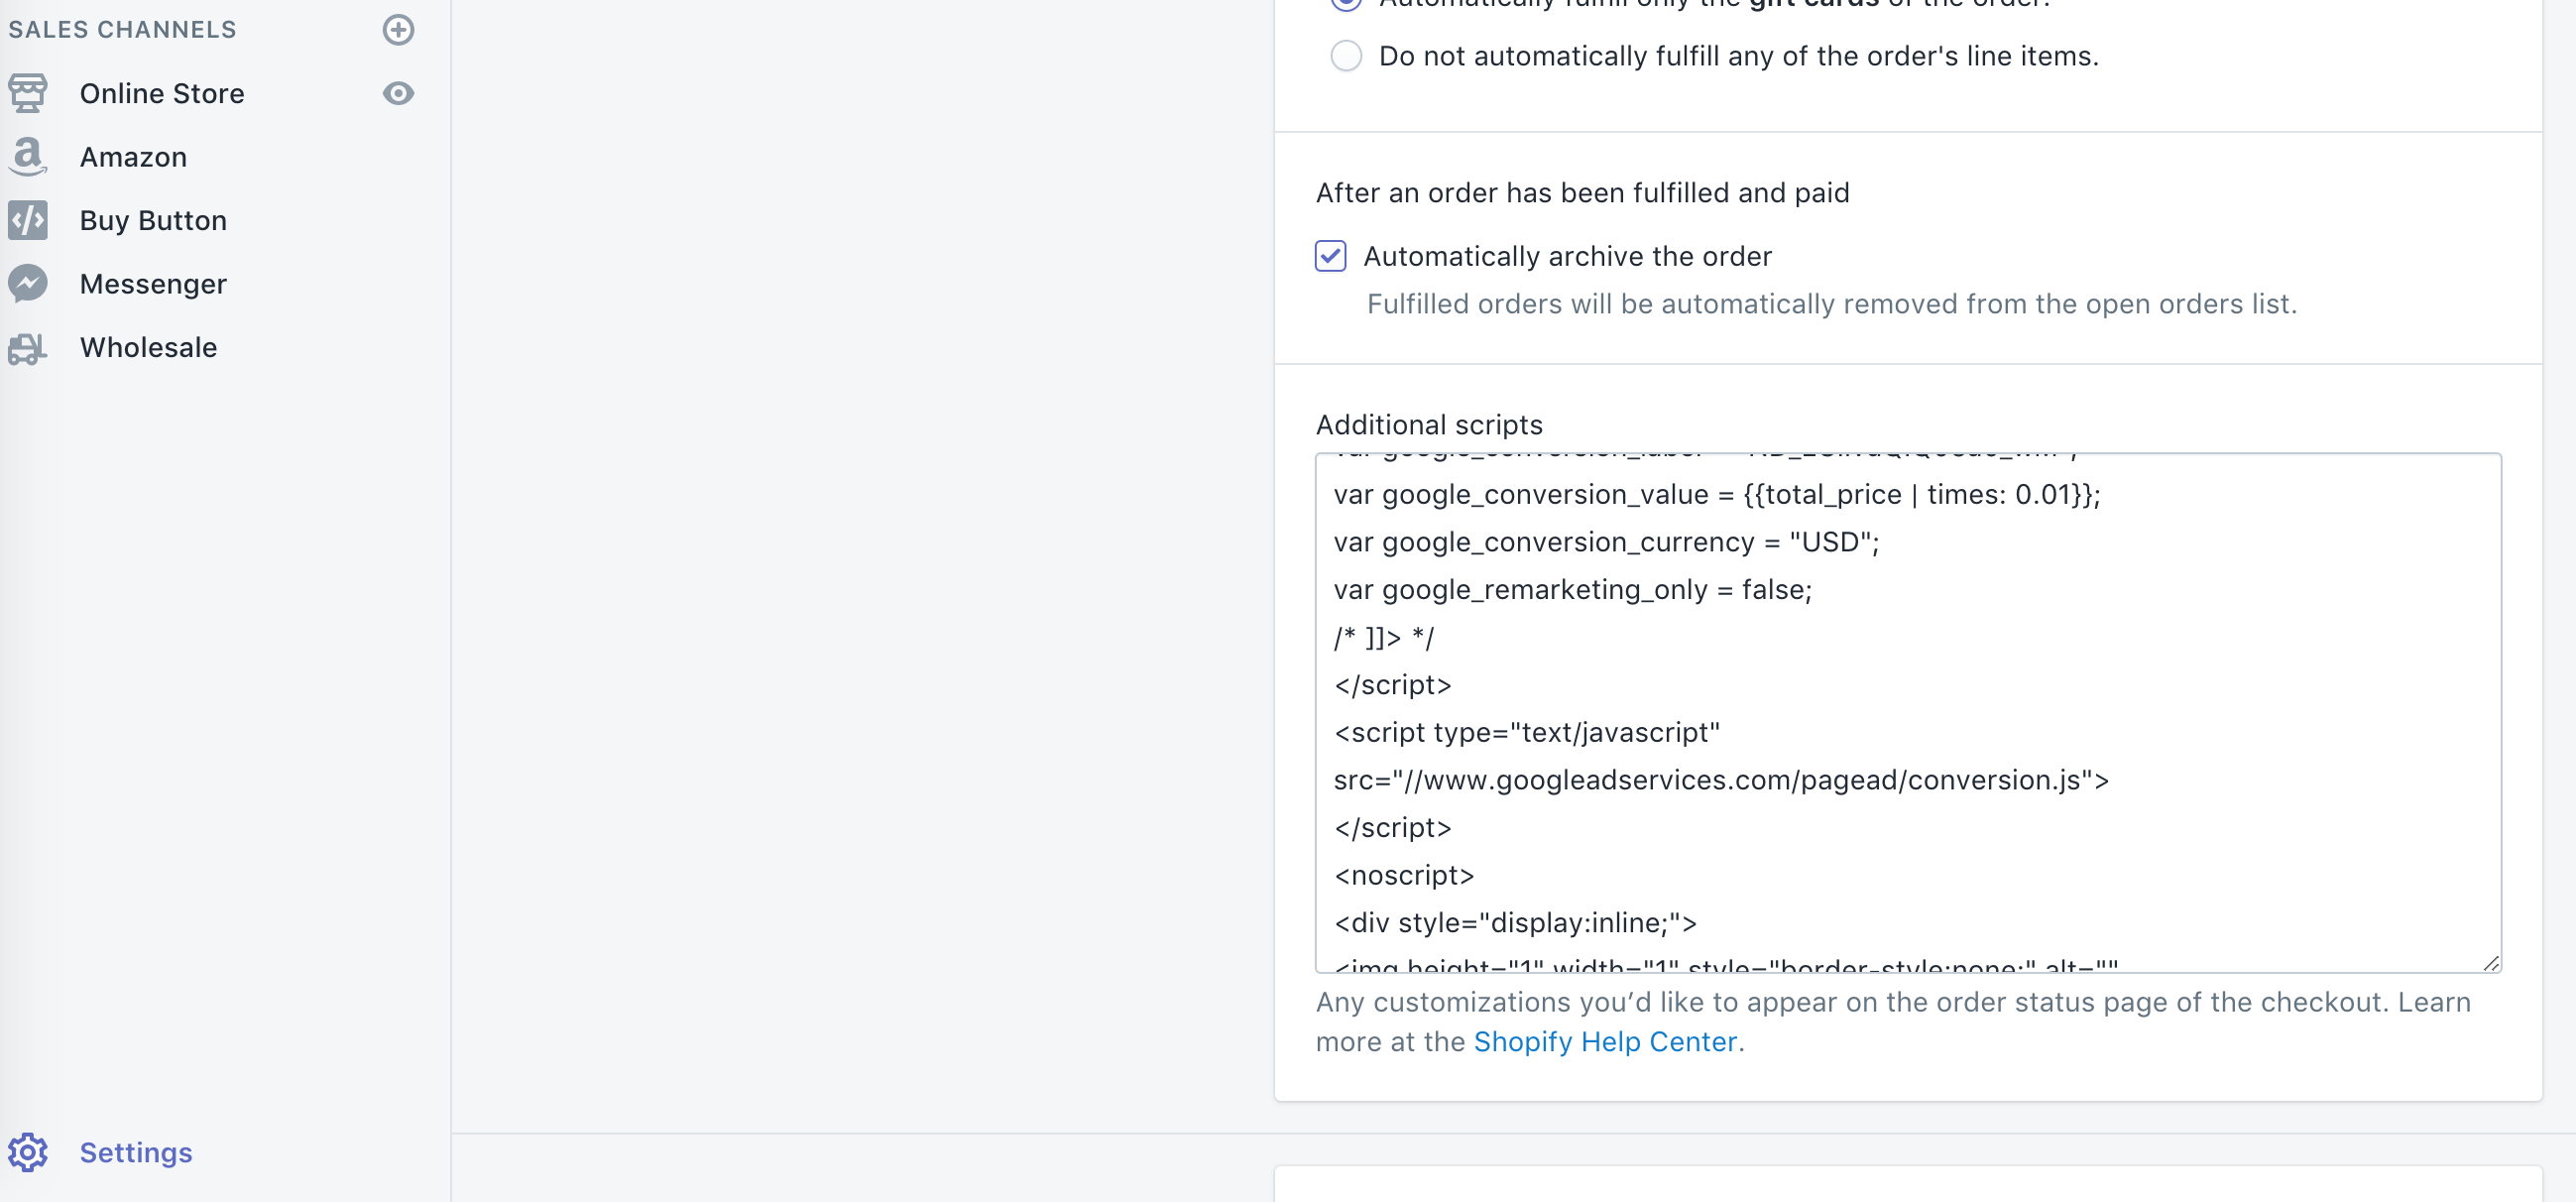
You’re going to need one or more of the following Shopify variables (not Data Layer variables) as part of your tags listed below.
- Order Amount: {{total_price | times: 0.01}}
- Order ID: {{ order.order_number }}
- Order Email: {{ order.email }}
- Order Tax: {{tax_price | times: 0.01}}
- Order Shipping: {{shipping_price | times: 0.01}}
These pretty much work “out of the box” and can be tested by configuring in your own settings > placing a test order > viewing your source code.
Summary
If you’re a GTM + dataLayer + GA purist then working strictly within Shopify does have it’s limitations. However, in my opinion (which I change often 🙂 ), the built-in benefits of Shopify’s GA implementation are really solid.
Take advantage of the additional benefits that GTM allows for in behavior tracking in addition to sitewide tag and pixel implementations. This can help unlock some really solid conversion optimization insights to help you make more money.
What do you think about GTM and Shopify? Any tips/suggestions to maximize usage?

Great article Brad. Just wondering, when setting up the Bing conversion tag through GTM, what do I use as the trigger to fire the tag?
Thanks Mitch! If you are setting a Bing conversion tag then you’ll want to use a trigger for the checkout thank you page (page path matches regex: checkouts.*\/thank_you)
Alternatively you could put this conversion tag into the Shopify checkout scripts admin settings.
PS – we have a GTM app w/full data layer variables built out that we are in private app QA mode. Let me know if you’d like me to send this to you when it’s released!
Cheers Brad. You’ve got some great content on the blog btw.
Would love the GTM app when it’s finished.
Hi Brad, saw your comment about the private GTM app. Would love to preview that to share with Shopify Plus clients when available.
Thank you so much for the note, Tony! I will definitely share when ready!
Hey, do you know how to make GTM Custom HTML working with .liquid syntax on Shopify? For instance, I don’t like to put tracking code in admin-checkout-additional-script, instead, I want to use GTM for all the tracking, so I left GTM script in admin-checkout-addtional-script, but the tag won’t validate .liquid syntax.
Hi Yifan,
liquid syntax won’t work within GTM itself. So if you want to use checkout variables within GTM then you will have to insert dataLayer variables inside of the checkout additional scripts section and then fire the tags within GTM using those new variables.
Does that help? We are releasing a Shopify app this week that creates all dataLayer variables required for GA, enhanced ecommerce and more. Let me know if you’d like to be notified when this is live.
Hi Brad certainly interested in the Shopify app that creates all dataLayer variables required for GA.
Please let me know. Great article and more importantly thanks for taking the time to share your knowledge so others can learn too. Appreciated
Hi Andrew – this is now available on the Shopify store here: https://apps.shopify.com/gtm-datalayer-by-elevar
Please let me know if you have any questions or issues with the setup!
Thank you very much.
Hi Brad,
I installed all your suite on our Shopify stores. I had To replace the GTM code in the elevar-head since there was an issue with the double quote surrounding the GTM container #. If not, the tags were not firing at all. I copy-paste the code from GTM.
Now, the additional code added in the checkout, for datalayer, was not functioning. Same thing, change the GTM code. Event transactionComplete began To fire but no info on transaction was pushed by datalayer.
Ever seen that issue?
Thanks
Hello!
Thanks forthis
I need to track a button that will take users to shop into another vendor
I see i could use a similar approach as initially described
My doubt is after setting up in GTM (my container is linked to GA in shopify) do i need to do anything else in GA or is all under GTM
Hi Brad,
Was wondering if Shopify has its own “Add to Cart” variable too so that we can track the number of carts additions.
Thanks
Hello, you mentioned these need to be added into the as part of the tag. Can you help me understand where to place them and what tag they should be implemented in?
Order Amount: {{total_price | times: 0.01}}
Order ID: {{ order.order_number }}
Order Email: {{ order.email }}
Order Tax: {{tax_price | times: 0.01}}
Order Shipping: {{shipping_price | times: 0.01}}
Hey Brad!
Just a quick but important clarification to ask – the Shopify says specifically that DO NOT add tags related to Universal Analytics for Google Analytics (and Facebook pixel).
However, you’ve screenshotted that you use Universal Analytics tags – doesn’t it cause the problems Shopify is outlining?
You can certainly see your expertise in the article you write.
The arena hopes for even more passionate writers such as you who
aren’t afraid to say how they believe. All the time go after your heart.
Hello, constantly i used to check website posts here in the early hours in the
daylight, because i love to find out more and more.