How to Create User Logged In State Variable in GTM for Magento
See how to grab your visitor logged in variable and modify the value of it by using a lookup table variable in GTM.
Brad Redding
Brad Redding is the Founder & CEO of Elevar. Specializing in analytics, tracking, GTM, and conversion optimization.
In the world of marketing tags, scripts, pixels, oh my, you’ve likely come across the requirement to implement a visitor status variable within one of your marketing tags (i.e. “guest” or “logged in”).
This variable is important for campaign targeting within services like Doubleclick, Criteo, or Adroll, but it’s likely the tag value requirements from these services don’t match your out-of-the-box Google Tag Manager (“GTM”) variables for pushing the logged in status of a visitor.
For example: your variable might populate “NOT LOGGED IN” but your tag requires a value of 1 to be sent when a user is not logged in.
If you are on Magento 1 or Magento 2 then you likely have a dataLayer.js and GTM implemented on your site. If you are on Enterprise then you might be using some of the native dataLayer variables Magento provides. Otherwise I imagine you’re using a third party extension that injects the dataLayer Javascript and creates GTM admin configuration settings for you.
In this quick how-to, I show how to grab your visitor logged in status variable and modify it with a lookup table variable that you can use to implement in your own marketing tags in GTM.
Step 1: Inspect your site for visitor status variable
Go to your homepage and right click to “view page source”. Once here you’ll see a bunch of html. I like to do a control+F to find “datalayer” which hopefully leads you to something like this:
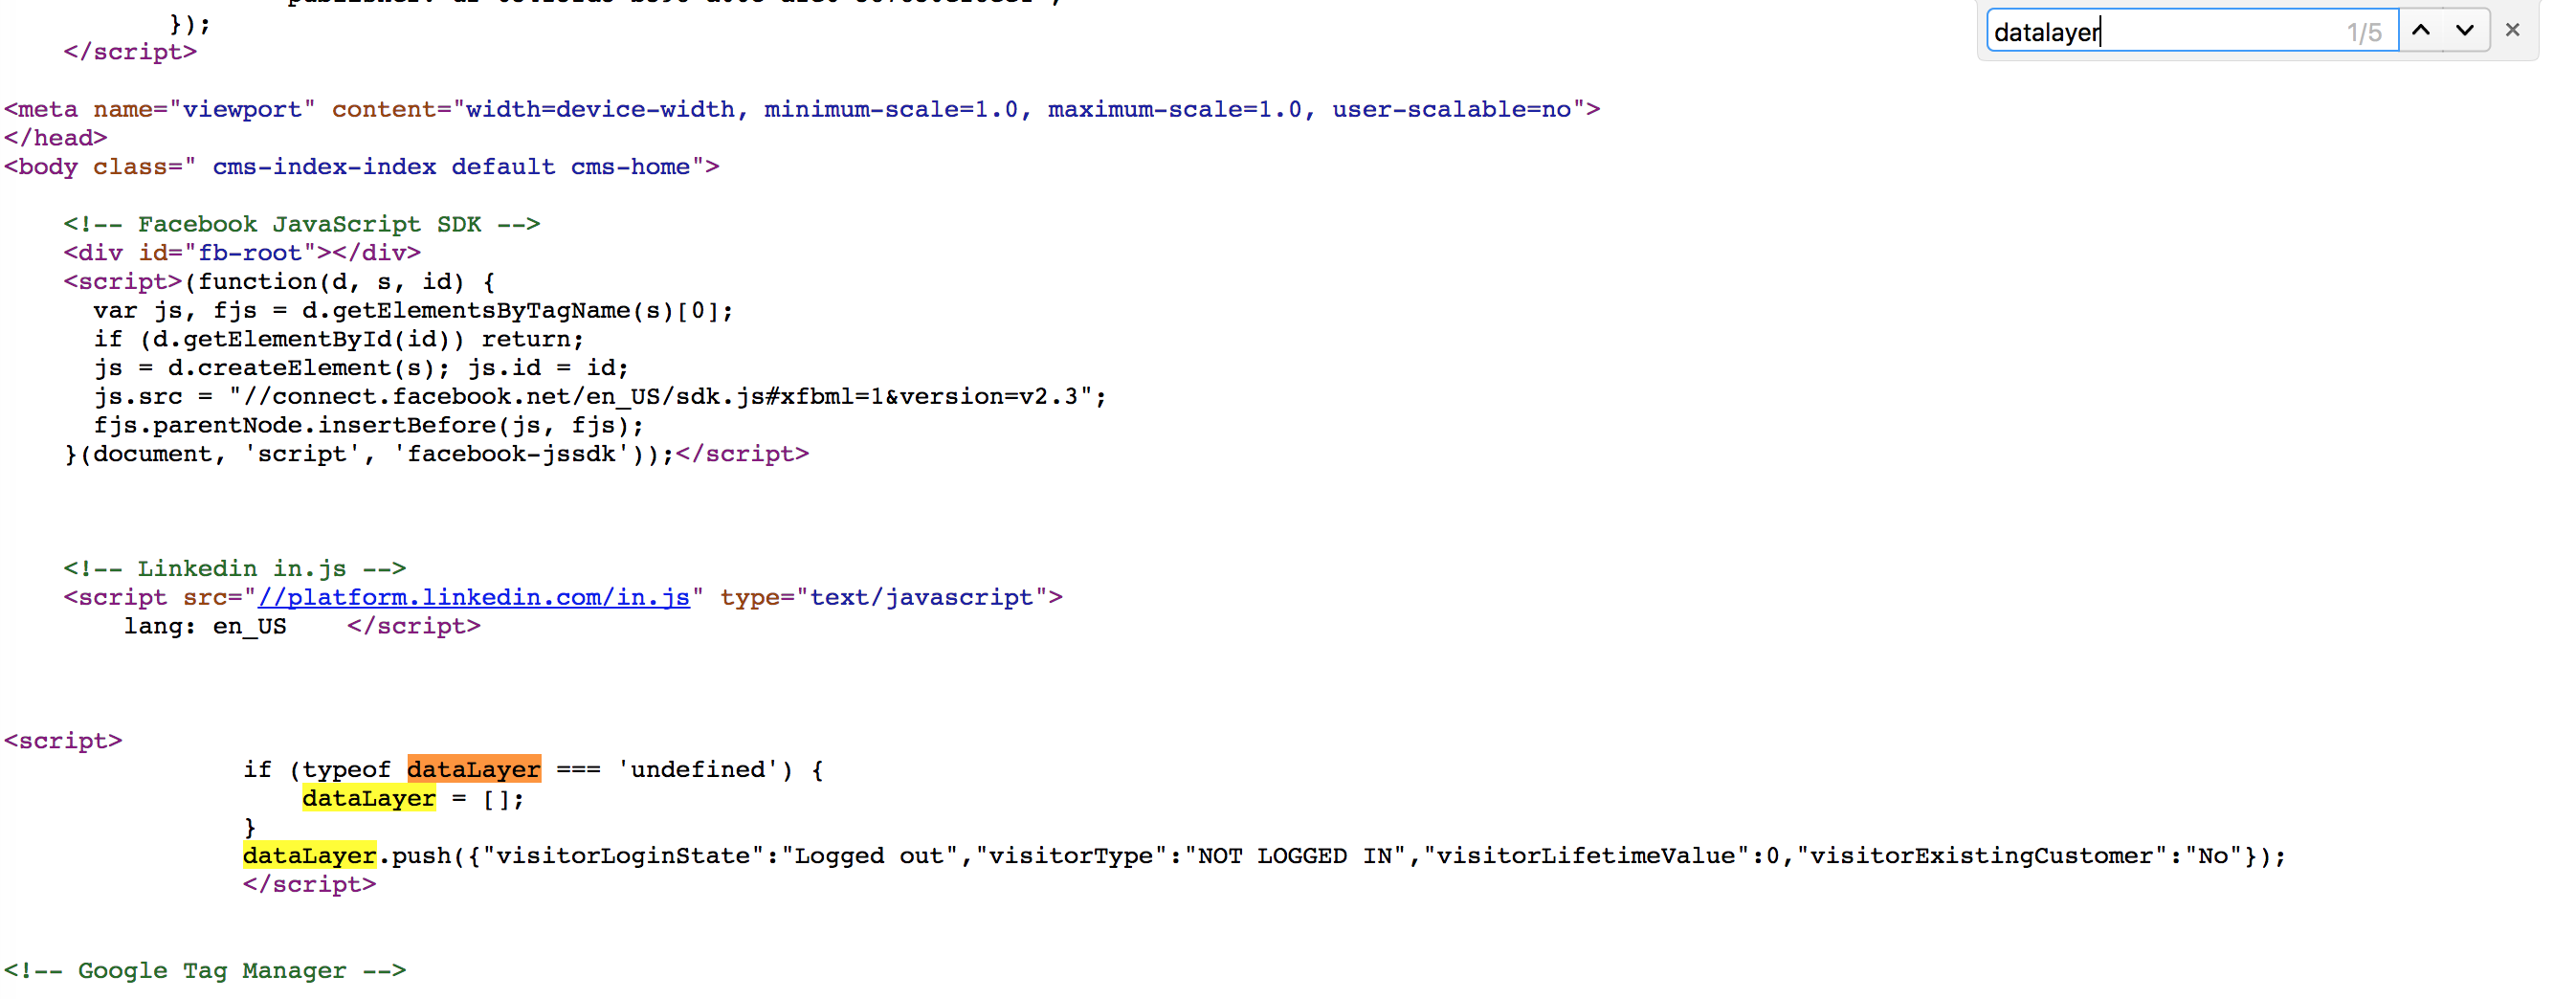
As you can see in this screenshot, I have the dataLayer installed and on the last line I see dataLayer.push which has my visitor logged in status. From my experience this is the out of the box dataLayer in Magento Enterprise so you might see something similar.
Here’s another variation from a different Magento website:
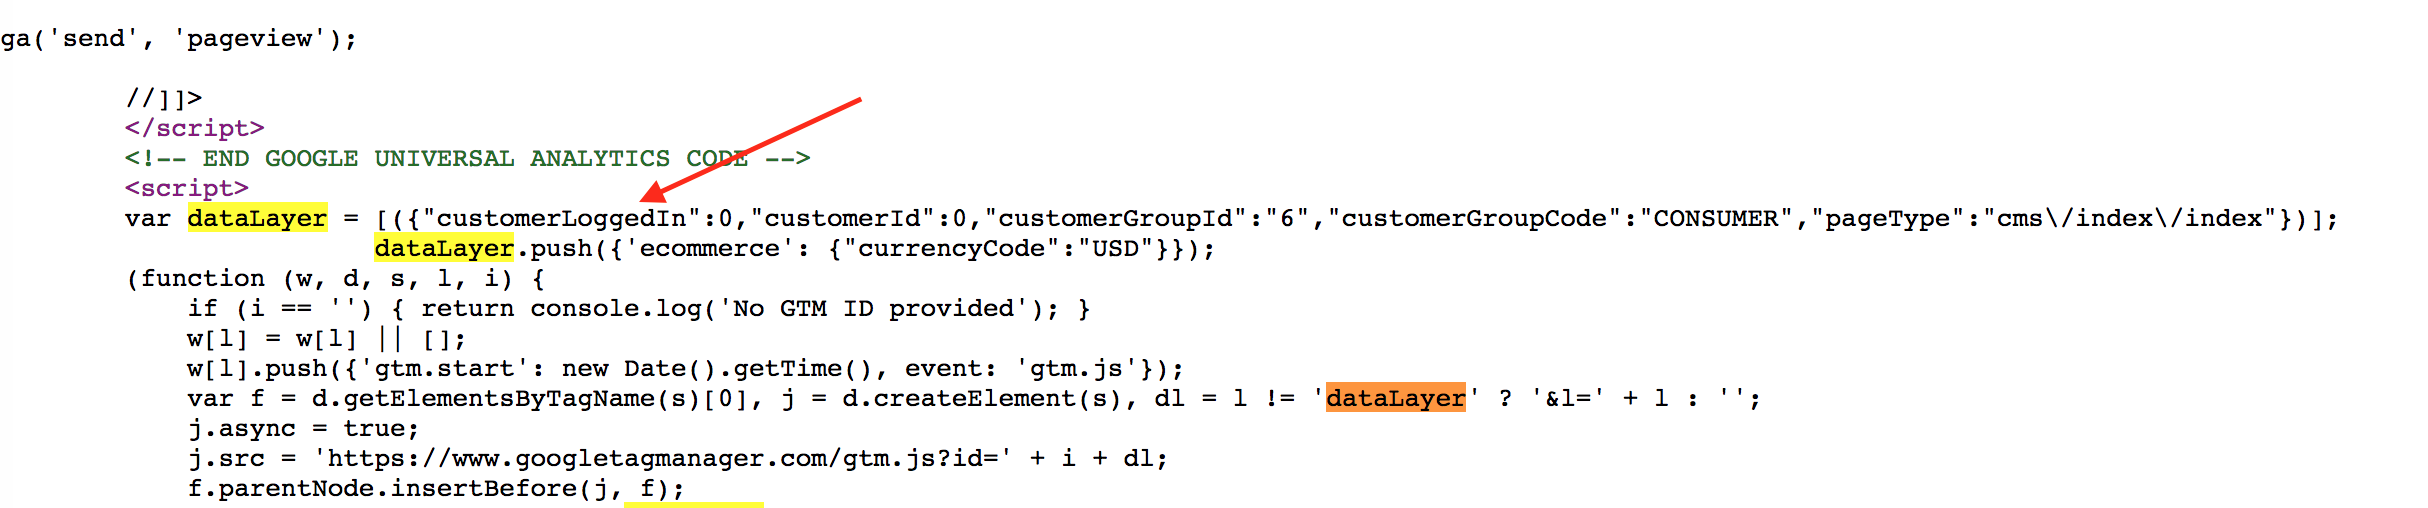
Both examples are pushing the same data – my status of logged out.
Step 2: Create this variable in GTM
Now we’re heading to GTM > Variables > User-Defined Variables > New Variable and creating a Data Layer variable type.
You’ll need to use the name of the variable found in the previous step from our own website. Here’s what mine looks like:
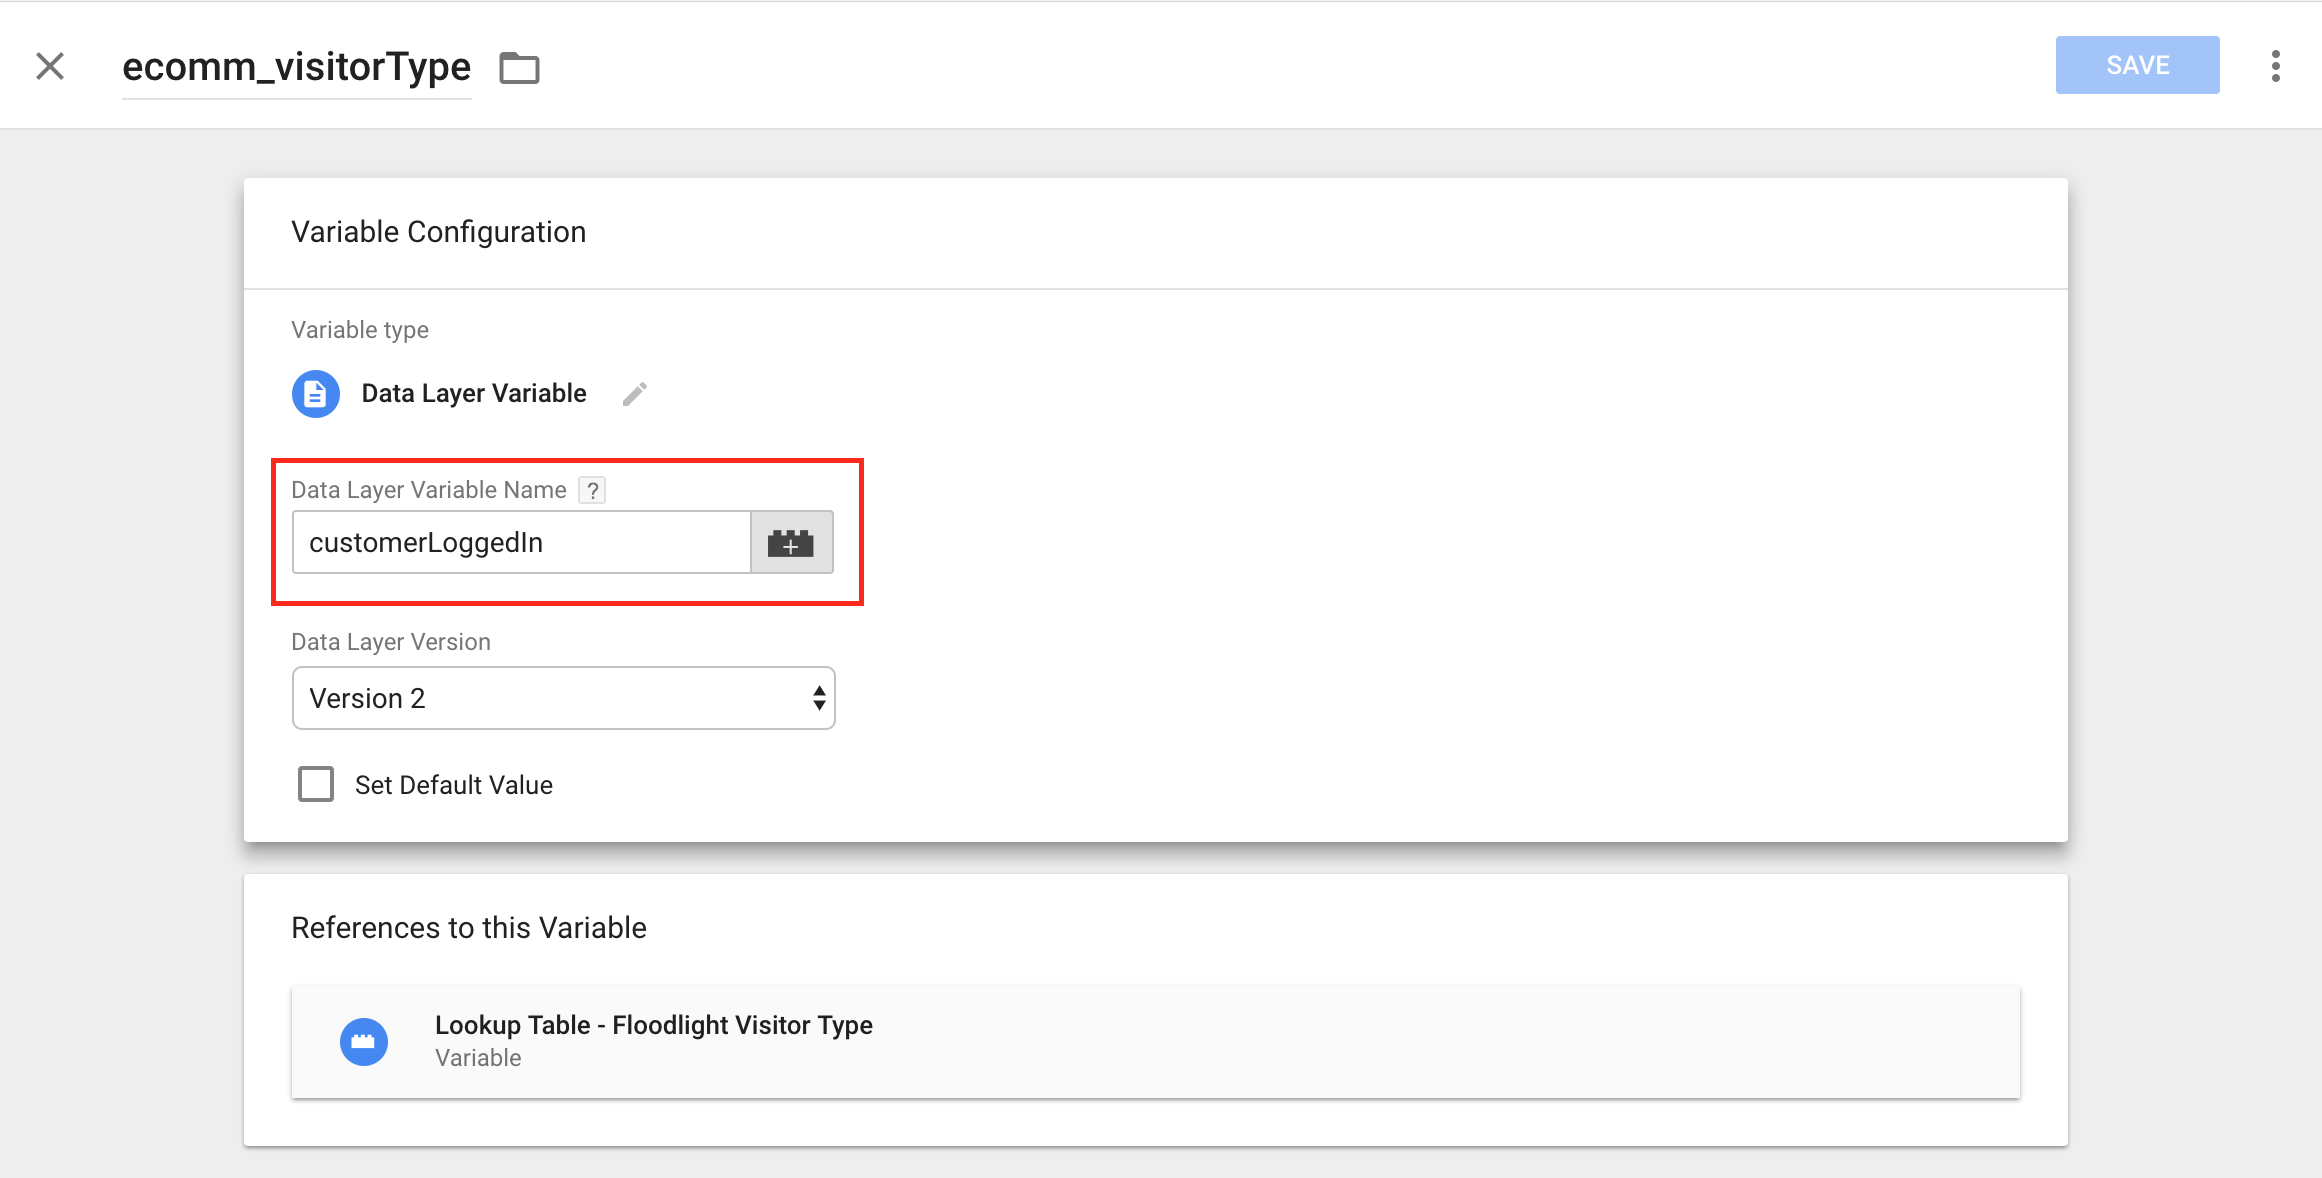
That’s all you need to do in this step!
Step 3: Create lookup table variable in GTM
This is the step that allows you to apply some logic to your variables to match up to your specific marketing tag requirements.
Lookup tables in GTM are really cool and easy to use. Think of it being able to do something like:
“When my logged in variable equals NOT LOGGED IN, then I want to pass the value of 1 in my Doubleclick Counter tag”
In GTM > Variables > User-Defined Variables > New Variable > Create New Lookup Table variable type
Then you’ll need to set the variable you created in Step 2 as the input variable. In the example above this would be {{ecomm_visitorType}}.
Then in the Lookup table, you’ll need to set up your:
- Input values: this is likely only two options. NOT LOGGED IN and LOGGED IN, or whatever your own unique variables are. In step 1 I showed two variations of this, with the 2nd screenshot having a value of “0” for my logged out status. To get both of your logged in and logged out options you’ll need to log in to your website and the view the page source code as shown in step 1.
- Output values: this is where you set “if my variable = NOT LOGGED IN” then I want it to pass the value of 1 in my Doubleclick Counter tag.”
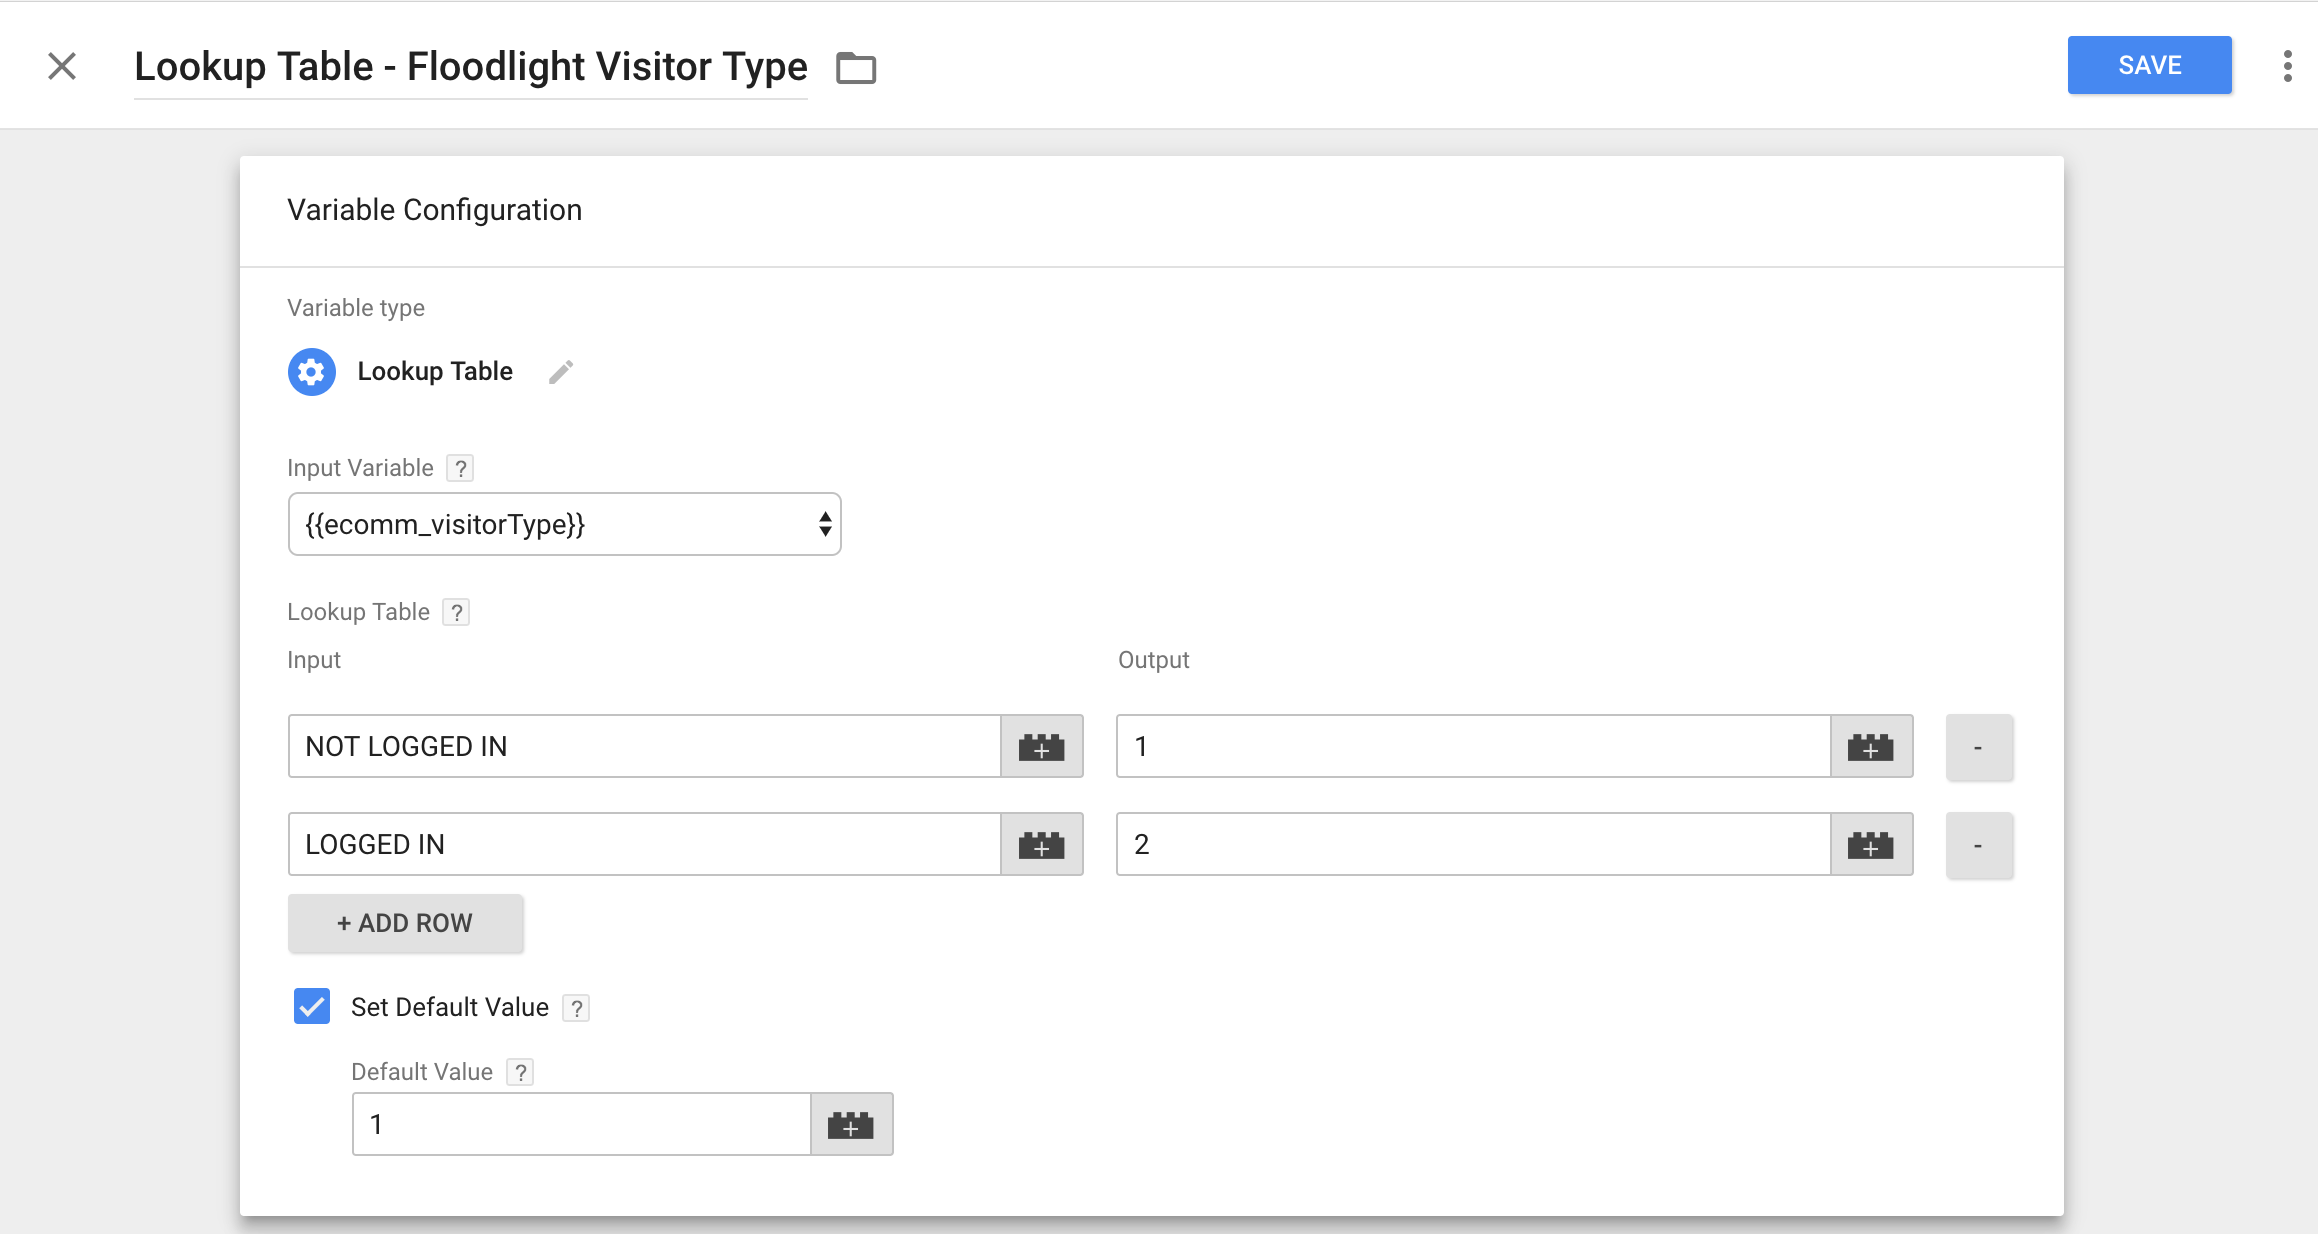
I’m also setting a default value just in case my input variable returns as undefined. If it does, I am defaulting to 1 which is my “not logged in” state.
Step 4: Set variable within marketing tag
The last step – input this variable into your marketing tag. I’m going to use a Doubleclick tag as an example but the process should be the same for other similar tag requirements.
Doubleclick has a built-in tag within GTM and the U1 variable is where I needed to set this logged in state (your U variable is unique to your own setup).
It’s as simple as selecting the lookup table variable you created in Step 3 and you’re done!

That’s it!
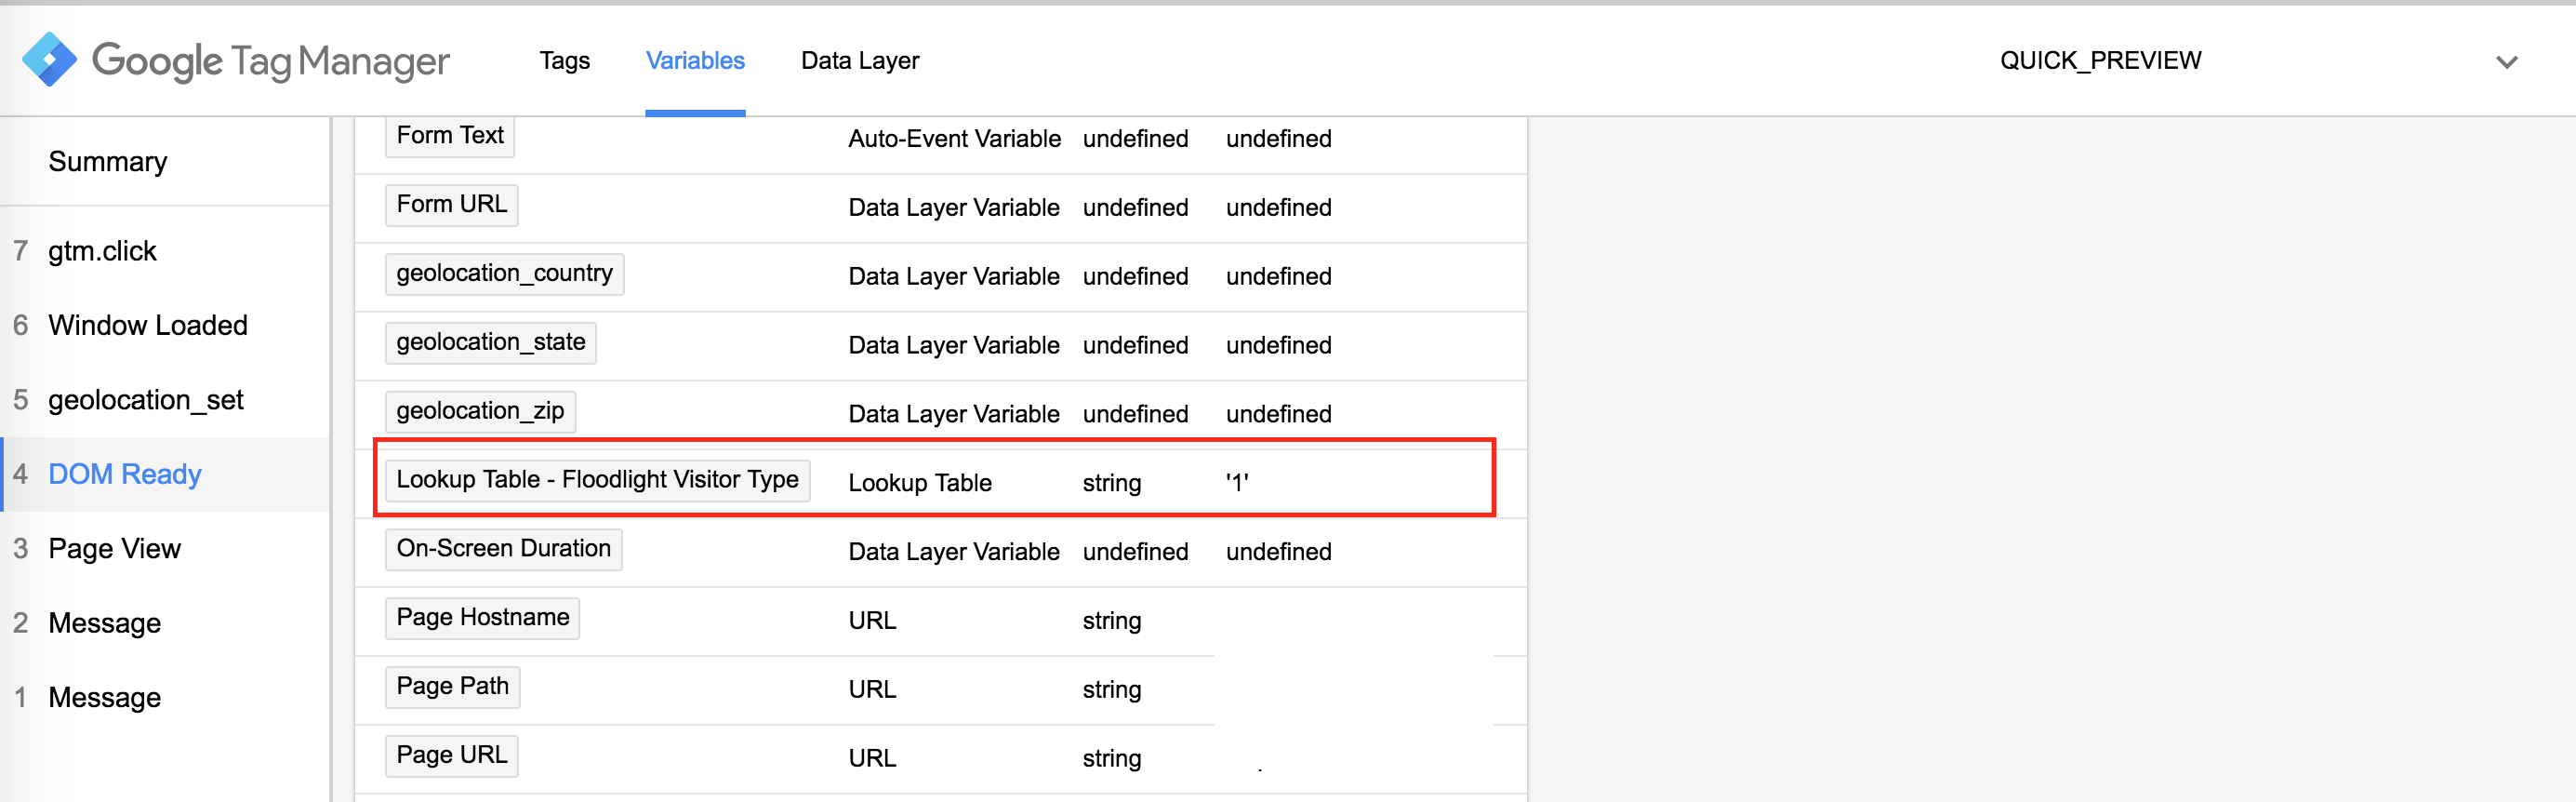
Once you save your new tag, you can put your workspace into preview mode and navigate to your site to verify your variable and tag are passing the proper values:
Happy tagging!


pg slot คืนยอดเสีย คืน ยอด เสีย เดี๋ยวนี้การเล่นเกมอย่างสล็อตนั้นได้ปรับปรุงเข้ามาสู่สมัยออนไลน์อย่างเต็มรูปแบบ ทำให้สามารถเข้าถึงกรุ๊ปนักเสี่ยงโชคมือใหม่ได้มากขึ้น pg slot คืนยอดเสีย ถึงได้ง่าย PG SLOT