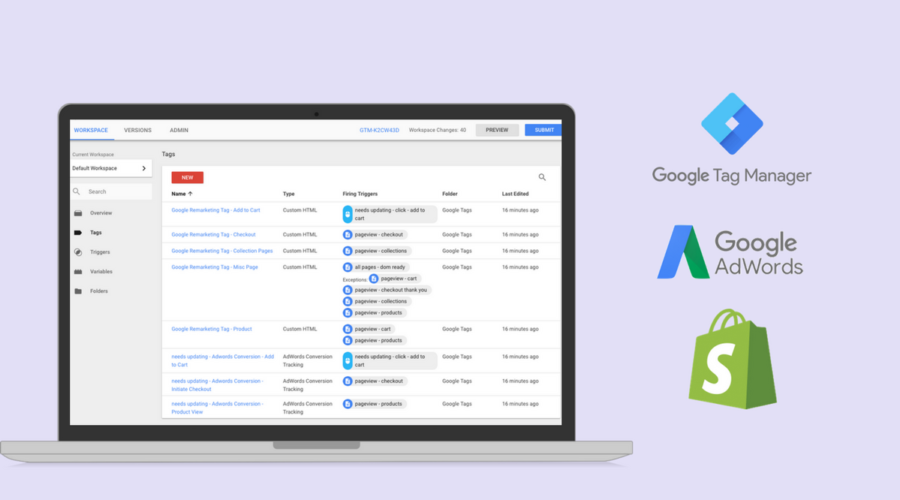
Shopify Marketing Analytics – Complete How-To Guide
This Shopify specific guide is continually updated with our best practices for common marketing analytics services like Adwords and Facebook.
Brad Redding
Brad Redding is the Founder & CEO of Elevar. Specializing in analytics, tracking, GTM, and conversion optimization.
last updated 7/13/2018
Keeping up to date with all the changing requirements of marketing pixels, tags, tracking, etc can be overwhelming!
This is the process that I personally follow in the majority of marketing analytics audits or implementations for Shopify stores. This is constantly updated so be sure to bookmark and visit if you’re curious if anything has changed!
I’m happy to make edits to this if you have suggestions or you find inaccuracies. I’m not perfect..and I may be missing something that doesn’t work for some stores.
Here are the steps:
- Download GTM Container
- Install GTM on Shopify
- Create AdWords Conversions
- Configure Dynamic Remarketing Data
- Setup Facebook Conversion Tracking
- Google Analytics Property Settings
- Google Analytics View Settings
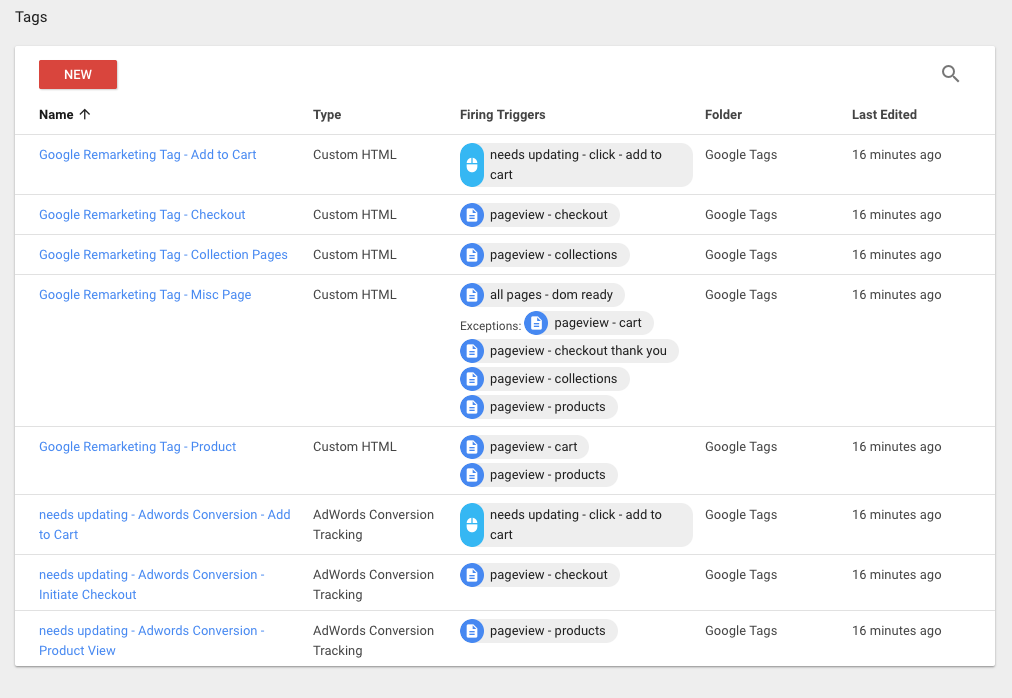
Step 1: Download/Setup Tags, Triggers, and Variables
Here is what this contains:
- (5) Tags for Remarketing Events*
- (3) Tags for Google AdWords conversion events
- (8) custom variables to be used in these tags
- (7) custom variables from the thank you page that contains order level data to be used in other conversion tracking (as needed)
If you already have Google Tag Manager setup then you might need to carefully select which tags you’d like to use from my container.
* There are two options to push dynamic remarketing data to Adwords shown in Step 4 below. If you decide to go the non-GTM route then you can pause/delete these Remarketing tags in GTM.
To import this container:
- Go to GTM > Your Account > Admin
- Click Import Container
- Choose “Merge” as your Import option
- Review conflicts, if any, that Google shows before finishing import. If you have conflicts then review your existing tags or variables current use.
- Import!
Be sure to select MERGE container, not overwrite!
Once you’ve completed this step or verified you have these already then move on to step 2. Steps 3+ assume you have these basic triggers and variables already available in GTM!
Step 2: Install Google Tag Manager on Shopify
You have two options:
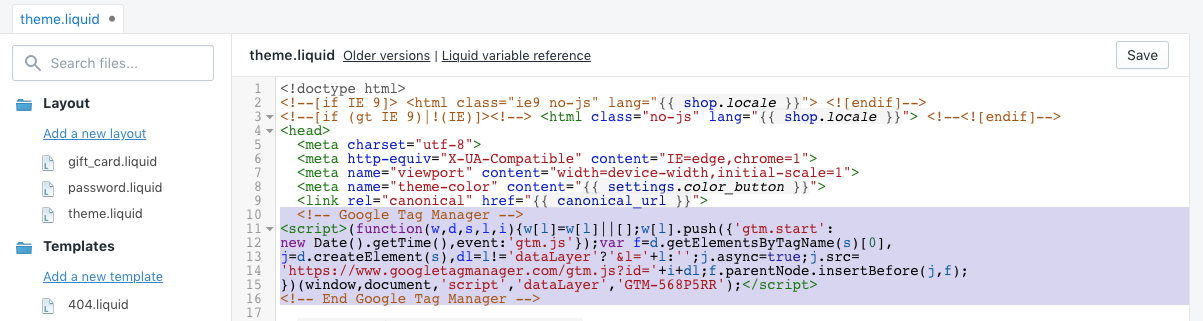
Option a: Via Your Theme
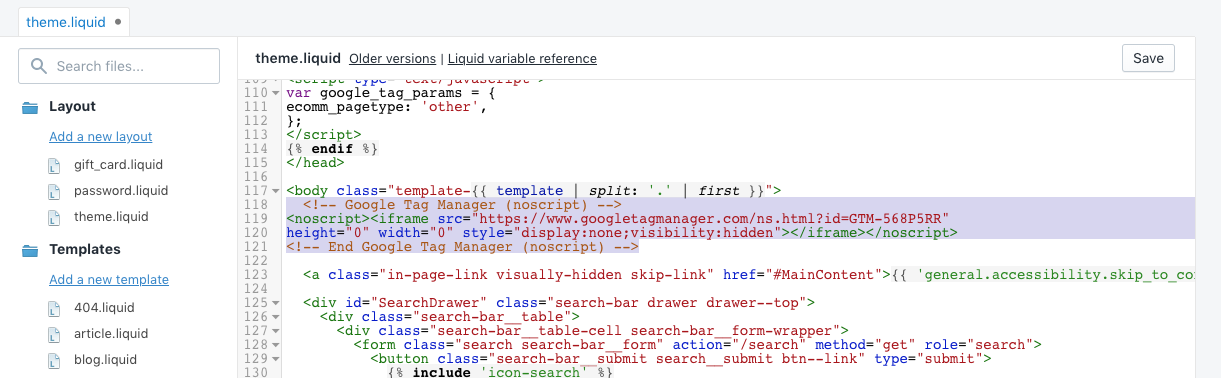
If you’re on Shopify Plus and you have access to your checkout theme file then this step will work fine for you. You’ll just need to (or have your developers) insert your GTM snippet at the top of your theme.liquid (or similar)and your checkout liquid template:
And then the <noscript> version can go here:
Option b: Via the Google Analytics Additional Javascript
This is the easy setup that works when wanting to have GTM on checkout pages within non Shopify Plus stores. You just copy your GTM snippet without the opening and closing <script> tags here:
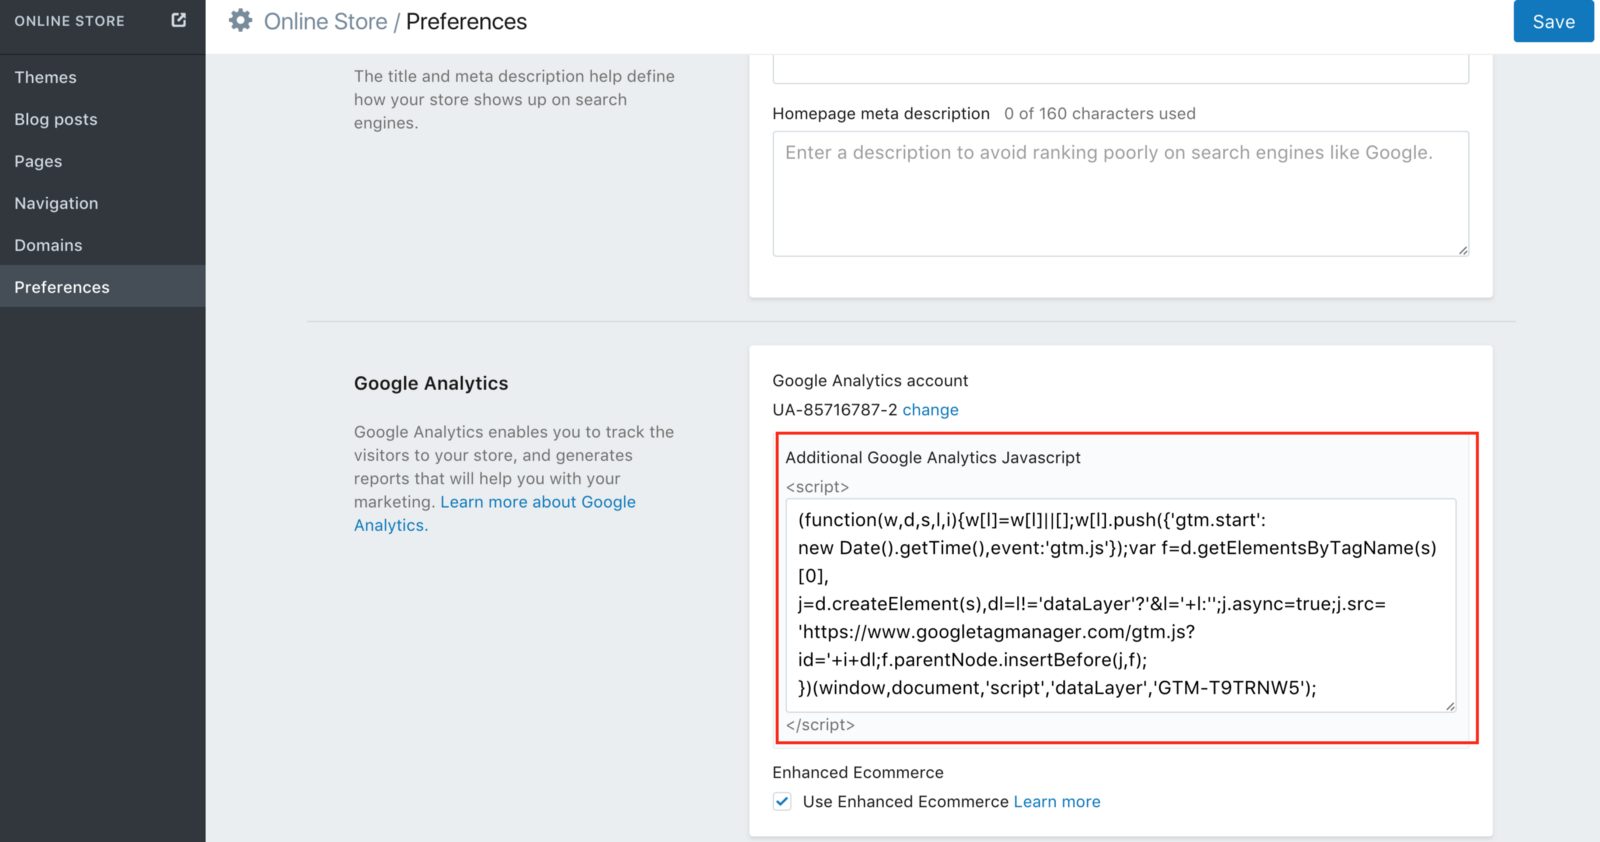
That’s it; you’ll then have tracking across all pages. You can see my full how to install Shopify & GTM installation here.
Step 3: Setup Google AdWords Conversions
This requires a few steps:
- Create (4) conversions in Google AdWords
- Setup conversion script in Shopify admin
Create conversions in AdWords
It’s a good idea to set up conversions to track key actions like viewing products, adding to cart, or viewing checkout. This will allow you to dig deeper into your campaign performance besides relying solely on transactions only.
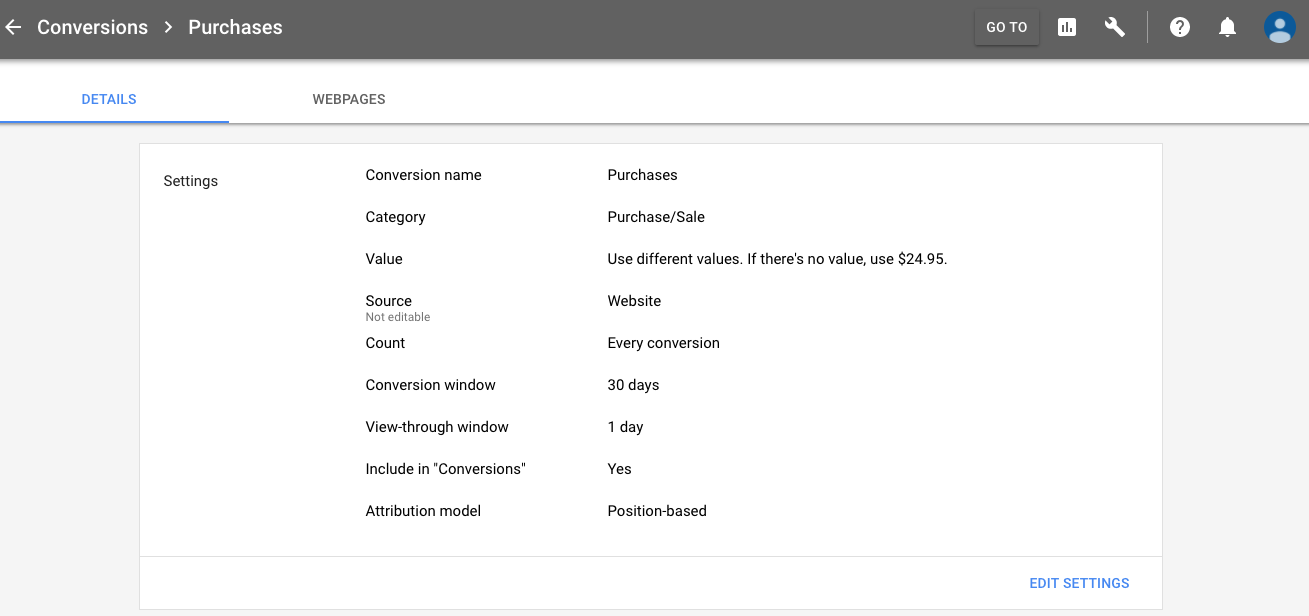
Inside of Adwords (the new version) click on the wrench icon in the top navigation and go to Conversions:
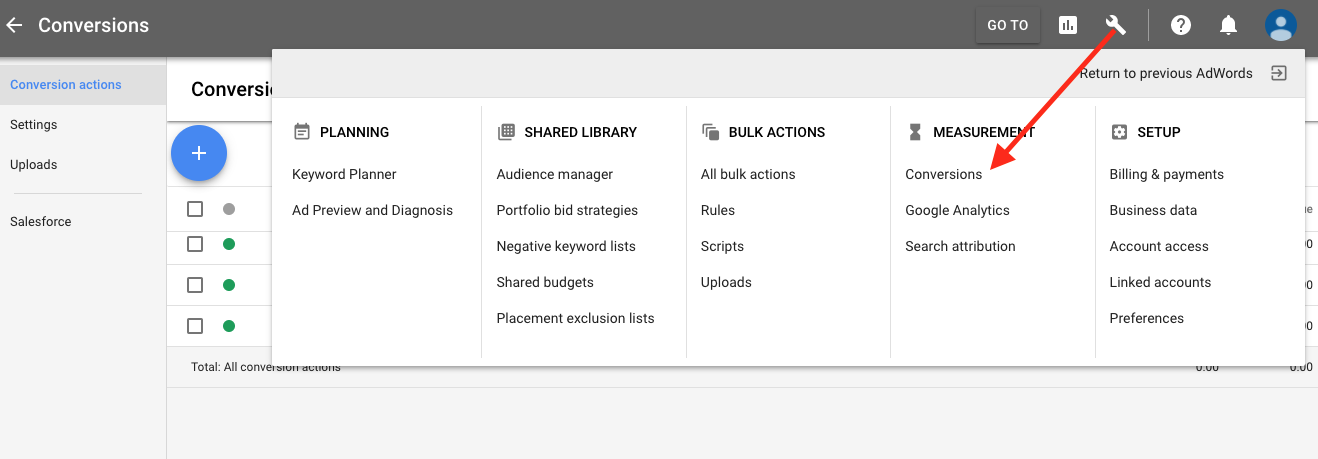
Then create a new conversion. We’ll use an example of viewing a product page:
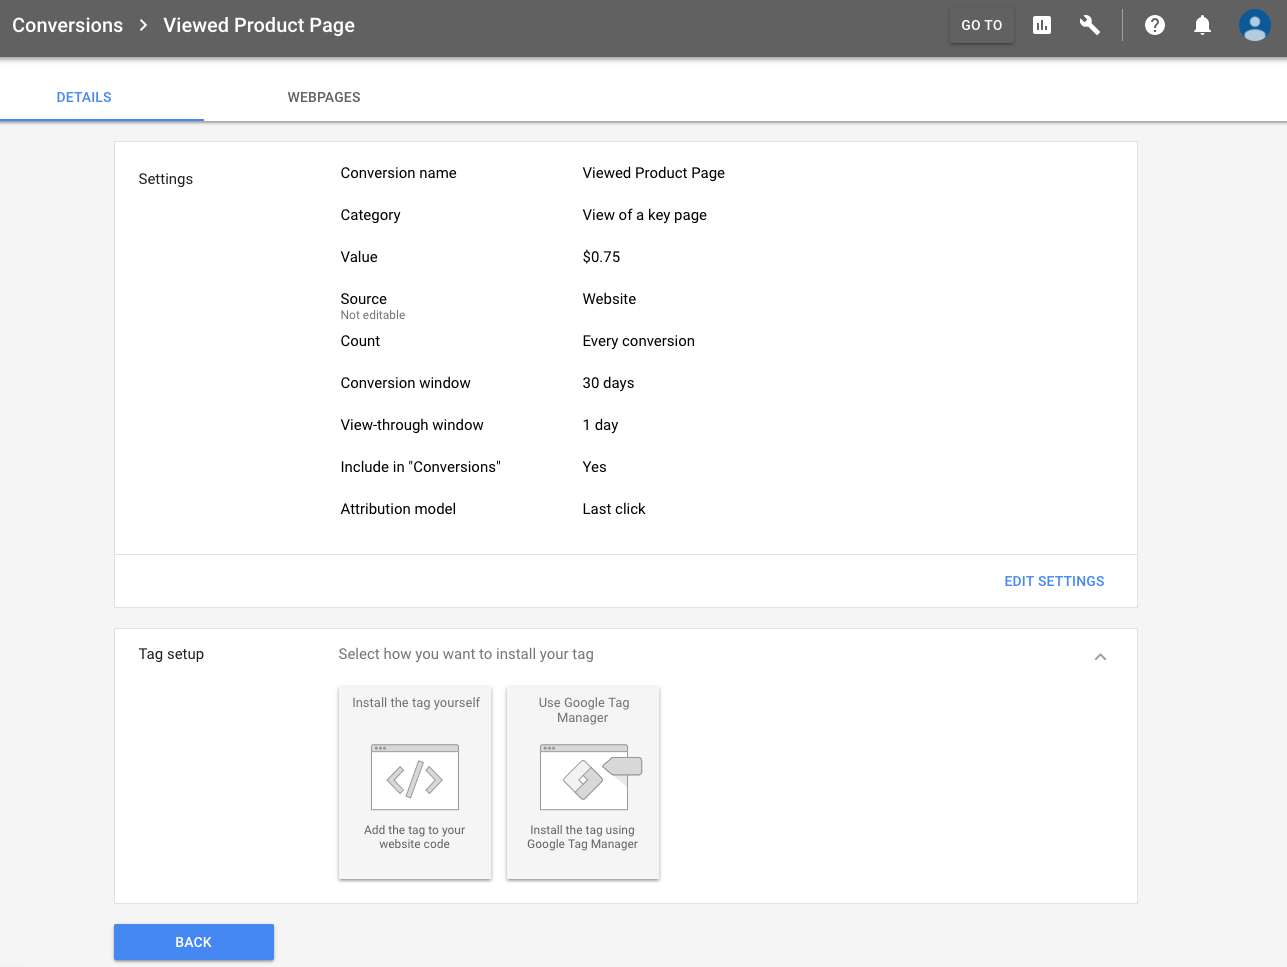
The settings above will likely be unique to your business.
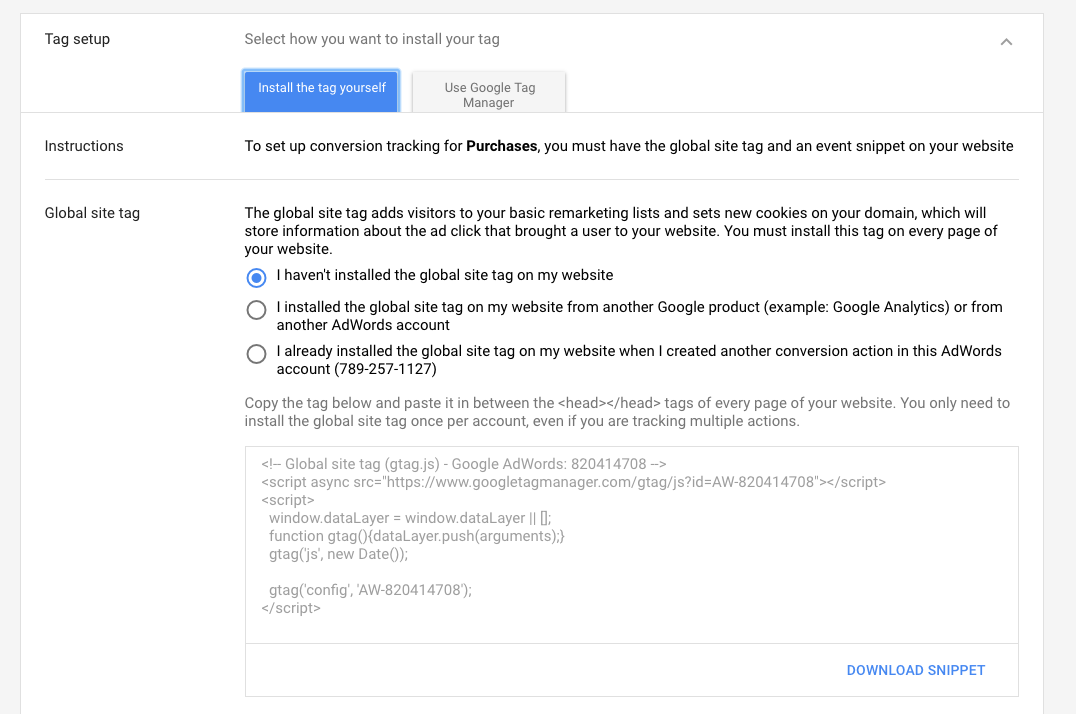
Once you’re done then click the Use GTM option which will give you your conversion ID and Label:
![]()
And then head on over to GTM and update your Adwords Conversion Tag with your ID, label, and verify you have the proper trigger assigned (which it should already be set up for you):
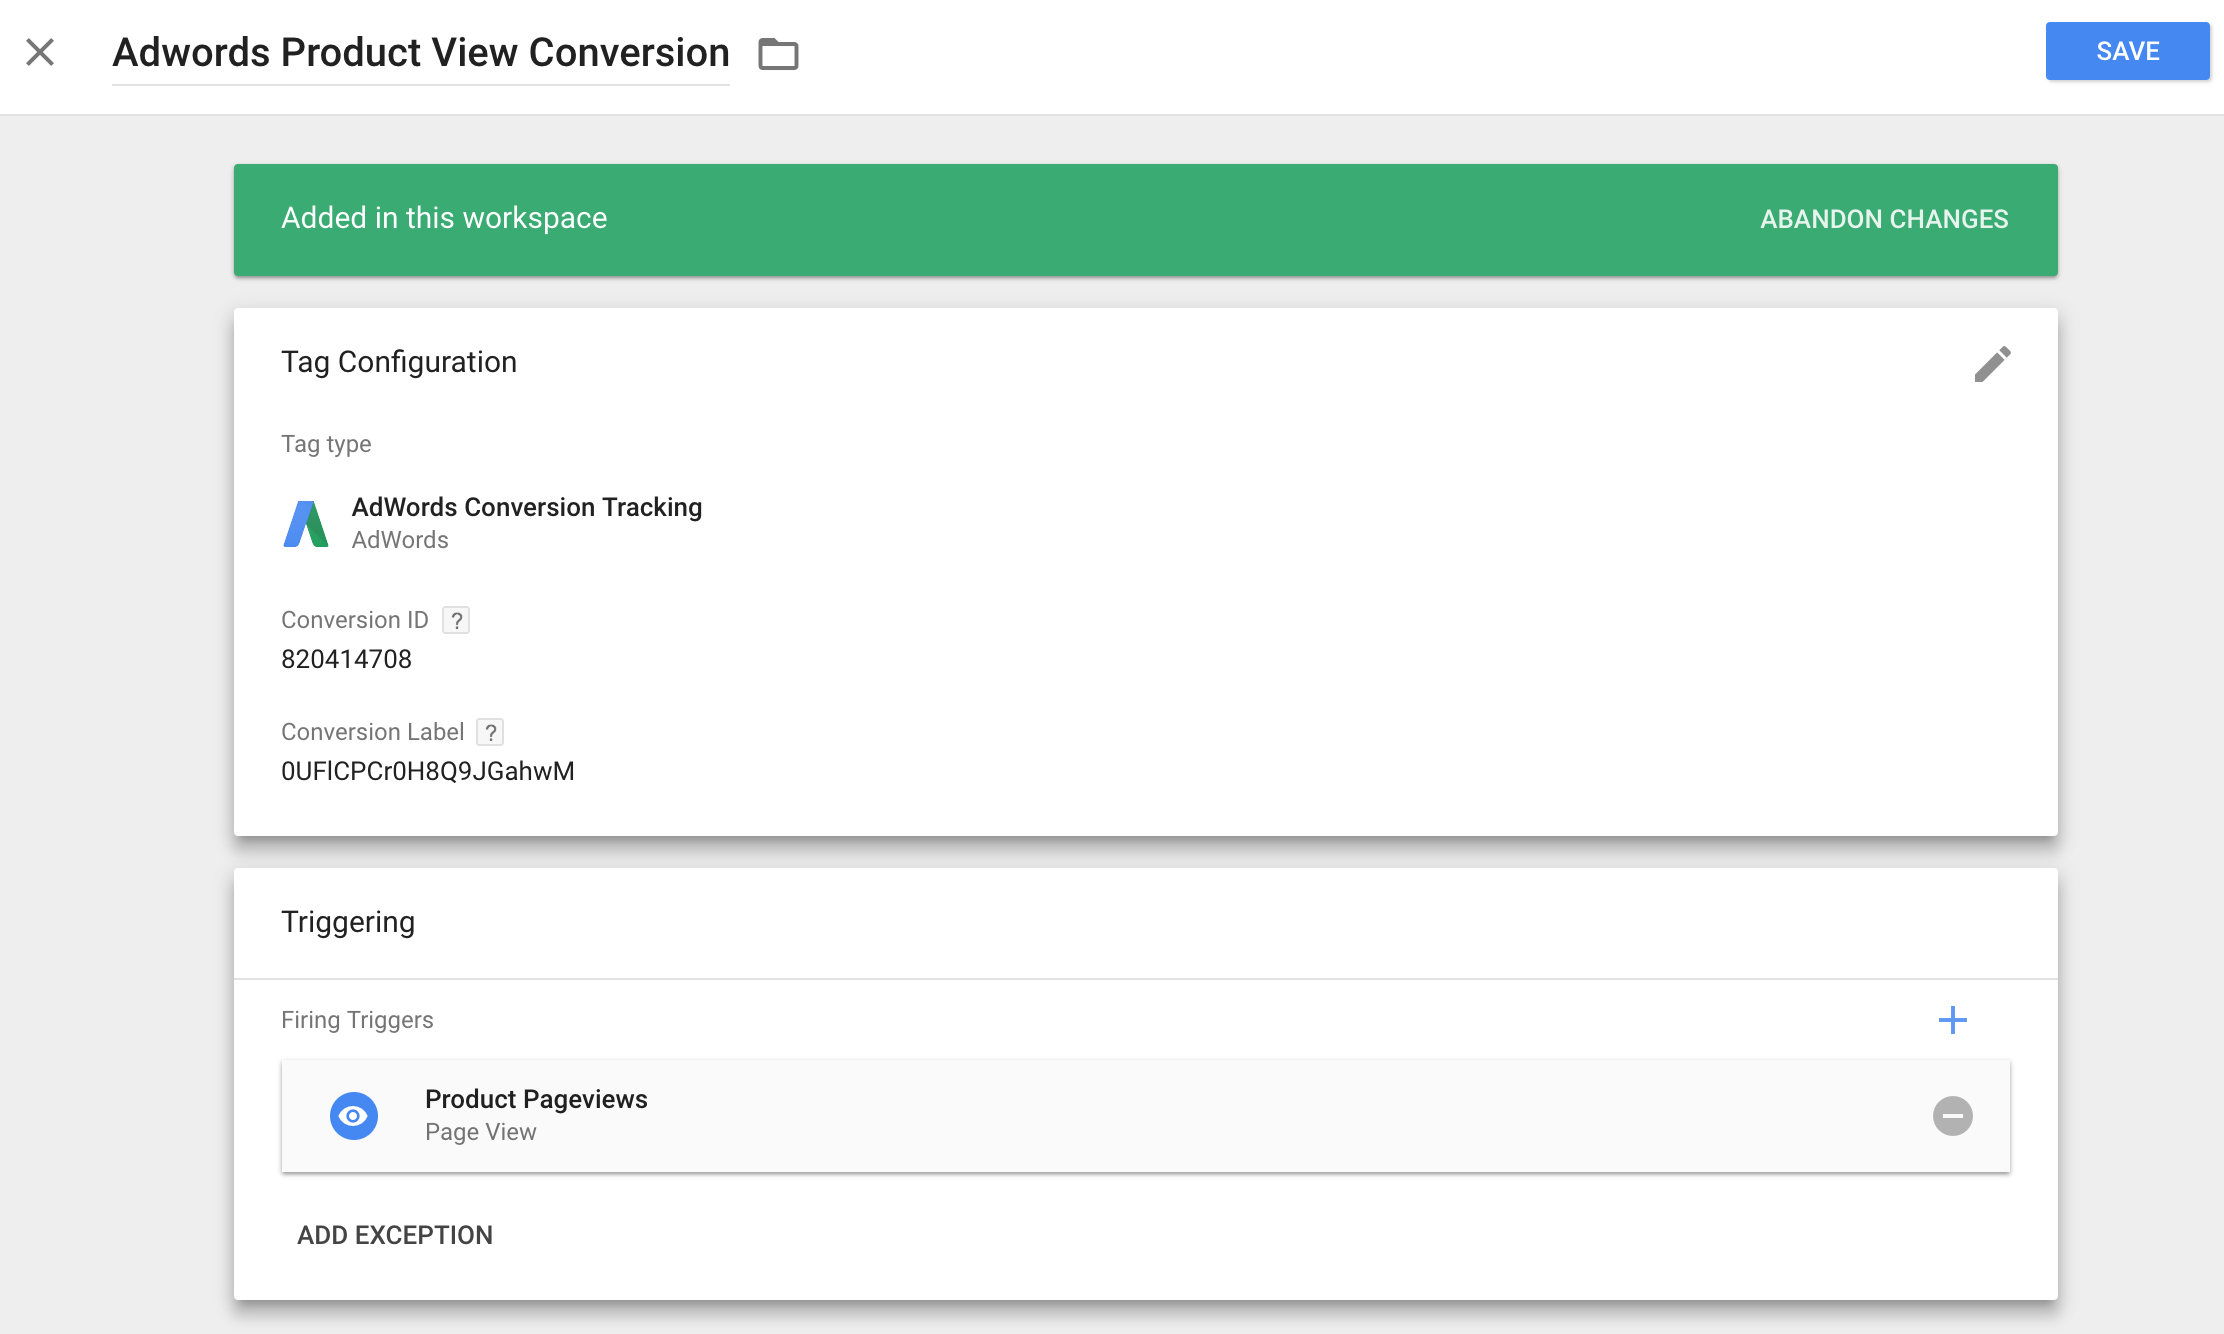
Repeat this step for Add to Cart and Initiate Checkout views.
Setup AdWords conversion script in Shopify admin
Call me paranoid, but I still prefer to set Adwords conversion tracking within the Shopify admin. There is less of a chance this configuration is going to break so it gives me peace of mind! But in theory you can set this up via GTM as well (I show how to setup conversion tracking via gtm here).
In Adwords, create a new conversion purchase event (or view an existing):
And grab each version of your tag requirements as shown below.
Global gtag.js:
Event snippet:
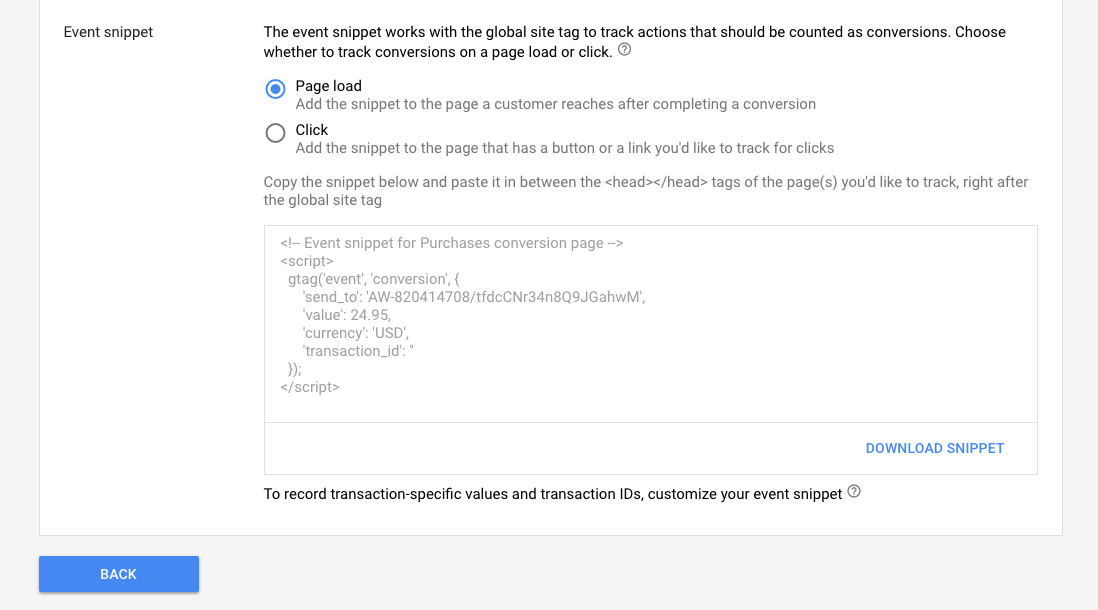
Copy these two scripts into their own file (maybe you’re using a text editor?), and then replace the items in bold to match your own unique variables:
{% if first_time_accessed %}

<!-- Global site tag (gtag.js) - Google AdWords: 123456789 -->
<script async src="https://www.googletagmanager.com/gtag/js?id=AW-123456789"></script>
<script>
 window.dataLayer = window.dataLayer || [];
 function gtag(){dataLayer.push(arguments);}
 gtag('js', new Date());

gtag('config', 'AW-123456789');
</script>

<!-- Event snippet for Google Adwords Purchase Conversion conversion page -->
<script>
 gtag('event', 'conversion', {
 'send_to': 'AW-123456789/z3o0CM_I4WkQ38PLvQM',
 'value': {{ total_price | money_without_currency | remove: ',' }},
 'currency': 'USD',
 'transaction_id': '{{order.order_number}}'
 });
</script>

{% endif %}
And then copy this into your additional scripts setting for checkout pages:
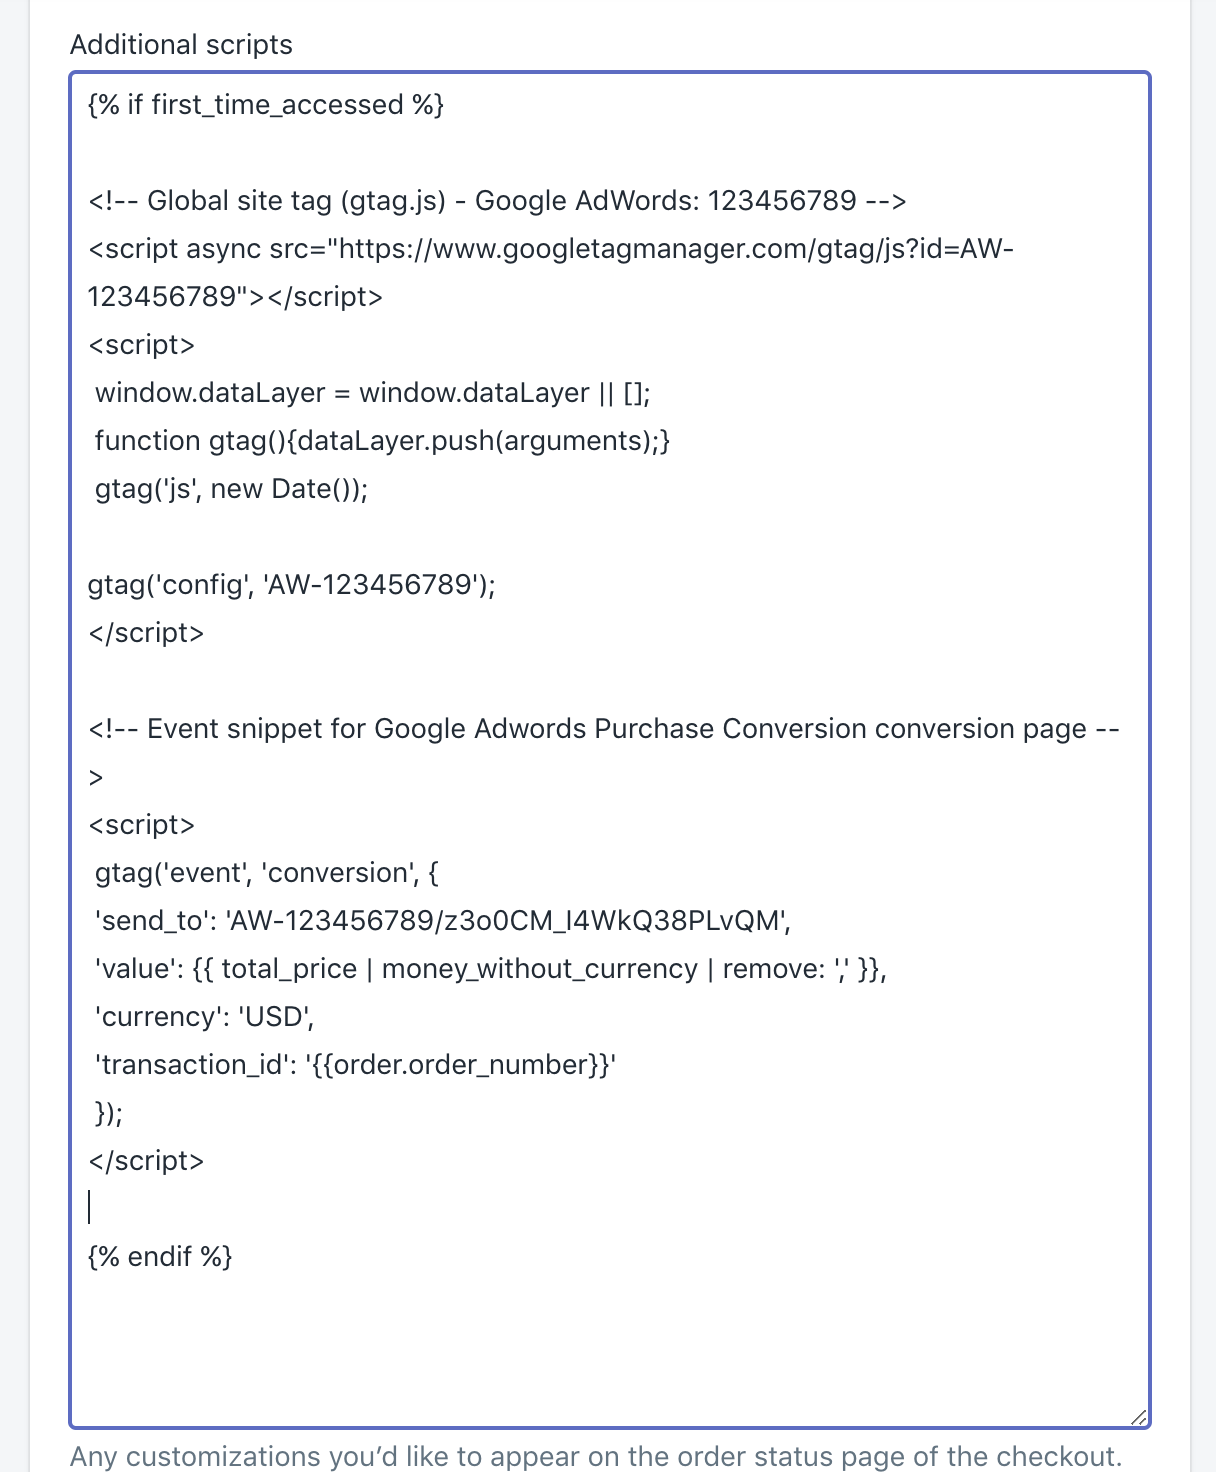
That’s it!
You now have 4 custom conversions setup for Google AdWords.
Step 4: Configure Dynamic Product Remarketing Data
This is usually where things can get very confusing for people! There are a few preconditions for this to “work” they way you expect (where customers see display campaigns with products they viewed, etc).
- You need a Google Merchant account with a valid product feed
- You need a campaign in AdWords where you create dynamic remarketing ads based on your product feed
- You need to associate your customer behavior to key onpage events like viewing product, cart, etc (this is what I’m showing how to do!)
- The ecomm_prodid that is sent to AdWords in step 3 needs to match the product ID of your product feed from step 1
I’m going to show step 3 – how to push key onsite parameters for retail audiences from your website to AdWords.
There are two options:
- Implement within your theme (e.g. theme.liquid or similar file that covers every page of your site)
- Implement via GTM
Option 1: How to implement within your theme:
- Modify the bold items in the snippet below to match your own Adwords IDs
- Implement into your theme.liquid file, preferably at the bottom of your <head> section
Very important: every website is different. I can’t promise this copy/paste will work in your store. It’s also a risk copy and pasting code from a blog (like this!) directly into your theme. If you have a developer, vet with them first. If you have questions please leave a comment below and I’ll help as best I can.
<!-- Global site tag (gtag.js) - AdWords: -->
<script async src="https://www.googletagmanager.com/gtag/js?id=AW-xxxxxxx"></script>
<script>
 window.dataLayer = window.dataLayer || [];
 function gtag(){dataLayer.push(arguments);}
 gtag('js', new Date());

gtag('config', 'AW-xxxxxxx');
</script>
{% if template contains 'index' %}
<script>
 gtag('event', 'page_view', {
 'send_to': 'AW-xxxxxxx',
 'ecomm_pagetype': ‘home’
 });
</script>
{% elsif template contains 'collection' %}
<script>
 gtag('event', 'page_view', {
 'send_to': 'AW-xxxxxxx',
 'ecomm_pagetype': 'category'
 });
</script>
{% elsif template contains 'product' %}
<script>
 gtag('event', 'page_view', {
 'send_to': 'AW-xxxxxxx',
 'ecomm_pagetype': 'product',
 'ecomm_prodid': '{{ product.id }}',
 'ecomm_totalvalue': '{{ product.price | money_without_currency | remove: ',' }}'
 });
</script>
{% elsif template contains 'cart' %}
<script>
 gtag('event', 'page_view', {
 'send_to': 'AW-xxxxxxx',
 'ecomm_pagetype': 'cart',
 'ecomm_prodid': [{% for item in cart.items %}'{{item.product.id}}'{% unless forloop.last %},{% endunless %}{% endfor %}],
 'ecomm_totalvalue': '{{cart.total_price | money_without_currency | remove: ',' }}'
 });
</script>
{% elsif template contains 'search' %}
<script>
 gtag('event', 'page_view', {
 'send_to': 'AW-xxxxxxx',
 'ecomm_pagetype': 'searchresults'
 });
</script>
{% else %}
<script>
 gtag('event', 'page_view', {
 'send_to': 'AW-xxxxxxx',
 'ecomm_pagetype': 'other'
 });
</script>
{% endif %}
Option 2: Implement via GTM
Google states that you don’t need to deploy the global gtag snippet if you already have Google Tag Manager installed, however in my experience when the gtag.js is not installed separately I have seen large(r) inconsistencies in data.
So for now, I configure these tags together in Google Tag Manager and will cover the entire site except the thank you page since we have that covered in the previous step #3.
Basically what we’re doing here is setting a sitewide gtag.js which is used for data collection to capture remarketing audiences, custom events, custom conversions, etc. And then sending the dynamic remarketing event parameters with the sitewide gtag.js script.
If you downloaded the GTM container in step 2 then you only need to swap out the value in the {{needs updating – adwords id}} variable to allow for testing:

A few important notes:
- Google does not differentiate between “cart” and “checkout” in their instructions so I’ve chosen to send the “cart” event hits on checkout views. My reason for this is I’m already sending an event for add to cart hits and many mini-carts today send users straight to the checkout (bypassing the normal cart page).
- Everything should work in GTM and follow Google’s instructions EXCEPT for cart ids. I’m working on a solution for this and will update the GTM container when completed.
There are additional steps required in Google Analytics that I have outlined in this related guide configuring dynamic remarketing with Shopify. If you’re going GTM route for this then please review this guide.
Step 5: Setup Facebook Conversions and Tracking
Hopefully you don’t need to do anything outside of the default FB pixel setup within the Shopify Admin:
![]()
This setup will automatically track the following events by default:
- View Content (category and product pages)
- Add to Cart
- Initiate Checkout
- AddPaymentInfo
- Purchase
- Search
Then you’ll want to connect a catalog to Facebook so you can take advantage of dynamic product remarketing as well.
One potential problem is when it comes to matching up the product content to the product catalog you associate in Facebook. If you’re using the FB pixel helper and see this content warning:

..then you might be experiencing this issue. The content_ids aka product IDs that are being pulled into this are your internal Shopify product IDs, not your own SKUs, barcode/UPC, or other custom IDs. So if you’re uploading a catalog to Facebook (or using your Google Shopping feed) and the id’s for these products are using anything besides the Shopify ID then you will likely get this mismatch warning.
If you’re using a feed for Google Shopping I don’t recommend changing the id’s to be your Shopify id’s for Google and Facebook at risk of losing out on mashing data from different sources to product profit reports by SKU.
So how do you fix this?
- You can go the route of recreating the Facebook pixel and event tracking in GTM
- Create/update your Facebook catalog to include ids that match your Shopify product IDs. If you’re using the native Shopify Facebook channel connection and/or apps like this then this should be automated for you.
Step 6: Audit Google Analytics Property Settings
In Google Analytics, “Properties” are where the unique UA-###### is assigned.
In this quick review, I’m looking for the following:
- Are demographic and interest reports enabled
- Is Search Console connected
- Do you have proper referral exclusion URLs defined so you don’t lose out on marketing or campaign attribution
- Are at least a few dynamic audiences created (for use in AdWords)
- Are the proper dynamic remarketing attributes created
There are other settings like UserID, etc, but these are a bit more advanced.
Search Console:
If this is not configured then this leads me down the path of ensuring Google Search Console is setup properly for your organic search analytics (very important!).
Referral Exclusion URLs:
At the minimum you should have:
- your own domain (e.g. ‘.getelevar.com’)
- checkout.shopify.com
- paypal.com
And then if you have any additional custom payment methods (like Affirm) then I’d set these up there as well. You want to see transaction data attributed (both in assists and last click) back to your true marketing sources so you can make more informed marketing decisions.
Dynamic Audiences:
This is where you can use Google Analytics data to create custom audiences in your AdWords account.
This will be unique per client but the basics should cover:
- New Users – 7 Days (to remarket to “hot” visits)
- New Users, > 1 Session – 30 Days (to remarket to engaged visits)
- Users who Added to Cart, $0 Revenue – 30 Days (to remarket to cart abandoners)
- Users who Viewed Product, $0 Revenue – 30 Days (to remarket to product viewers)
- Users with Revenue > $0 – 365 days (to remarketing to existing customers)
There are so many possibilities here, but these cover large macro audience groups.
Dynamic Remarketing Attributes:
If you are implementing dynamic remarketing via Google Tag Manager (as shown earlier in this article) then this is a required option that is two steps:
- Create custom dimensions for each ecomm retail attribute (shown on left side of image below)
- Map these custom dimensions to the dynamic retail attributes shown on right side of image
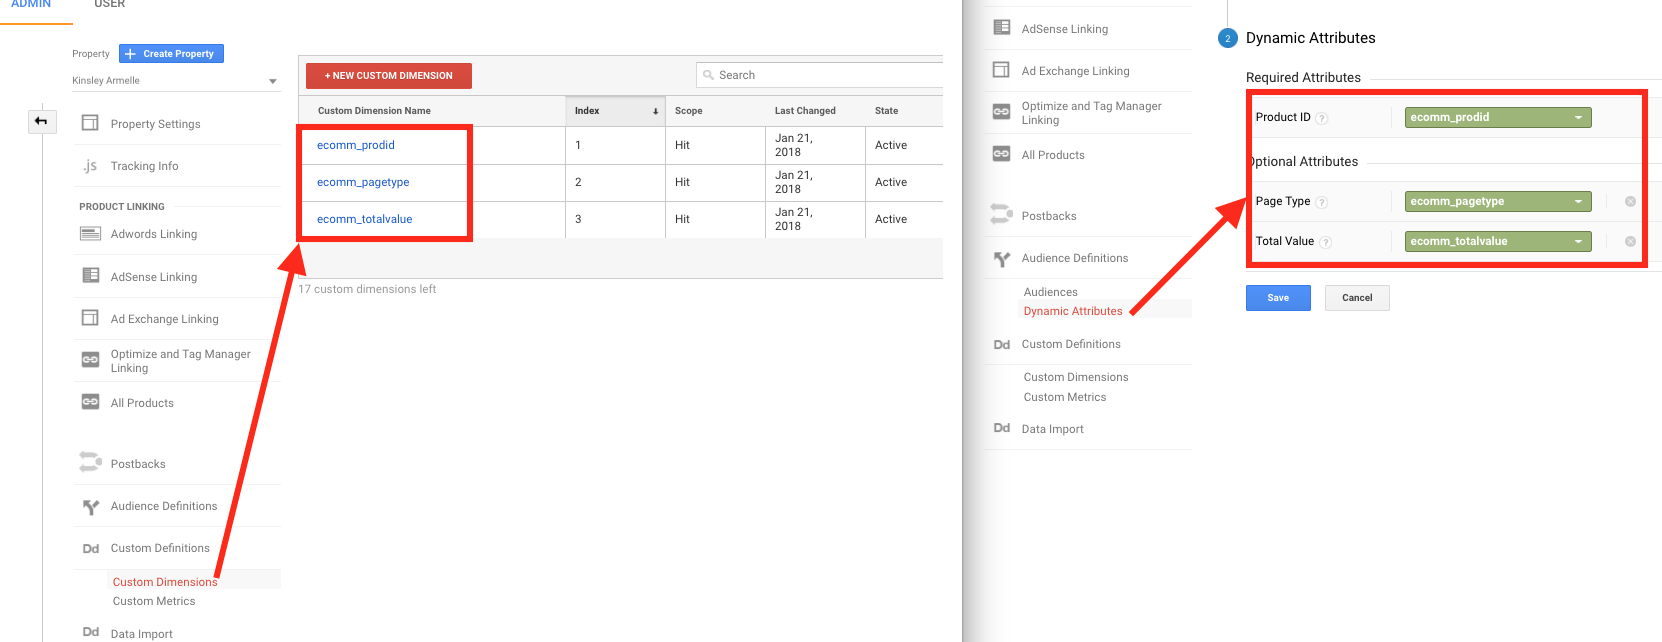
If these are not set then I’ll usually review AdWords audience sources to see if the ecomm data is being pushed through other means.
Click here to view a more detailed walk through of property settings as part of my Google Analytics Audit for Shopify stores.
Step 7: Audit Google Analytics View Settings
The Basics
In a similar process as property settings, I will double check a few common settings:
- Is there a single view only or more than one? At the minimum I look for filtered, test, and a raw data view.
- In the Exclude URL query parameters: if this is empty then I’ll expect to get quite a bit of dirty page data even if just from utm parameters at the end of URLs.
- Is bot filtering enabled
- Is Adwords connected to the main filtered view
- Is site search tracking setup
- Are add to cart, viewed product, checkout started, checkout completed goals created (at the minimum)?
- Is Enhanced eCommerce reporting enabled
Custom Filters
This is another section that is subjective however I’m usually looking for the following:
- Internal IP filters
- Lowercase filters on medium, source, campaign, campaign content (for data cleanliness)
- Include hostname filters for your own store (to prevent spam data)
There are a handful of others that I also outline in my Google Analytics foundation previously linked in previous step but these are the big ones.
“Other” Traffic / Default Channel Grouping
Inside of GA > Acquisition > All Traffic > Channels, do you see a large amount of (Other) traffic? If so then this is likely traffic that is tagged with utm parameters that Google isn’t automatically bucketing into predefined channels.
You can control this within your view settings by editing or creating new channel groupings.
For example, you might want to break up:
Paid Social Prospecting vs Paid Social Retargeting or just Paid Social from Organic Social.
There is typically one rule that rules all stores – don’t leave the default settings “as is”. You can read more on the “why” this is important in my marketing attribution 101 guide.
That’s it (for now). Leave comments below if you have any questions!
If you received this guide from a friend please sign up for our email to receive more guides like this!

Hello Brand, thank you for the great post.
I’ve a couple of questions.
Do you consider a good strategy to mix both google tag manager and embedded code to trigger events?
We use Ajax requests extensively and it a bit complicated to get the data from google tag manager only.
The second question is about the tag “Google Remarketing Tag – Checkout”.
In your setup it uses the tag {{ecomm_prodid}} ( window.ShopifyAnalytics.meta.product.variants.0.sku ) which is not available during the checkout, so it results being undefined.
And even if it would be available wouldn’t it consider only the first product in the cart ?
Am I right or I missed something ?
Hi Federico,
Yes, if you’re able to push custom events from your theme to dataLayer/GTM then that is definitely helpful!
Regarding the Checkout tag. You’re correct on both accounts..this was the one tag I noted was not working/setup as it should, I just haven’t had a chance to jump back into this to update! Good catch/thinking. I’ll try and update this one tag soon after additional testing.
Hi Brad,
Any ideas how to access that product/value in the cart via GTM?
Or do I need access to the templates?
Do you have any tutorials for implementing Bing Ads/Microsoft Ads purchase tracking/retargeting? I did download the global tag and installed the json file/container. I’m not sure though if purchases are being tracked. Thanks.
Great blog you have got here.. It’s difficult
to find excellent writing like yours nowadays. I seriously appreciate
individuals like you! Take care!!