Google Analytics Custom Metrics for eCommerce Insights
Amplify your custom event hits from GTM into powerhouse insights in Google Analytics using custom metrics.

I love custom metrics in Google Analytics. 3-4 years ago I hardly used them. Now a day doesn’t go by when I’m not implementing or analyzing a report in search of insights based on custom metrics.
Custom metrics can be applied across every type of business however I’ll focus on eCommerce and how they help us enrich user behavior analysis.
I’ll probably add to this guide over time so bookmark this page to check in :).
Related: If you haven’t read my ultimate content analytics dashboard article yet then check it out. It uses custom metrics, calculated metrics, and fancy GTM tricks!
What are Custom Metrics in Google Analytics?
Custom metrics are like standard metrics in your Google Analytics account however you create them yourself to collect unique interactions with your website that aren’t automatically tracked. Custom metrics are like custom events on steroids (to quote Yehoshua from Analytics Ninja).
Custom metrics enable you to unlock some really great reports like this:
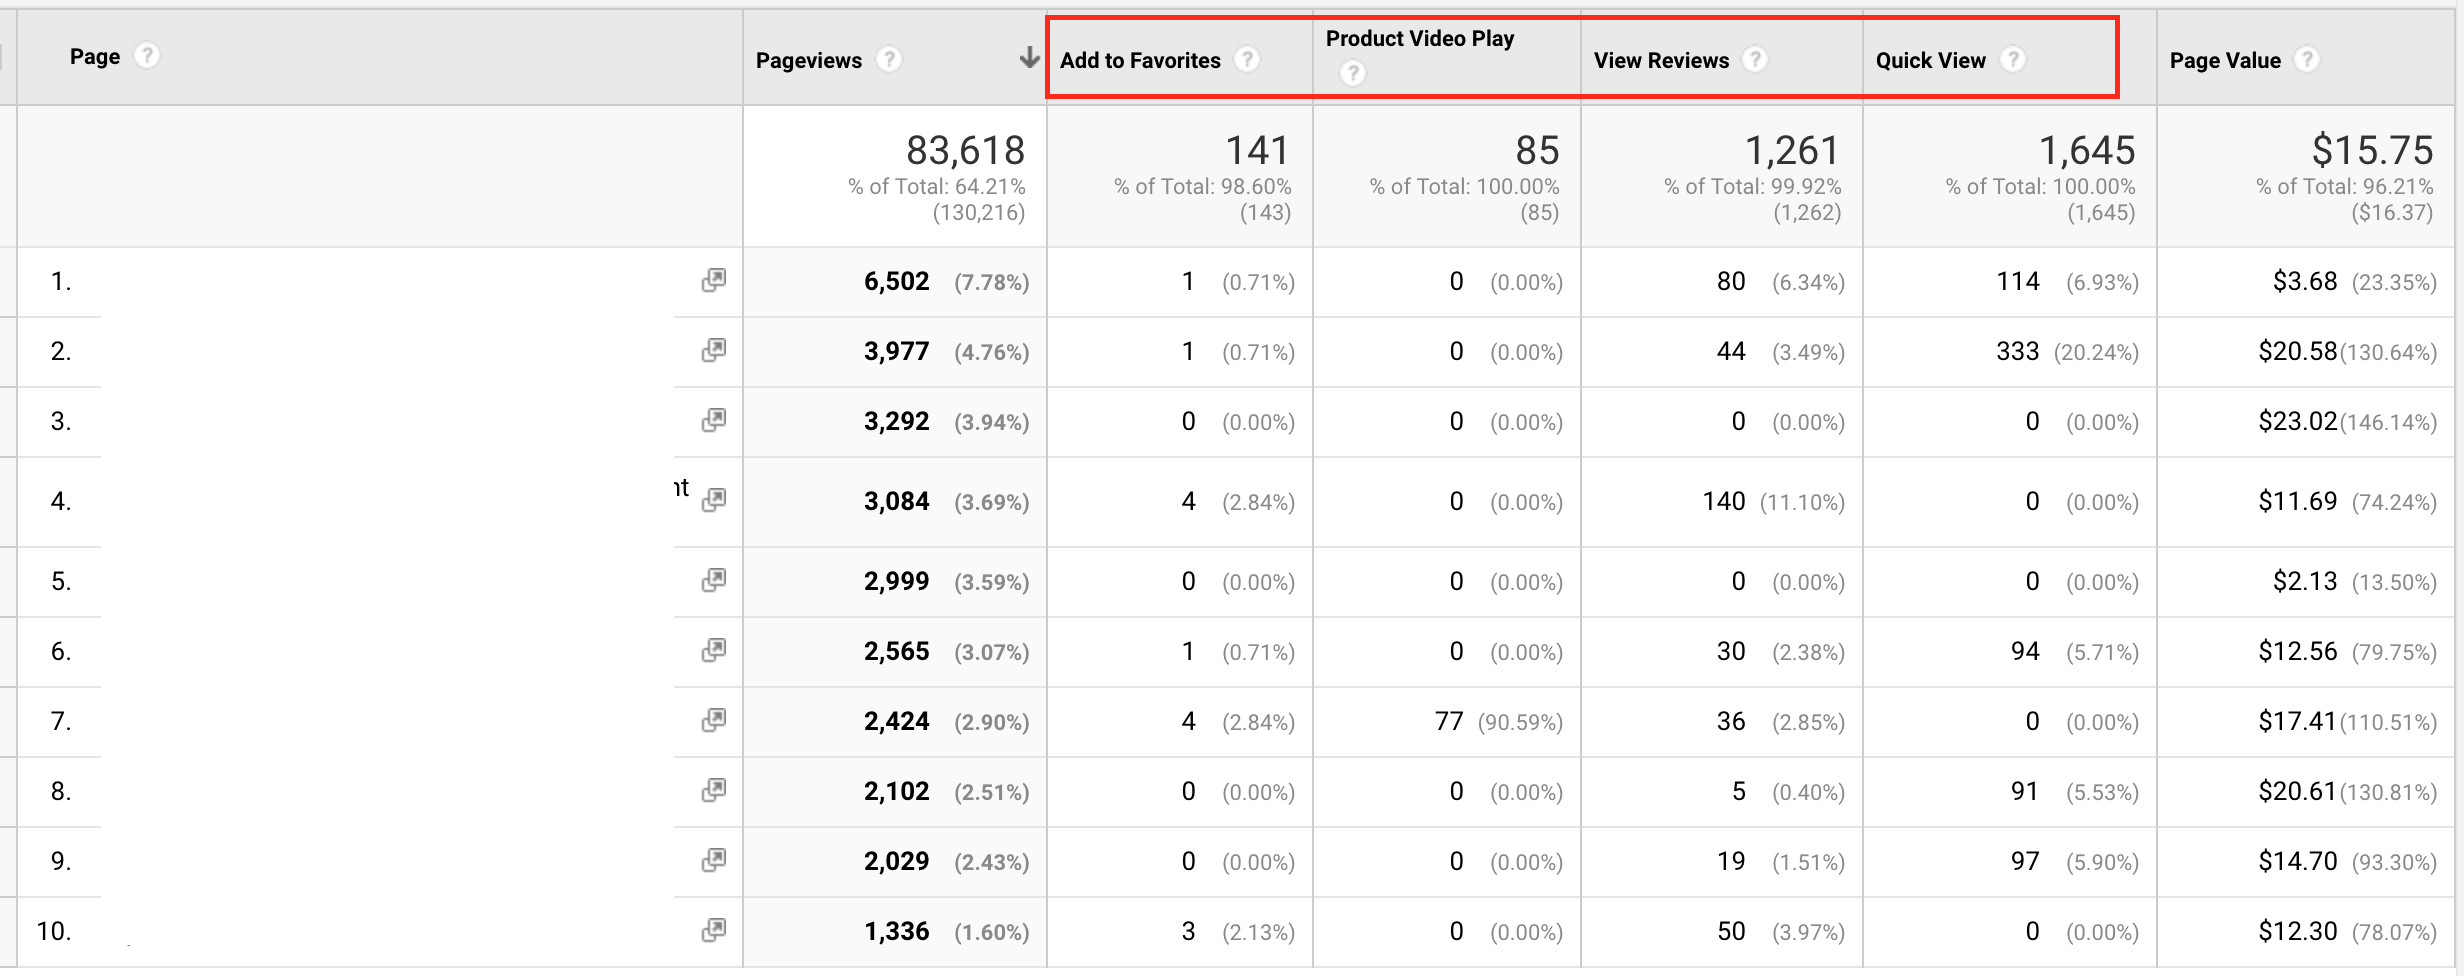
And how about these insights for product pages:

And how about this one below which tracks % of email signups compared to total users (screenshot from Elevar 🙂 ). This is showcasing a custom metric of “email signup clicks” used within a calculated metric so we can view email signups in a % ratio:
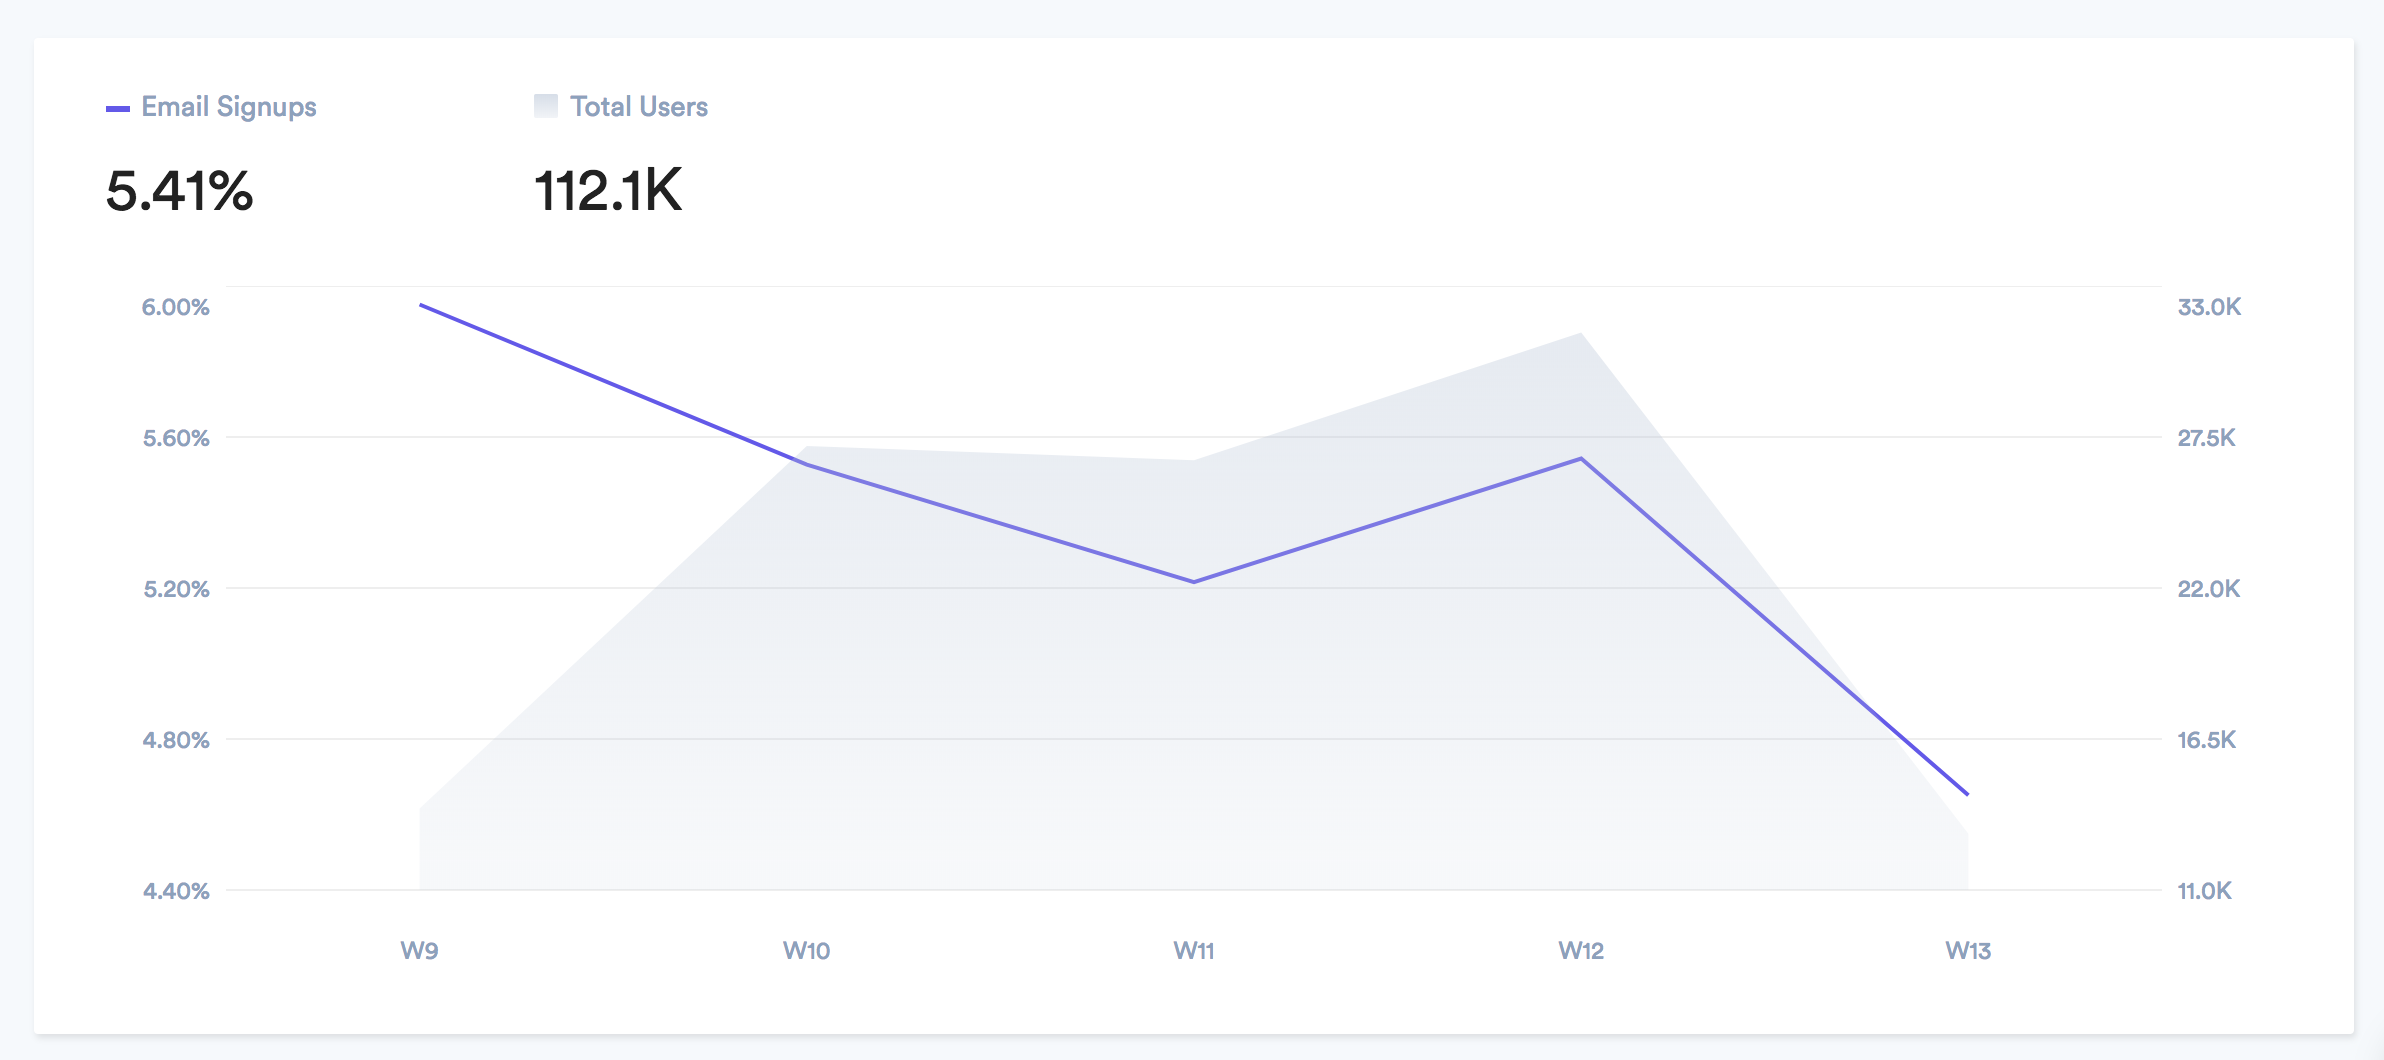
Having the ability to evaluate user behavior per page or groups of pages/dimensions, via multiple “events” (e.g. view reviews, watching videos, etc), is so much more efficient than going one by one with events.
Lets take the PDP Main Image custom metric above as an example. If this were only a custom event then we’d have to view our Events > Pages report and then add a secondary dimension (in this case – Event Label) and then add a filter to this Event Label to provide us with a list of pages:
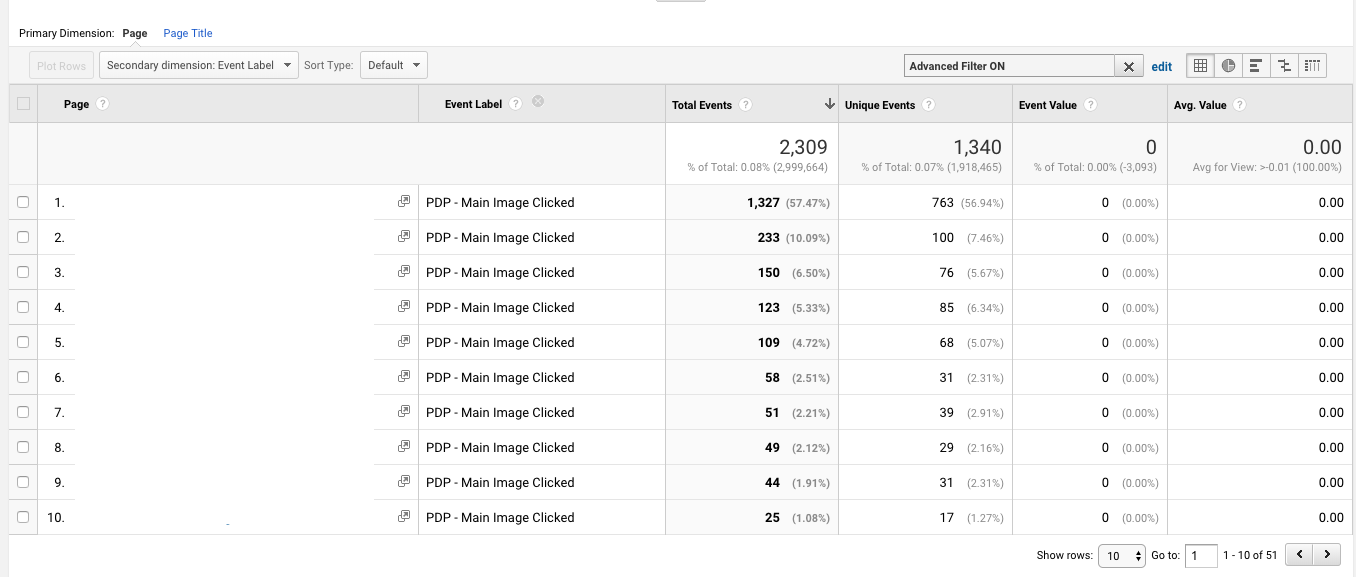
Dredging through reports like this ^ is sooooo time consuming!
Why Use Custom Metrics
If the report examples above aren’t enough to spark your imagination of fancy new reports for your own website, consider this:
You’ve created a tag plan to have implemented for you or you’ve implemented sitewide tagging on your own using *gasp* auto-event tagging. How often are you really analyzing everything after setting these plans up? Those link tags in the footer…or even super footer tracking clicks on your privacy page? Have you ever produced an insight from them 🙂 ??
Custom events are great but unless you have a machine to process them all to spit out insights then (if you’re like me) you’re usually stuck checking your top few reports and only performing surface level data analysis on a consistent basis.
For me – custom events are my gateway to custom metrics to enable faster and deeper analysis (in bulk) through:
- Calculated metric creation and use
- Bulk page feature use analysis
- Segmentation creation (although you can create segments based on events only as well).
Take a look at the custom segment of users who read reviews and add to favorites:
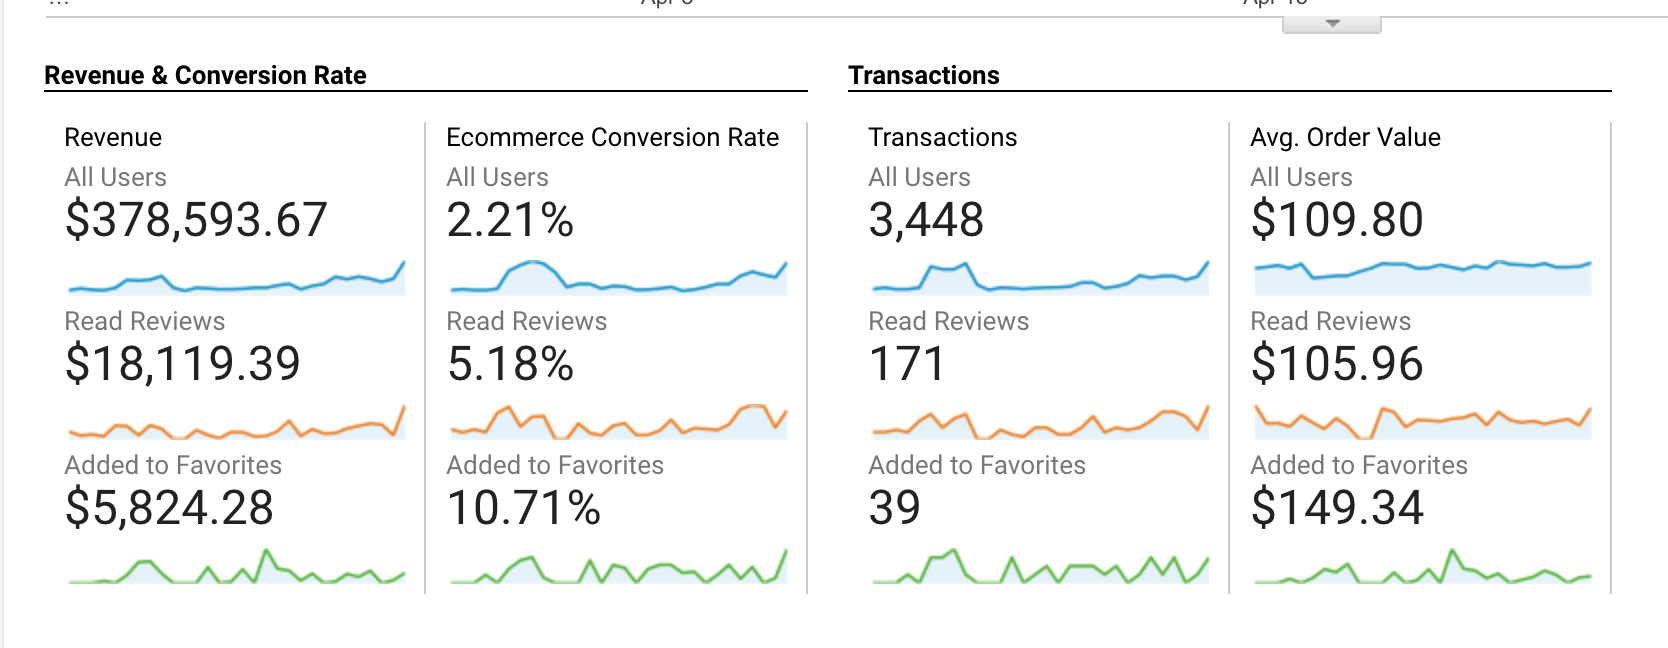
Quite a few a/b test hypothesis you might be able to pull from this!
How to Create Custom Metrics in Google Analytics
Implementing custom metrics requires two steps:
- Creating the custom metric(s) in Google Analytics property settings
- Send custom metric hit(s) from your website to your GA account
Step 1: Create custom metric in GA
In Google Analytics > Property > Custom Definitions > Custom Metrics you’ll see the following:
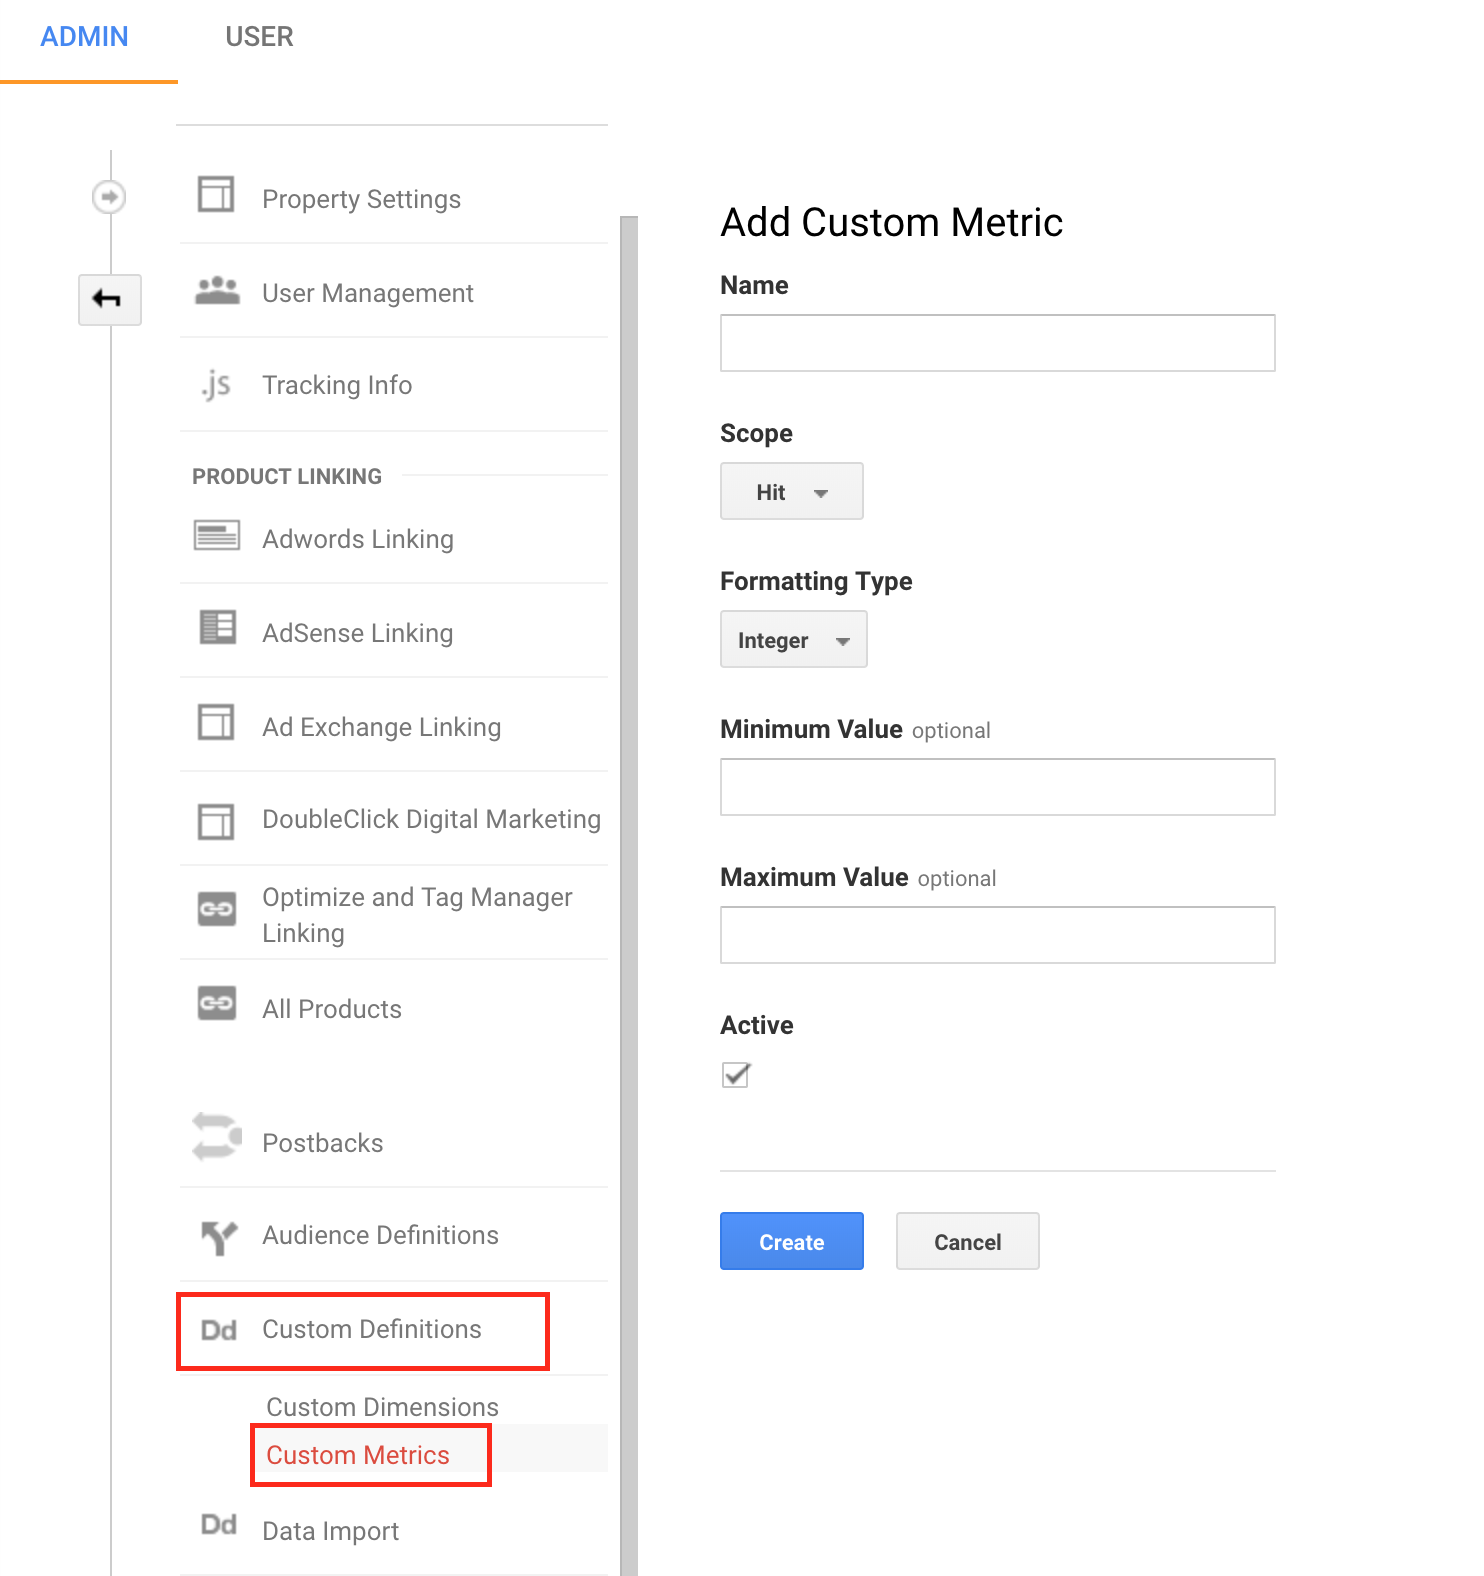
You have a few options when configuring:
- Scope:
- Product: this means it can be combined with other enhanced ecommerce product data
- Hit: functions just like an event or pageview “hit”
- Type: integer, currency, or time
- Min/Max Value: you can set this to help with data control. In general if you’re creating metrics for things like Email Signup clicks then min value would be 0 and max value is 1.
The combination of these options can equal so many use cases.
Consider these examples:
- Product SKU Cost (product scope and currency type)
- Email Signups (hit scope and integer type)
- % Read Ratio (hit scope and integer type)
- List and Sale Price (product scope and currency type)
- Mini Cart: Clicks to View Cart vs Go to Checkout by page (hit scope and integer type)
- Read Review Clicks by page (hit scope and integer type)
Step 2: Send custom metric hit from your website to GA
There are a few different ways to accomplish this. One way involves pushing this directly within your GA snippet as Google showcases here however Google Tag Manager is the better (and easier) route in 98% of use cases.
So I’ll show you how to do this in Google Tag Manager!
I will use the example of tracking the # of email signups shown in our example reports.
I’ll assume you already have an event tracking email signup clicks inside of Google Tag Manager so should have a tag that looks something like this:
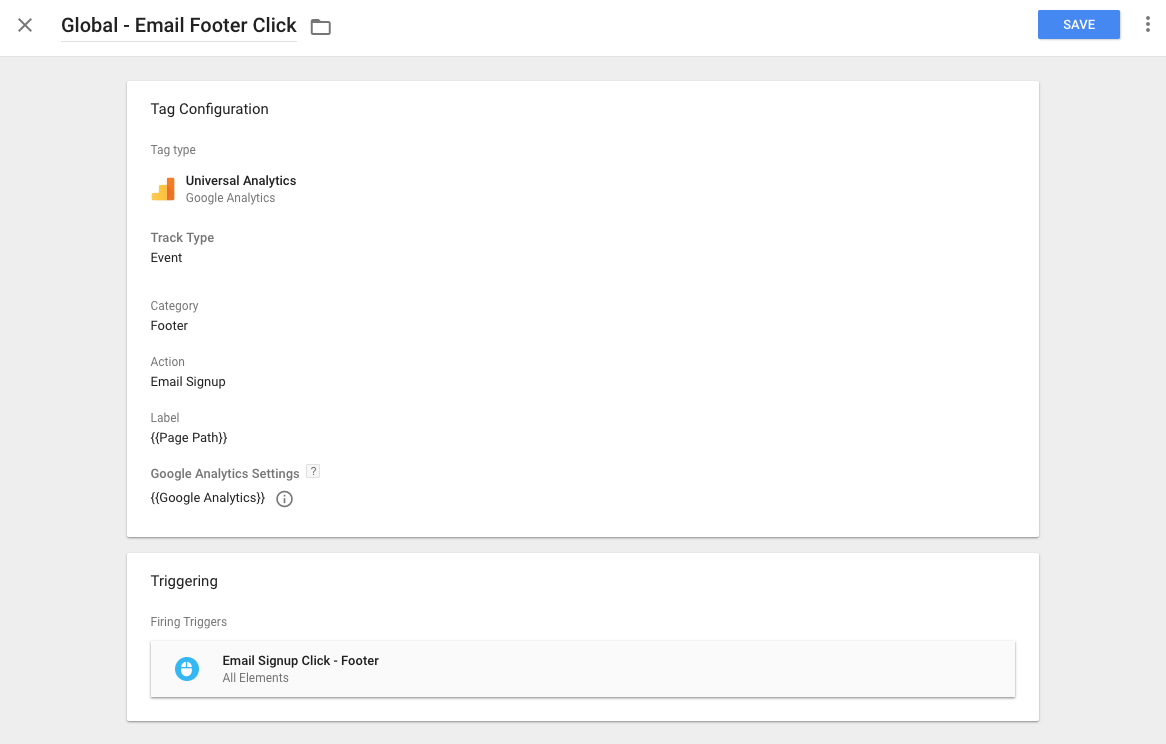
If so – great! If not, then set up a tag tracking email signups (or something similar you’d like to track).
The next step is to click into the Google Analytics Settings..setting…which will expand additional options for us. You’ll want to:
- Click “Enable overriding setting in this tag” checkbox
- Expand the “More Settings” options
- Expand the Custom Metrics options
Like this:
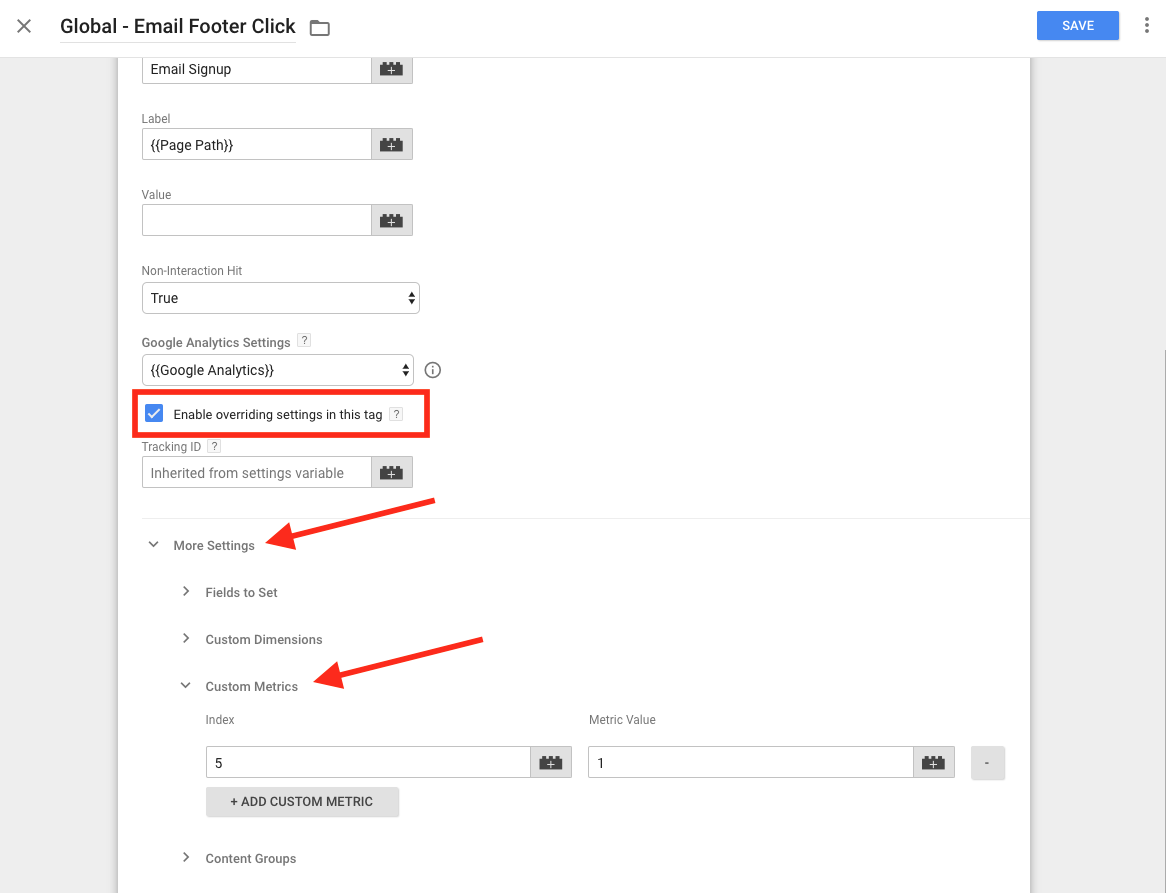
You’ll notice I’ve set the index of 5 with a value of 1. Basically what we’re doing here is saying “Every time someone triggers this tag event to fire then push a value of 1 into my custom metric index # 5”.
And what is the custom metric index? It’s the index assigned to your metric when creating your custom metrics inside of Google Analytics here:

Email Signup custom metric name equals index # 5.
That’s it. Now save your tag and go to preview mode inside of GTM. Navigate to the frontend of your website, trigger this event, and view the event in your GTM debug console. You should see your custom metric shown like this:
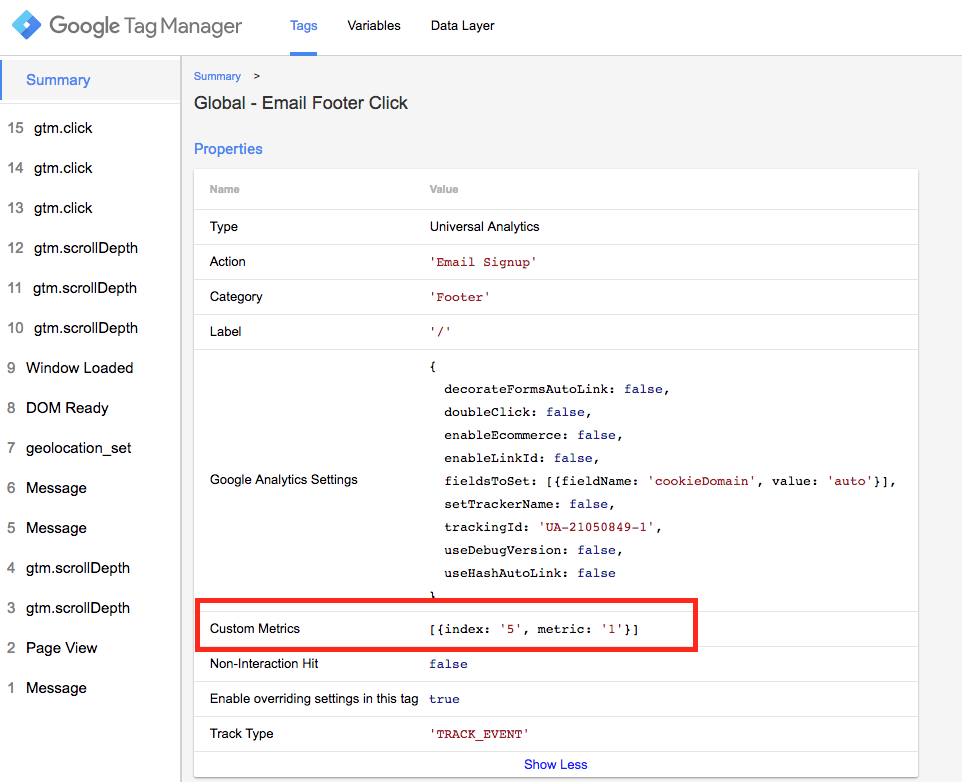
If you do then you’re good to go!
View Custom Metrics Insights in Google Analytics
Once this data begins to build you’ll want to create reports in Google Analytics to analyze this further. In this example I want to see how landing pages + campaigns are performing driving email signups.
Inside of GA go to Customization > Custom Reports > Create New Report and then configure your report to look something like this:
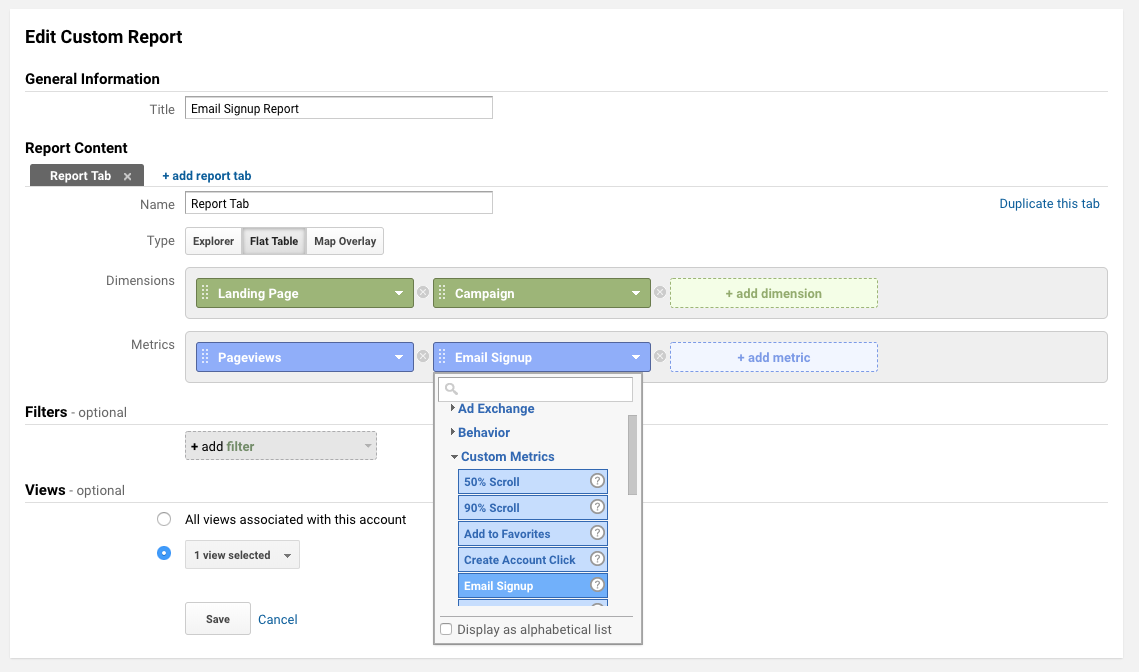
Once you’re done click save and view this fancy new report:
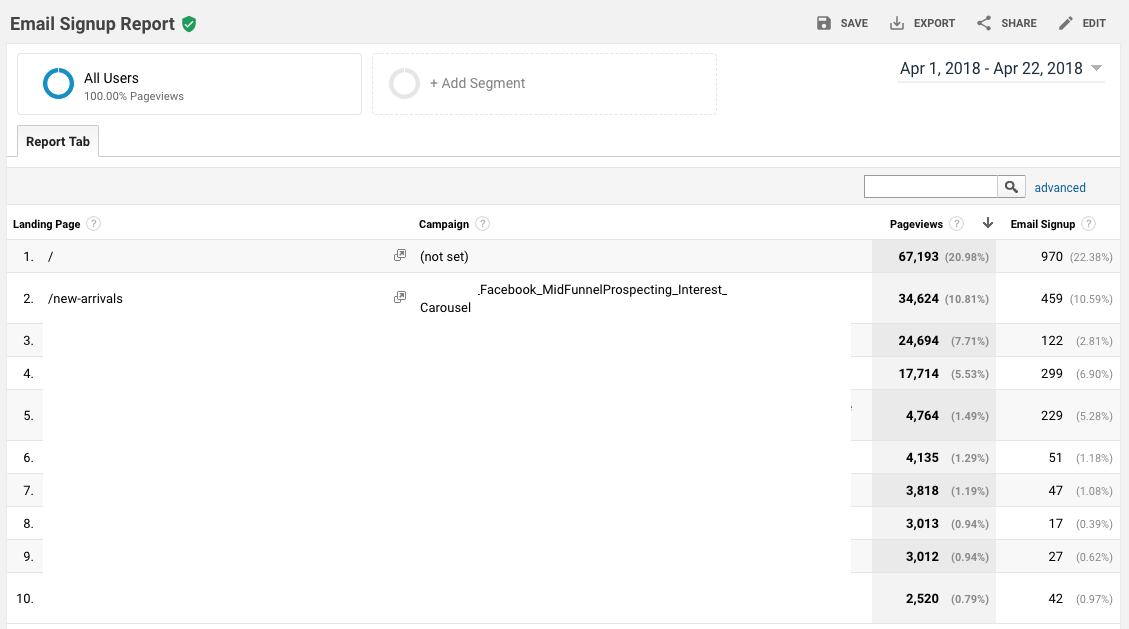
You can now attribute additional engagement metrics to your campaigns, especially prospecting types, to take your campaign analysis one step further past transactions only.
Considerations & Wrapping Up
As you can see custom metrics within Google Analytics are:
- Easy to setup
- Work seamlessly with custom event tagging in GTM
- Help unlock amazing insights for onsite behavior analysis
But there are things to consider before jumping right into custom metric creation.
Here are a few lessons I’ve learned over time about custom metric creation:
- They increment based on every hit sent to GA, so if you’re wanting to use for things like sale price or cost of goods price for a particular SKU then you won’t get nice clean “$45” sale price listed by each product. If you’re sending a sale price hit from product pageviews then you’ll basically see: # of pageviews x sale price metric. This is a bit of a head scratcher when you’re first jumping into product scoped custom metrics.
- You’re limited to 20 custom metrics in the free version of GA so plan accordingly. I don’t suggest duplicating every event hit as a custom metric. When you’re putting together your tag plan then add another task of determining what events you want to send as custom metrics.
- Don’t set custom metrics on your global Google Analytics variable in GTM. If you do this then the metric will accumulate every time this GA variable is included with a tag triggered.
If you have any questions or ideas on how to use custom metrics for your website I’d love to hear them in the comments below.
Related Articles:
- Content analytics dashboard via Google Analytics
- Fast feature analysis via Google Analytics
- Sequence segment analysis via Google Analytics


We have set a custom metric for email signup as described in your blog. The custom metric is getting triggered in debug mode, but we are not able to get any data in the GA custom report.
Why visitors still make use of to read news papers when in this technological globe the whole thing is
existing on web?