How to Refund and Cancel Orders in Google Analytics
Learn how to import refund and order reversal data in Google Analytics for more accurate revenue by channel metrics.
Brad Redding
Brad Redding is the Founder & CEO of Elevar. Specializing in analytics, tracking, GTM, and conversion optimization.
Refund or cancellation data within Google Analytics is not something I’ve seen much…probably less than 5% of businesses I’ve worked with in my career either had this process in place or worked to get there.
One common trait between these companies (that had a solid GA cancellation & refund import process in place) – they ran highly successful marketing & advertising campaigns.
Granted, cancellations and/or refunds are only a fraction of ensuring business-wide data accuracy, however it was clear that decisions were made on accurate data.
The process for managing refunds in GA is largely the same for any eCommerce platform – Shopify, Magento, BigCommerce, Commerce Cloud, etc.
A few callouts:
- There is a difference between reversing a transaction and refunding a transaction. Reversing a transaction is done by sending a negative value while refunding a transaction will populate the native refund metrics available in Google Analytics.
- In order to import refund data via the Data Import feature in GA you need to be utilizing Enhanced eCommerce.
- You can’t “fix” refunds that have been already imported…so be sure you test refund imports on a test view first to verify it works as expected.
- To be safe, check reports the following day after importing data to minimize freaking out if the data looks weird a few hours after.
How to Import Refunds into Google Analytics
There are three ways to manage this:
- Manual CSV import into GA (say, what?! Yes, you can upload CSVs to GA)
- Using the measurement protocol hit builder
- Automating imports via API
Import via CSV
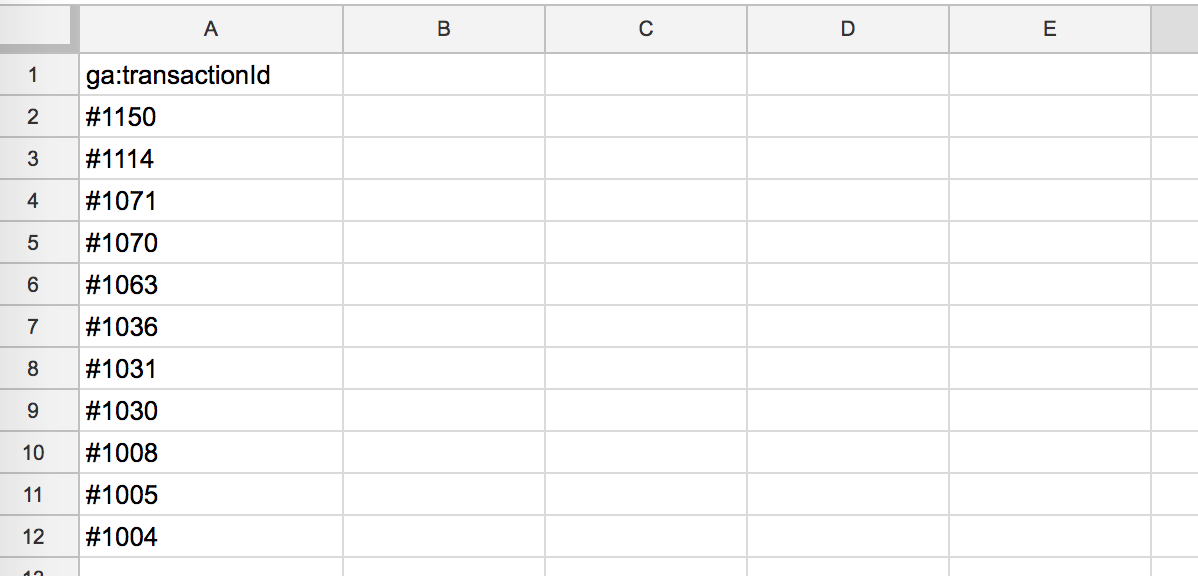
If you are refunding complete transactions then all you need is a CSV file that contains your transaction IDs like this:
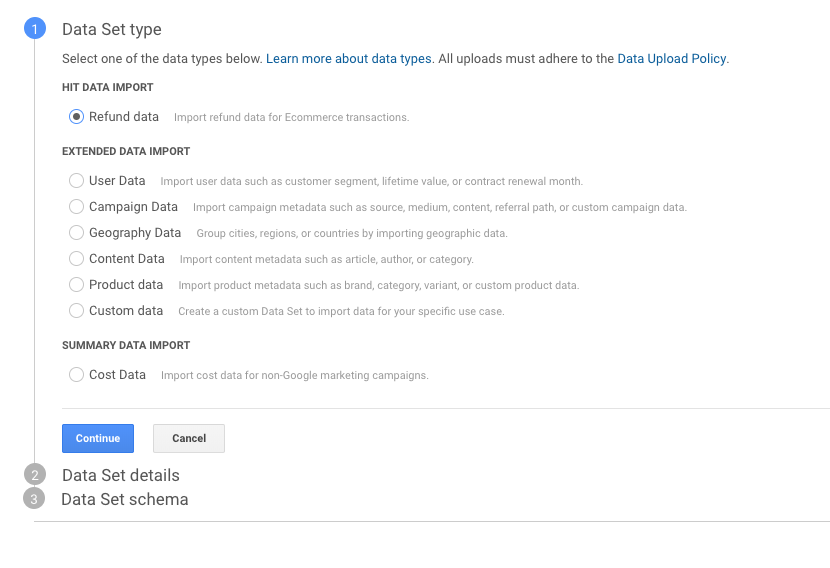
Then you’ll want to head to Google Analytics => Property Settings => Data Import => Create New Import => Refund Data:
 Then name your import in Step 2 Data Set Details and leave your Data Set Schema in Step 3 as is (you should only see Transaction ID column) and click Done.
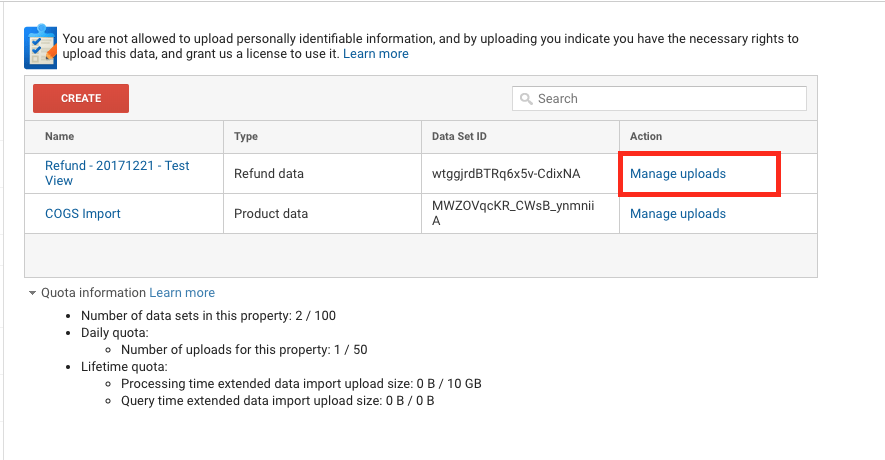
Your next step is to upload your CSV file in the Manage Uploads Settings of this new data import:
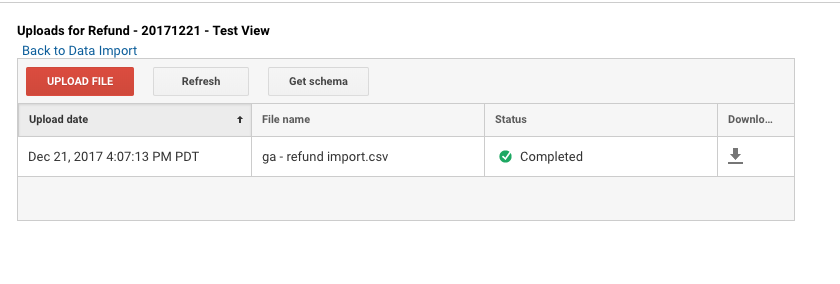
Once you upload your file, you should see a status screen which shows the success of your import:
That’s it!
If you are importing partial items as part of an order (e.g. only 1 qty of an order that has > 1 qty or partial amount on a single qty) then you’ll need to configure an import with a few more columns (shown below).
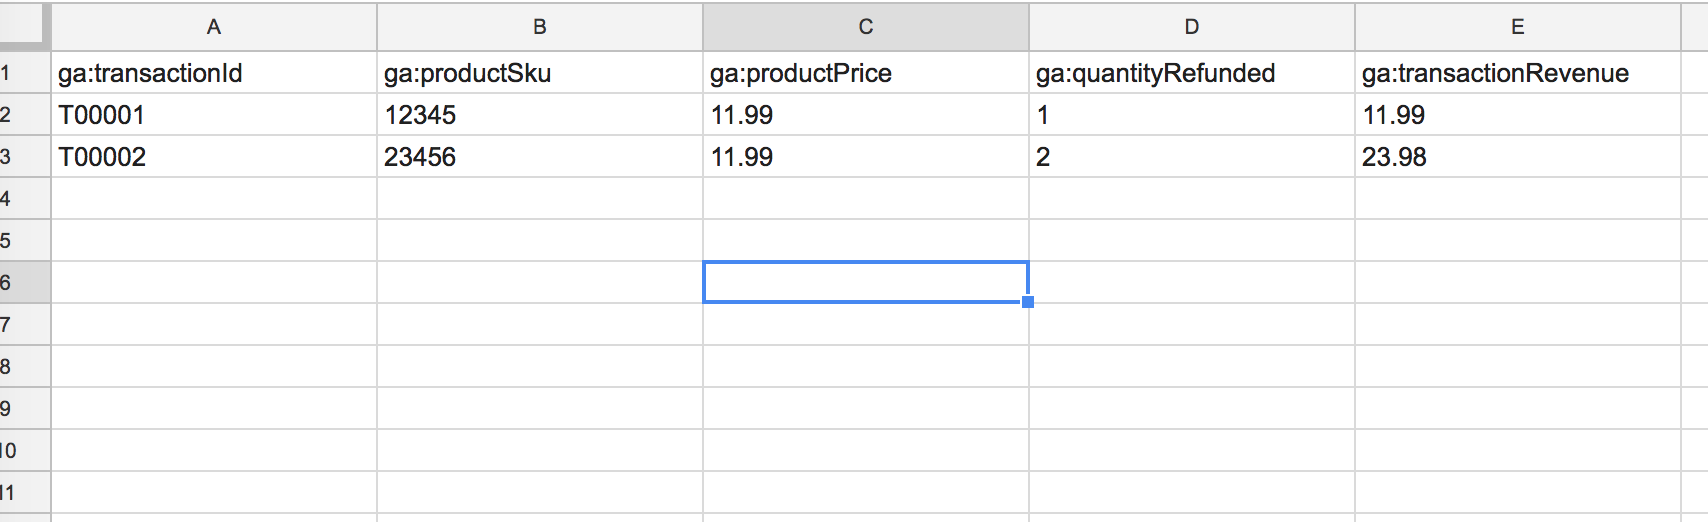
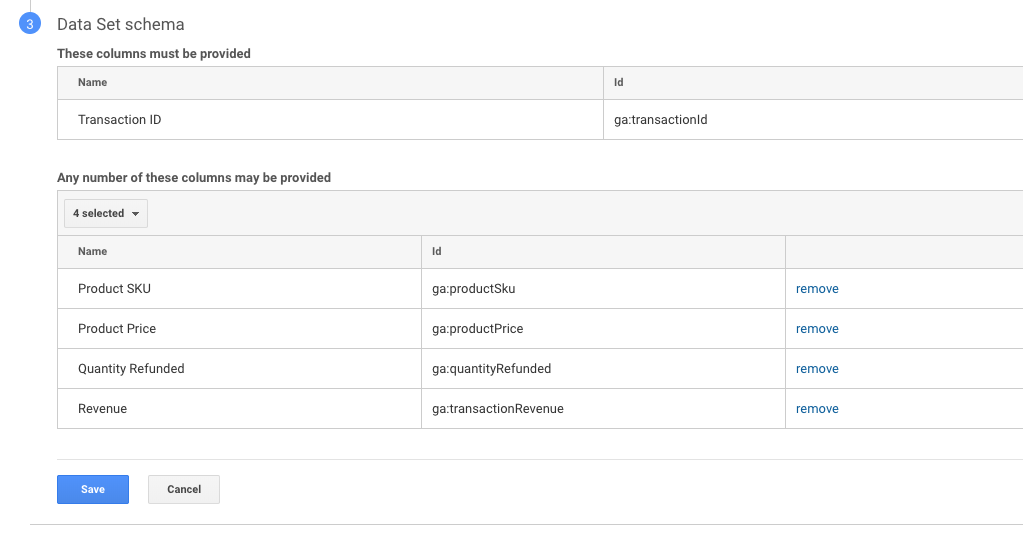
In your data schema details from step 3, be sure to select these fields shown in row 1 below that you’re including in your import:
Note: If you’re importing a file with partial refunds then you need to have every field completed. You can’t have one row with only transaction ID for a full refund and another row that is completed for a partial refund.
Import via Measurement Protocol
This step takes advantage of the Google Analytics Hit Builder which allows you to send your own hits to Google Analytics.
This example shows how to do it through an event hit but you can also do with a pageview hit type as well.
If you’ve never used the hit builder – it’s pretty awesome! We use it quite frequently to validate test hits we’re sending for Elevar clients pushing offline data into Google Analytics.
You can view the full list of parameters here, but here are the ones we’re showing in this refund hit example:

- v: 1 (can’t change)
- t: event
- tid: this is your GA property ID
- cid: you can use any number for this (click the little generate button on right side)
- ec: this is the Event Category and 100% subjective.
- ea: this is the Event Action and up to you.
- ni: this is Non Interaction hit. It can be 0 or 1, with 1 being “True”.
- pa: this is the Product Action we’re setting on this hit which is refund (see all available actions here)
- pr1id: this is the line item of the SKU in the order. So if you had two SKUs you were sending in a single hit then you’d have pr1id AND pr2id.
- pr1qt: this is quantity of SKU with same application for multiple SKUs in an order.
- dh: this is setting the hostname and is optional. The reason I included this is just in case you have a custom filter on your Google Analytics account to only include your hostname in reports.
Once you have this completed then you can click “Validate Hit” which will verify your hit is good and give you the option to send the hit.
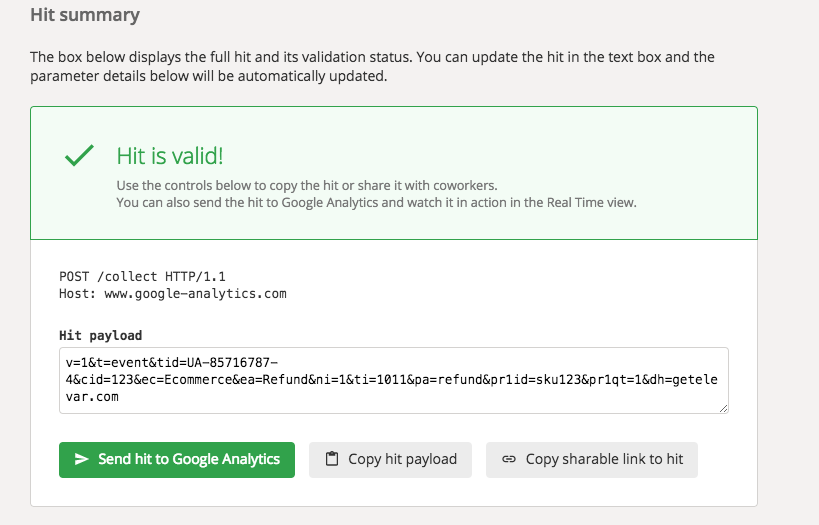
That’s it! Once you send the hit, I’ve found it can be up to 20-30 minutes before the refunds display in GA.
To save you time, you can just copy this hit below into the hit payload shown in the above screenshot and it will create the parameter fields for you:
v=1&t=event&tid=UA-12126787-4&cid=582df885-2745-4acb-83ac-4cbd20c988de&ec=Ecommerce&ea=Refund&ni=1&ti=1011&pa=refund&pr1id=sku123&pr1qt=1&dh=getelevar.com
Automate Import Process via API
This will require some development chops, but you can set up an automated process by:
- Automating the process of sending hits in batches or individually via Measurement Protocol HTTP POST request (similar to previous step). Google’s documentation on this is pretty solid.
- Another option is to automate the process of uploading your Data Import CSV file (from the first option above) through the Management API. Here is where you can get started on this and there are a few good examples of hooking this up via Google Sheets as well (here’s one example).
How to Reverse a Transaction in Google Analytics
This is close to a refund import hit except we’re sending another transaction hit with negative values to zero out the data from the original order.
The difference from refunds is we just aren’t populating the native refund metrics in Google Analytics…I think that’s about it?!
Here is how this looks in the hit builder:
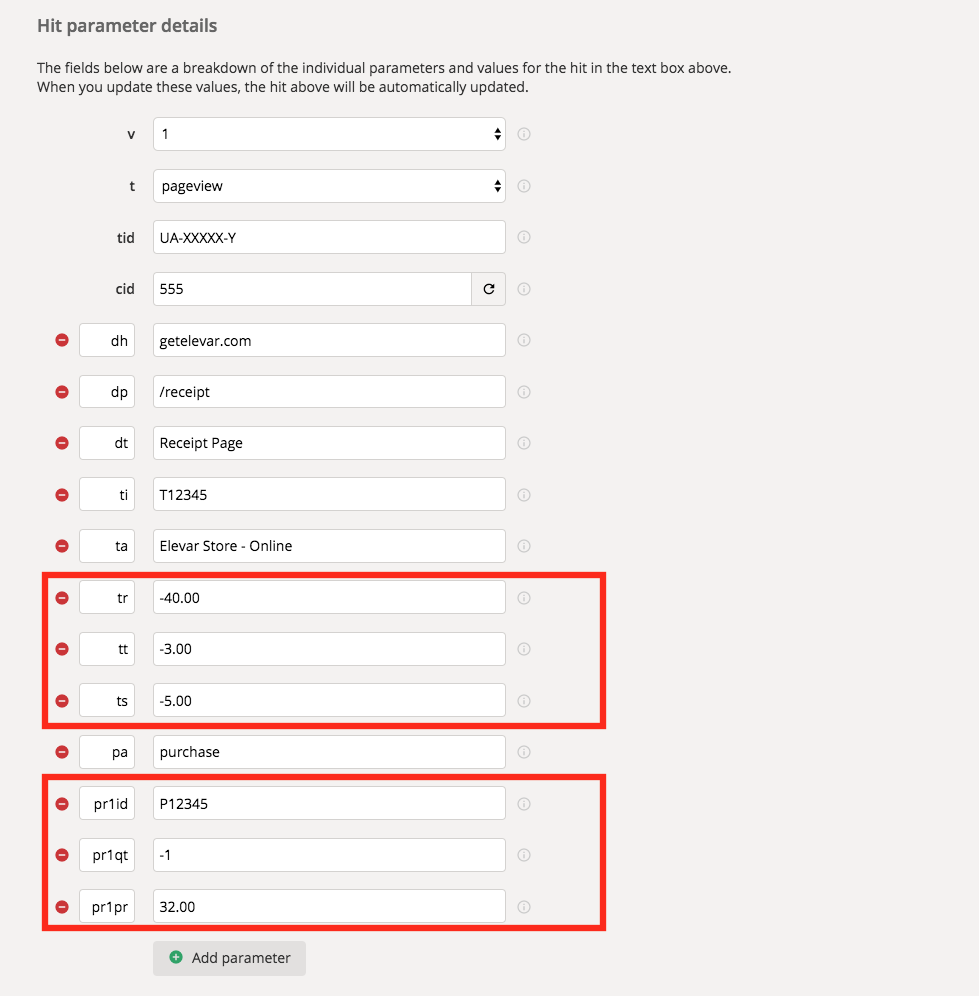
A few things to note in red:
- Total transaction revenue, tax, and shipping are negative values.
- Product quantity is a negative value.
- Individual product price is a positive value.
That’s pretty much it. Validate and send your hit then wait a bit to see this show up as an additional hit for this transaction ID.
How to Analyze Reversed or Refunded Reports
If you’ve never refunded orders in Google Analytics then you might get a bit confused when reviewing your transaction reports the first time.
Remember – GA is not going to delete the original order data so depending on the date range you are viewing you might see orders you expected to be refunded like this:
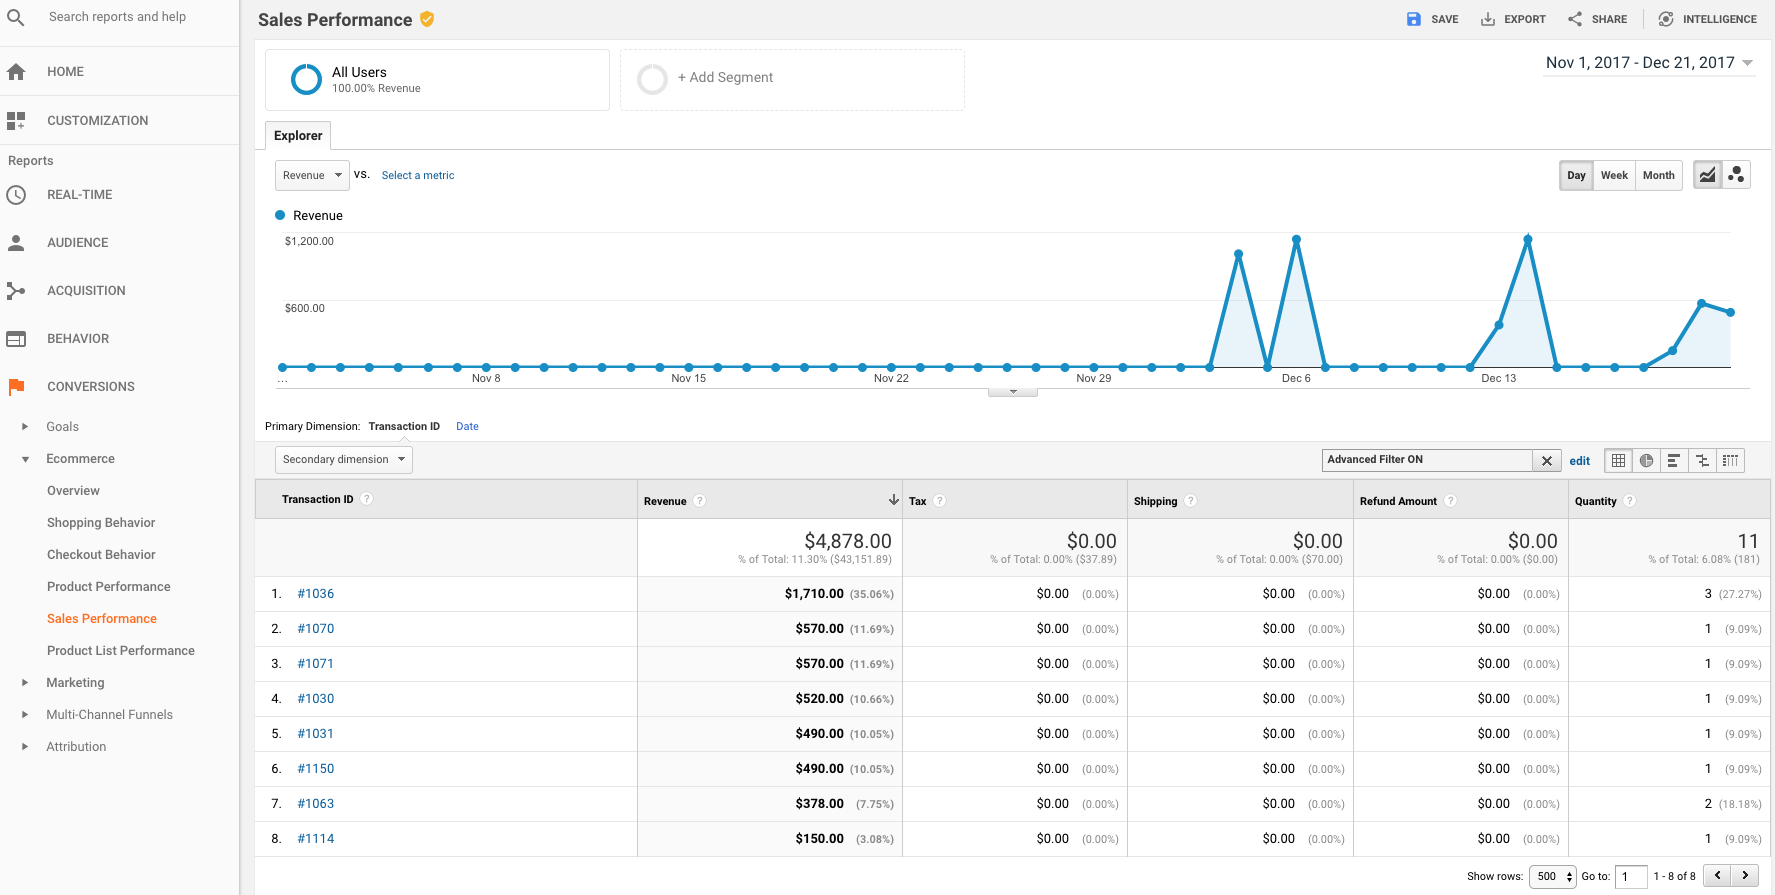
Notice the revenue and refund amount columns?
Once you include the date when you imported your refund data, you should see something like this:
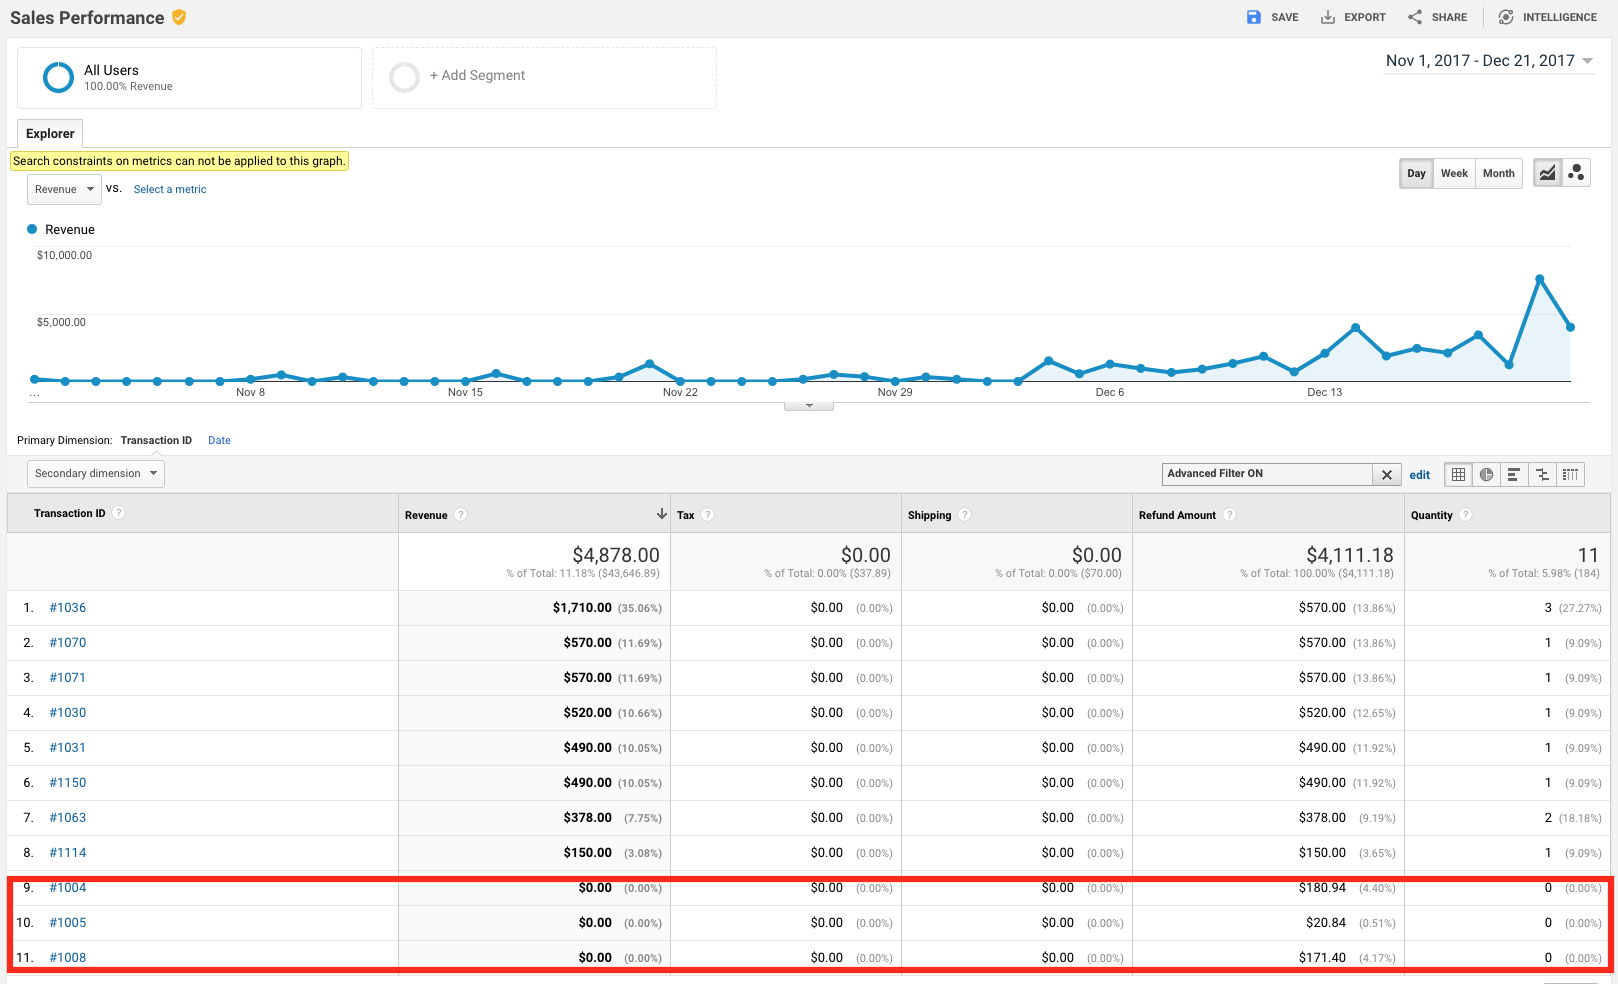
Wait…why do some of my orders have $0 revenue and others don’t?
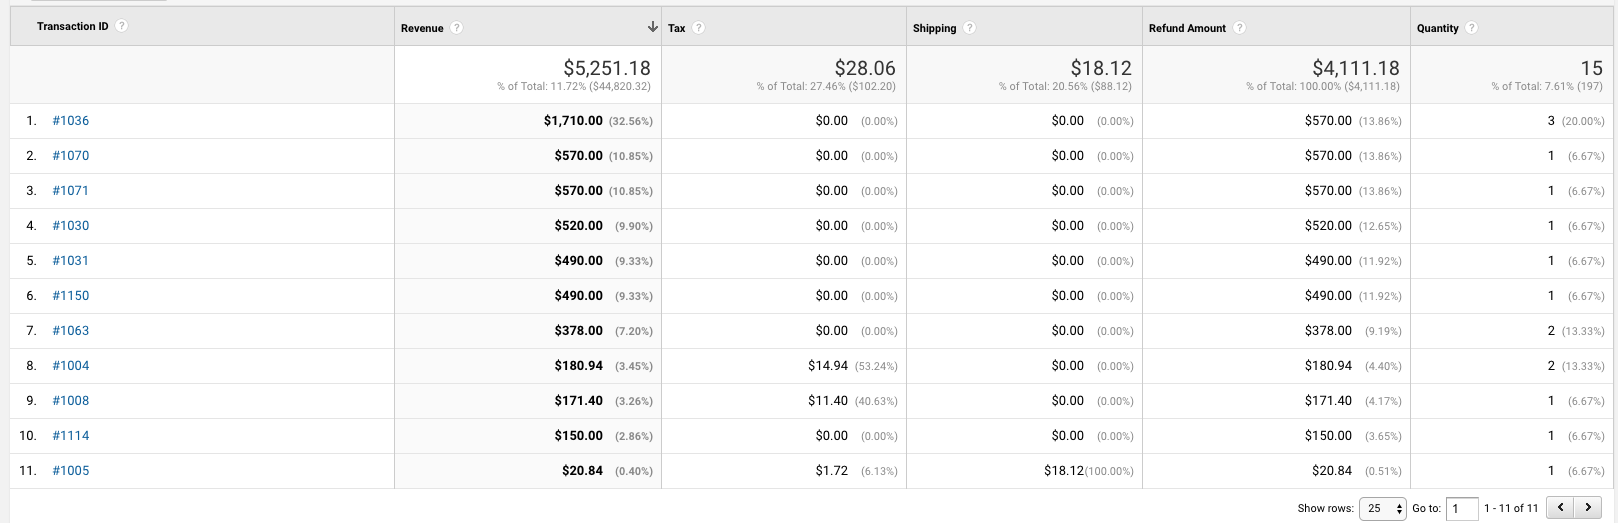
Well in this case these orders were placed in October but my report is November – December. Once I change my date, I now see revenue here too (phew):
Now we can begin creating reports to slice our refund data further; like by medium:
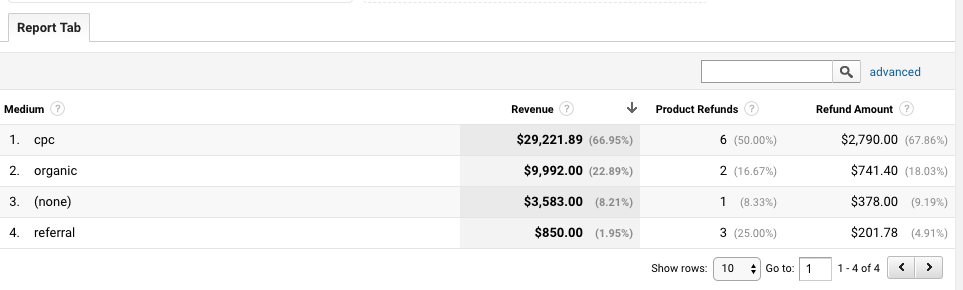
Google states one caveat of viewing refund data by source/medium – if the user returns to your site after placing an order and still has their original GA cookie in place then this refund will be attributed to the last session they visited from…not the session where they completed the purchase.
Not very helpful.
I hope this quick tutorial on importing refunds to Google Analytics helps :).
Related Articles:


Just wanted to call out this is a great post. Most detailed and valuable post I’ve found so far on GA refunds.
Have you come across new features in GA/GA360/DataStudio that improve refund attribution? I’m looking for a couple features :
– attribute a refund to the original order date
– attribute a refund to the original source/medium
Thanks for this post, should be useful for my scenarios. Finding info on GA refunding is a nightmare. There’s no guidance in the Measurement Protocol docs beyond refunding a single line item or the entire purchase, leaving us high-and-dry to figure out the best way to manage the very real-world scenarios of a purchase changing over time.
We could theoretically only send to GA once the purchase is finalised, but because you can’t send custom timestamps through you end up with times that don’t reflect when the customer transacted on the website and it won’t be in their session.
There’s some really tricky edge cases. Seems like reversing AND refunding is the way to go for accurate total revenue and refund column data population, which makes sense for partial or full refunds. But for purchase modifications (add, remove, change product), I may also be best to reverse and refund everything and add a new one, which will hopefully work with the same transactionId.
Thanks again!
So looking for some guidance here–say we want to add an additional item to an existing order already passed through GA–example: Customer orders 1 shirt, and wants to add another–what would the best way to process this?
Hi Calvin, unfortunately I don’t think this is possible if you want to keep the same datestamp in place for the original order. You can edit transaction IDs but the date stamps for adding/deleting will be reflected on the date of import for that order.
Hi, thanks for covering this topic! I have a question about reversing the eCommerce transaction. I have sent the hit with negative numbers via measurement protocol but realized the negative transaction can only be posted on the current date, since the transaction I am trying to cancel happened a month ago, it creates a reporting misleading. Do you think there is a way to cancel / modify this negative transation and try another teqnique or the only way for me to leave the annotation and further use reporting filters to cut off this bad transaction?
Great article. We managed to import refund data using a Magento extension. Unfortunately all refund transactions have direct/none as source/medium. I know the extension is using the API to send data. Any idea if this is customisable so that the origina source/medium is connected to the refund?
I would like to create a custom report such as the one you are showing with refunds per source/medium.
This is a very good question and one I’d love to hear the answer to if anyone knows???
Thank you