How Does Server-Side Tracking Work

10 minutes
Difficulty

In this lesson you’ll learn how server-side tracking works in the context of Shopify and eCommerce platforms. It’s important to […]

Brad Redding

Brad Redding is the Founder & CEO of Elevar. Specializing in analytics, tracking, GTM, and conversion optimization.

In this lesson you’ll learn how server-side tracking works in the context of Shopify and eCommerce platforms. It’s important to note that the way it works for Shopify is different than how it can work with Magento, WordPress, and other self-hosted eCommerce websites. The reason is because Shopify itself is a hosted SaaS application. You, the store owner, do not need to pay a hosting company for servers to host your website when you are using Shopify.

Server-Side Tracking Lessons:

How Does Server-Side Tracking Work

Here is a step-by-step process for how server-side tracking works in a real-life Shopify website:

  1. You route event data — like add to cart and purchases — to your server. These are commonly called “Sources” in solutions like Elevar and Segment.
  2. Your server can be your own Google Cloud server attached to a GTM server-side container or a fully managed end-to-end solution like Elevar or Segment. 
  3. In order to maximize the value of server-side tracking for events that don’t have webhooks on Shopify, you’ll want this data routed to your server in what’s called a 1st party context – e.g. under your primary domain URL so you have complete control over what’s collected.
  4. Then inside your server (GTM) or App (Elevar, Segment) you configure Destinations that you want this data routed to. For example you’ll configure sending events and conversions to the Facebook Conversion API.
  5. Depending on the channel, you may need to adjust your client-side tracking. Facebook wants you to send server-side events and client-side pixel events. Other channels — like Impact Radius — don’t require both server-side and client-side tracking. So once going live with server-side then you can disable the client-side tracking.
  6. When your server receives a conversion event  from your website or Shopify admin — like a purchase — then it’s routed to destinations you configured in step 4. 
  7. The destination API that receives the conversion event then sends a response back to your server. It’s typically a success or failure message, and if failure contains an error code.
  8. (optionally) Your server sends a response back to the user browser to reset header information.

There are many nuances within each step above.

Most if not all of your marketing destinations will have unique and distinct data requirements.

For example:

  • Facebook Conversion API requires an event_id to deduplicate server and pixel events.
  • TikTok requires ttclid captured in a query parameter from a link a user clicks on from the TikTok app
  • Impact Radius requires irclickid captured in a query parameter from an affiliate link a user clicks on

Defining Your Data Requirements

Server-side tracking requires you to define what information you want (or need) to send to your analytics and/or marketing destination.

In addition to collecting common data like revenue and order ID, you can also choose to:

  1. Grab data from the browser like IP address and user-agent information
  2. Customer information like email address and phone number
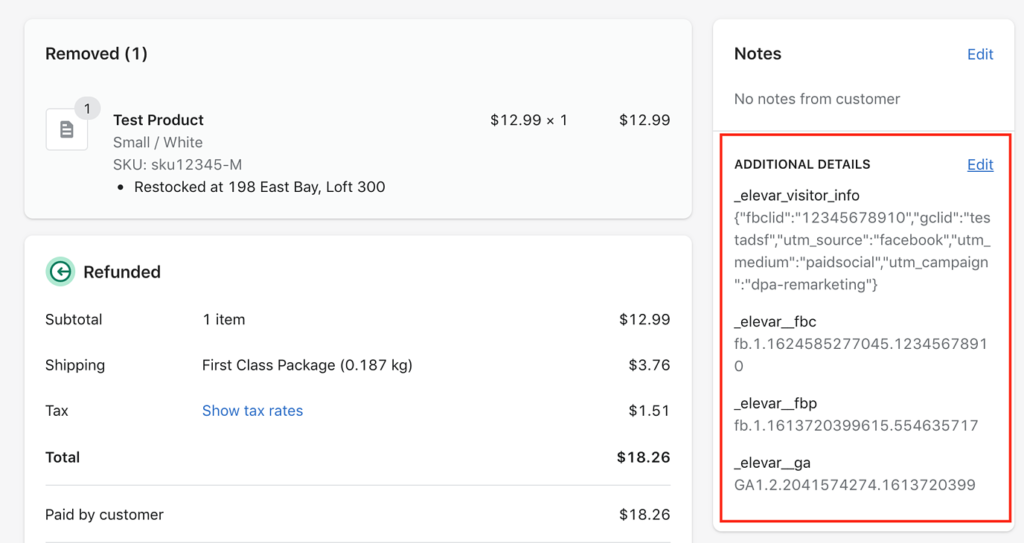
  3. Attribution data like cookie values, UTM parameters, and click IDs

And if you need to integrate with consent tools like OneTrust and Cookiebot then you’ll need to collect each user’s consent choices to be routed with your server-side hits.

Think of it like this:

  1. Aggregate the data requirements from all of your analytics and marketing destinations
  2. Complete a red (not collecting this data), yellow (unsure if collecting) green (collecting) exercise with the data that you are sending to your server-side solution (GTM SS, Elevar, etc).

For a basic example lets assume you want to implement server-side tracking for TikTok, Impact Radius, and Postie.

TikTok’s requirements state you need the following events:

  • Add to Cart
  • Product View
  • Collection View
  • Initiate Checkout
  • Complete Payment

And within each event the following variables are required:

  • external_id
  • email
  • phone number
  • content_id
  • content_name
  • price
  • value
  • content_category
  • currency
  • eventId

Impact Radius requirements state you need the following events:

  • Purchase

And within the purchase event the following variables are required:

  • CampaignId
  • ActionTrackerId
  • EventDate
  • ClickId
  • CustomerId
  • CustomerEmail
  • CustomerStatus
  • PromoCode
  • CurrencyCode
  • ItemCategory
  • ItemSku
  • ItemSubtotal
  • ItemQuantity
  • ItemName

Postie requirements state you need the following events:

  • Email signup
  • Add to cart
  • Initiate checkout
  • purchase

And within the events the following variables are required:

  • order ID
  • order revenue
  • order tax
  • order shipping
  • product name
  • customer city
  • customer state code
  • customer country code
  • customer first name
  • customer last name
  • street address 1
  • street address 2
  • shipping city
  • shipping state
  • shipping zip
  • shipping country
  • email address

That’s a lot of data to collect!

And do you notice how the naming conventions differ a bit?

Naturally some of these overlap which you will need to merge into one final list of events and variables needed to cover each of the 3 channels.

If you are DIY’ing your setup using GTM server-side container by using GA4 tags to route data to your server container then you’ll need to configure each of your events (e.g. add to cart, view content, purchase0 to include the required variables for all 3 tags (e.g. price, sku, category, email, address info, etc).

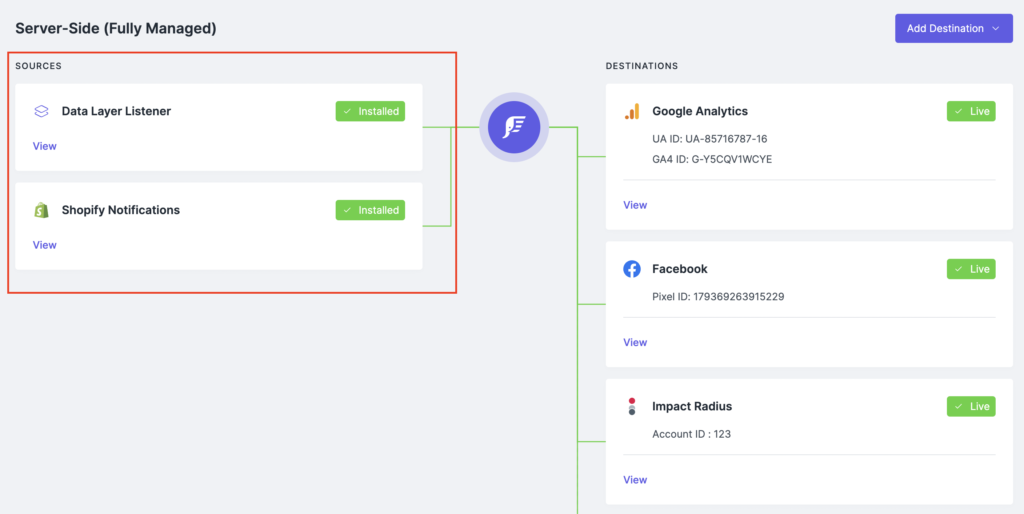
If you’re using a pre-configured solution like Elevar (fully managed or the GTM server-side option) then this data mapping has already been done for you.

Next, lets look at how to get data from your website to the server.

Sources

A Source is one single stream of data that feeds into your server-side data engine.

For example shopper’s browsing behavior on your website where they are viewing pages, adding to cart, and signing up for emails are an example of a source of data that comes from an onsite data layer for Shopify.

Another data source are webhooks from Shopify such as order creations.


data sources

Sources provide the data that your server-side destinations (i.e. channels like Facebook Conversion API, Google Analytics, etc) require.

If you are an Elevar customer, you can find these integrations in your Elevar Dashboard > Server-Side settings.

Once the Elevar Data Layer is installed on your Shopify store then these integrations take just a few clicks to install directly to your store.

Currently, Elevar supports the following sources of data:

  1. Data Layer Listener. If you have our Data Layer live on your website then you may know that the Data Layer translates behavior (i.e. product views, add to cart actions) into a data structure that tags in GTM can utilize. Elevar’s Data Layer Listener also leverages this to route data in a 1st party context from your primary Shopify domain (i.e. yourdomain.com/elevar/*) to Elevar (via Shopify). This is a powerful way to capture data that is not available via webhooks.
  2. Shopify Notifications. When configuring this data source, we will install a webhook on your store that listens for specific events like order creation, checkout creation, etc. For example, when an order is placed, Shopify will essentially say “Hey Elevar, I have a new order for this store” and we fetch the order parameters we need for your integrations. This moves all order processing out of the browser (to maximize accuracy) and allows us access to all of your orders that can be integrated with your marketing channels, not just “Online Store” orders.

We do want to call out one other dependency here.

Elevar’s data layer has a feature called “Order Notes” that does the dirty work of storing various attribution data (like UTMs, fbclid, gclid, etc) that improves the accuracy of your server-side destinations.

order-notes

Destinations

What is a Destination?

Server-Side Destinations are where you want to send your data. These are typically synonymous with your marketing pixel integrations you’re used to like Facebook, Google Ads, Google Analytics, TikTok, etc.

As outlined above in the TikTok, Impact, Postie example, each channel is going to be unique in how they collect and process data coming server-side.

Lets use Facebook as an example. 

Facebook has a “pixel” that you install on your website that collects various data about the user and their interaction on your website. 

Facebook relies on:

  • Data from their pixel to track the user and their activity, etc
  • Data from conversions to track ad performance, improve your bidding, etc

Facebook requires you to run your FB pixel client-side in parallel with their Conversion API server-side so both sources of data are sent back to your FB business manager:

fb-pixel-conversion-api

And when it comes to server-side tracking for Facebook, there is one big problem to consider:

Managing the conversions that happen on your website.

It’s not uncommon for most Facebook events manager accounts to miss ~ 10-20% of conversions due to issues that happen within the browser, AdBlockers, etc.

Utilizing the Facebook Conversion API can remove this friction point in your tracking process while remaining compliant. 

Before jumping into your options for implementing server-side tracking, review the limitations of server-side tracking to help you make an informed decision.