9 Steps to Tagging your Shopify Store Like Leading D2C Brands
We’ve audited, tagged, fixed, and managed tagging solutions for thousands of Shopify stores. See our 9 stop process.

Brad Redding
Brad Redding is the Founder & CEO of Elevar. Specializing in analytics, tracking, GTM, and conversion optimization.
The word “tagging” can cause moments of euphoria because of the insights it can bring you.
But it’s also a word of frustration due to the amount of problems you can experience with tagging over time.
Conversion tracking breaking. Inconsistencies in data across platforms. Lack of user behavior data when you need it the most.
We’ve audited, tagged, fixed, and managed tagging solutions for thousands of Shopify stores.
From new D2C brands to giants like Rothy’s, Vuori, and more.
In this guide I’m going to show the steps that we take when going through our own tagging process. To help get our customers away from chasing tagging issues to a solid data foundation to scale confidently from.
Step 1: Implement Sitewide Data Layer & GTM
For the majority of use cases we’re a big believer in keeping the native Shopify<> Google Analytics integration in tact.
Brands we see moving away from Shopify <> GA to GTM <> GA is primarily due to the need to customize data collection for BI tools, international payments, GDPR, etc.
Yes there are some gaps in the native GA integration. But most of the gaps can be fixed with Google Tag Manager running GA in parallel such as checkout funnel enhanced ecommerce report.
But even if you have GA running via Shopify you still need a data layer for customer interactions like:
- Product detail views
- Add to carts
- Viewing shopping cart
- Purchases
- Logging in to view subscription data
Then for each of these events, you need data like:
- SKU
- Product ID
- Variant ID
- User Email
- Category
You can even get creative and start including stock status, quantity, color and size attributes, etc to really customize your data collection.
The best part: implement the Google Tag Manager data layer once and then you have a simple way to add marketing tag destinations like Snapchat, Pinterest, Facebook, and Klaviyo without any development effort.
A proper data layer foundation will save days/weeks of development work.
Other benefits to implementing a data layer on your Shopify site:
- Save on site speed by limiting the # of hard coded scripts on your theme that are looking for the same information – like product SKU on detail views
- Implement custom enhanced ecommerce implementation
- Implement custom dimensions that you want to associate with your product and user data
- Implement advanced remarketing tracking
The GTM Suite app is the fastest way to implement a proper sitewide data layer.

View Elevar Plans
Learn how Elevar can help you simplify your tagging and event tracking.
Step 2: Implement Data Layer on Thank You Page
Now that you have a sitewide data layer implemented it’s time to implement on your thank you page. For the majority of Shopify stores, the thank you page is the universal thank you page handling all of your built-in payment types like Shopify Pay, Paypal, etc.
The thank you page data layer should contain:
- Order details, including discount data
- Customer details, ideally hashed, that can be included in your marketing tags
- Product level details
In a very similar manner to step 1 above, once this is implemented then you can leverage pre-built GTM containers to launch conversion tracking for nearly any third party marketing channel in minutes.
In most cases all you have to do is input your pixel ID.
However if you are doing any type of offsite third party payment processing then the thank you page grows in complexity.
For example:
- Global E payments for multi-country/currency
- Custom Visa/MC payments in Europe
- Bank payments (also common in Europe) that take the user to offsite logged in state
In most cases these users are sent back to the “thank you” page however it does not trigger the actual transaction complete events that a normal checkout flow does.
This means no transaction events are sent to GA, Facebook, or any other marketing tags that you have set to trigger on the purchase complete thank you page.
This can be fixed by having a proper data layer on the thank you page and triggering these marketing tags to fire when the user reaches this version of the thank you page, which is really the order details page.
Step 3: Marketing Tag Cheatsheet for Event Tracking
Now that the data layer is configured across the entire store, it’s time to map the marketing tags that you’d like to configure via Google Tag Manager.
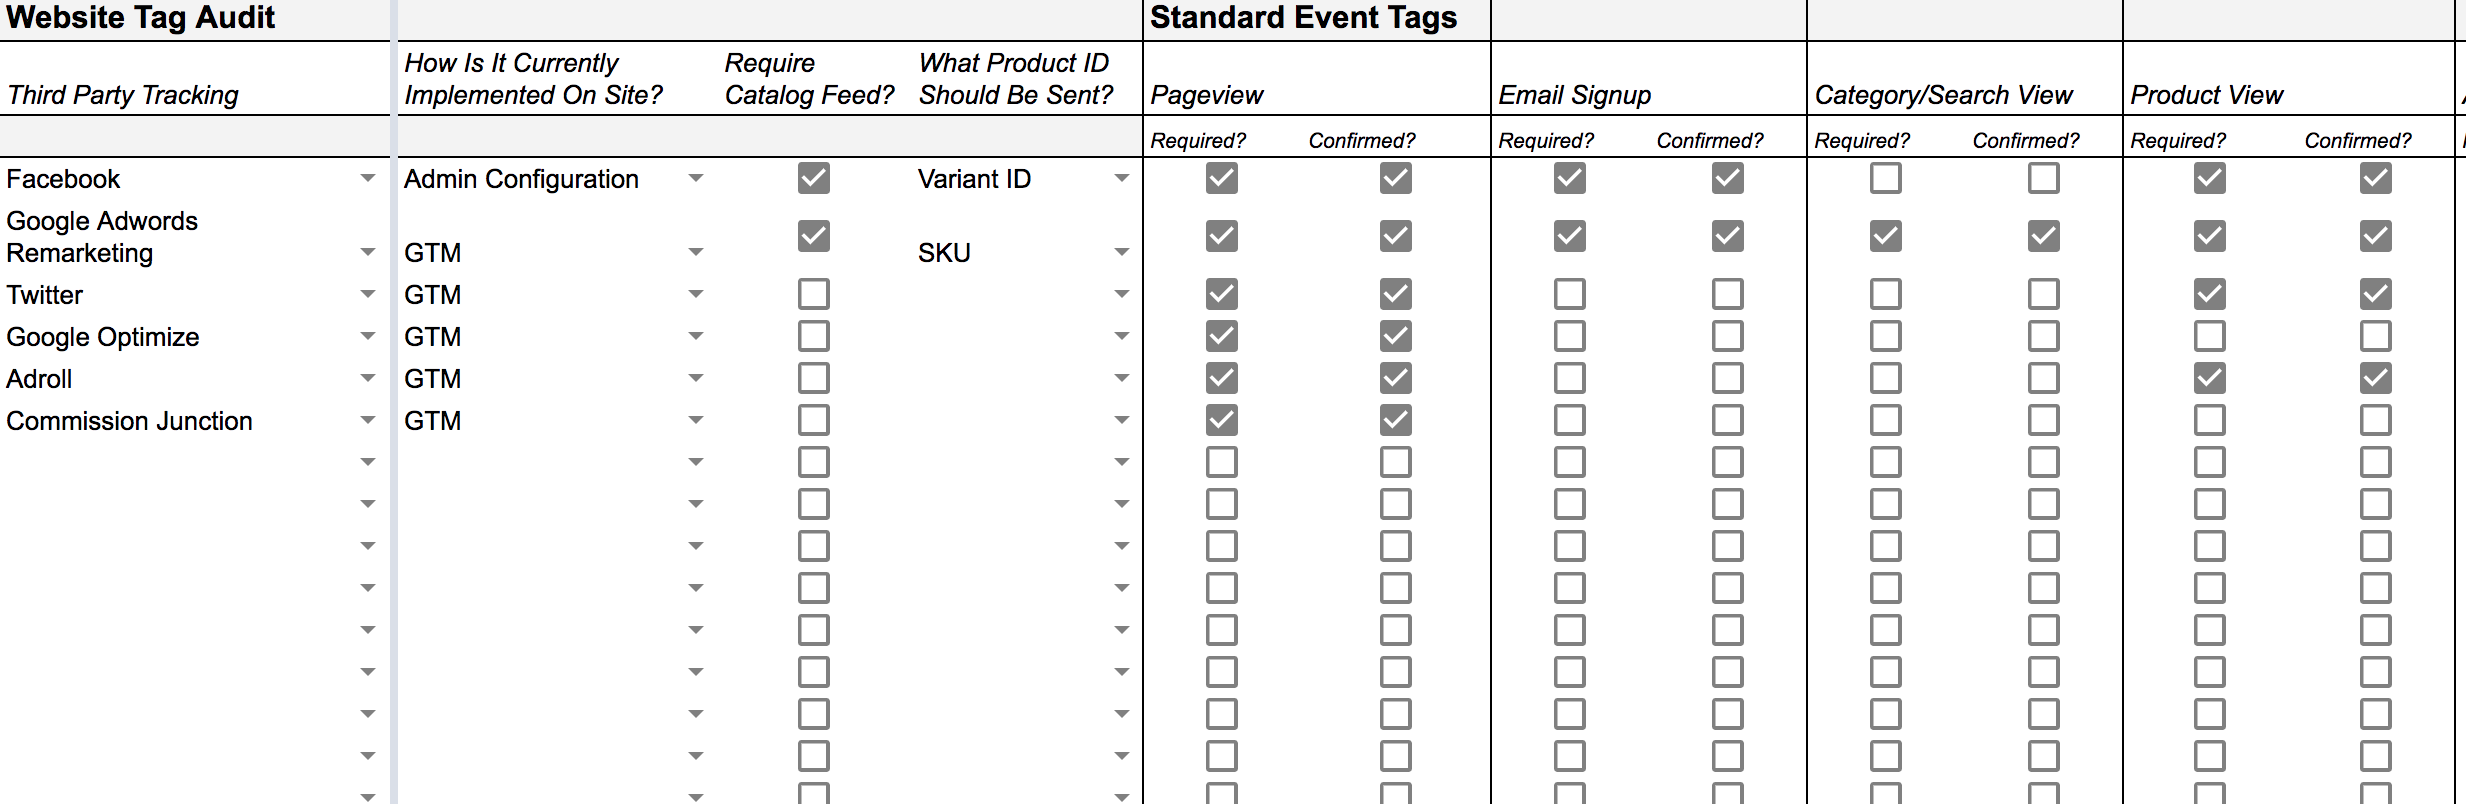
The cheatsheet which you can download here looks complicated – but essentially boils down to this:
- What tags need to be implemented as tag destinations in GTM?
- Do they need to map to a product catalog uploaded to the marketing channel? (example: the Facebook catalog that needs to match the content ID sent with the Facebook pixel)
- Do they need to be removed from the theme to prevent duplicate tracking?
- What actions need to fire a unique tracking event? (e.g. add to cart, purchase)
Once you’ve identified each of the steps above then it’s time to configure these tags via GTM.
There are a few ways to accomplish this:
- Build your own tags, triggers, and variables inside of GTM from scratch
- Import pre-built GTM containers that have all of the tags, triggers, and variables created for you. You just need to update your account ID and test. These pre-built containers come with the GTM Suite on the app store
- Have experts handle the implementation, setup, and testing for you. View our plans if you prefer the “done for you” type of approach 🙂
Once this step is complete then you’re ready to move on.
Step 4: Implement Google Analytics Event Tracking
Tagging doesn’t stop at marketing channels.
Most stores do not have the time to take advantage of custom event tracking aka tagging for Google Analytics to drive custom user journey reporting.
You can tag your website to track:
- Click actions (e.g. what promo banner drives conversions? What is the most used filter?)
- Video plays
- Impression actions (e.g. does UGC visibility to user drive more engagement and conversions)
- Time on page
- And much more
The good news is that we have a codeless way for you to tackle this quickly as well.
Elevar’s GTM Event Builder Chrome Extension allows you to point and click on your website to create custom events for Google Analytics.
No code or developer needed to add to your website. The video above shows exactly how it works along with some real life examples that you can draw inspiration from.
Step 5: Implement Event Tracking for Your User Journey
The power of event tracking doesn’t stop at just viewing click based events.
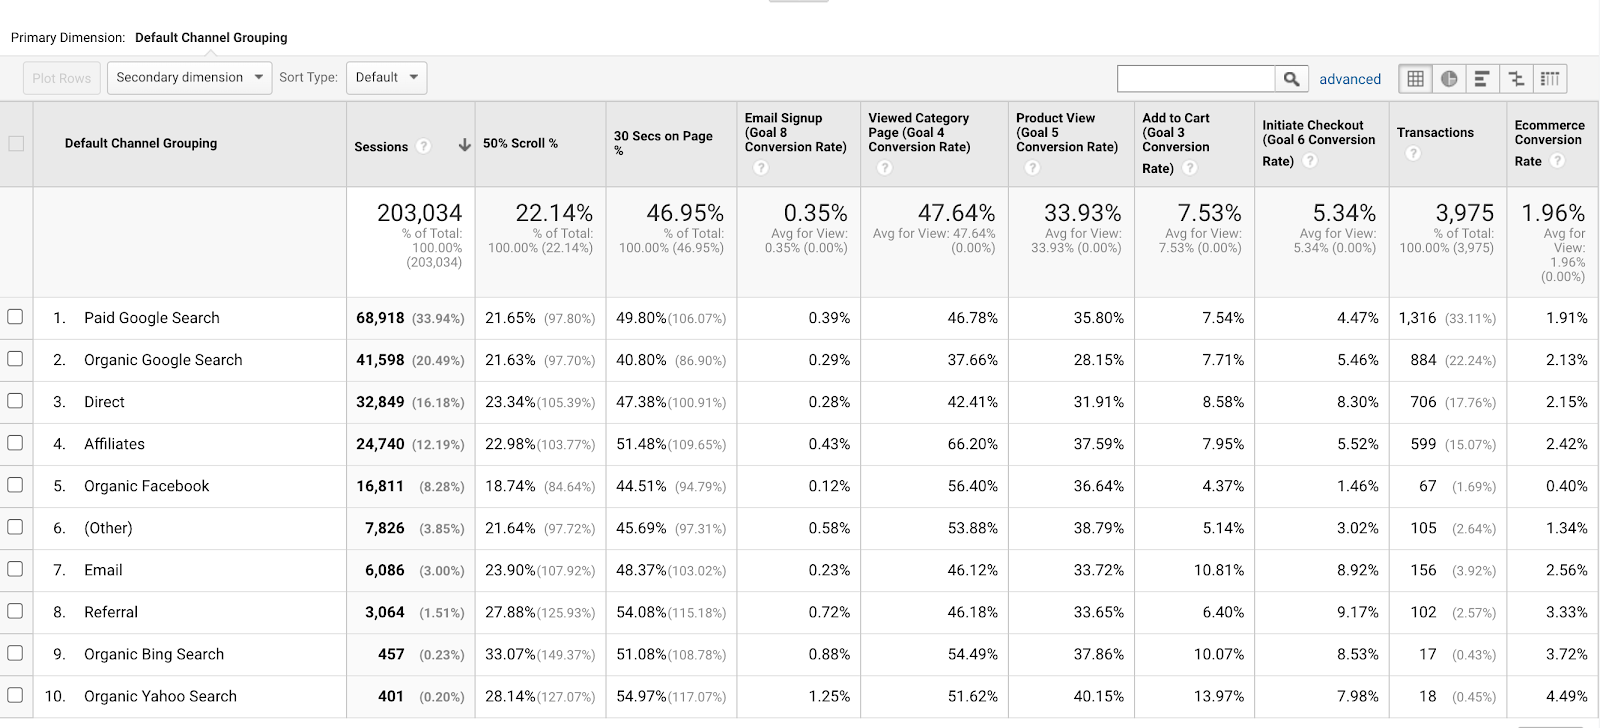
The above image is an example report in Google Analytics that uses a combination of:
- Event tracking
- Custom metrics
- Goals
- Calculated metrics
This helps to provide an at a glance visual of how marketing channels are performing across the entire funnel.
This can be done for landing pages, product pages, etc.
We’ve found marketing teams love this type of report to evaluate how campaigns are driving user engagement at the top of the funnel and which are better at driving purchases.
This means you can evaluate campaign success on other metrics – like email signup or add to carts – vs purchases alone.
This video provides a more detailed overview on custom metrics and how you can leverage them for a custom report like this.
Step 6: Create Custom Audiences for Remarketing
So you’ve created all of this amazing event tracking across your website for Google Analytics, Facebook, AdWords, Klaviyo, and more.
But what can you do with it besides analyzing your user behavior?
- Create custom remarketing audiences
- Create lookalike audiences
- Create trigger based campaigns or personalization flows
Here’s a quick example of using something as basic as time on page to determine intent signals for Facebook:
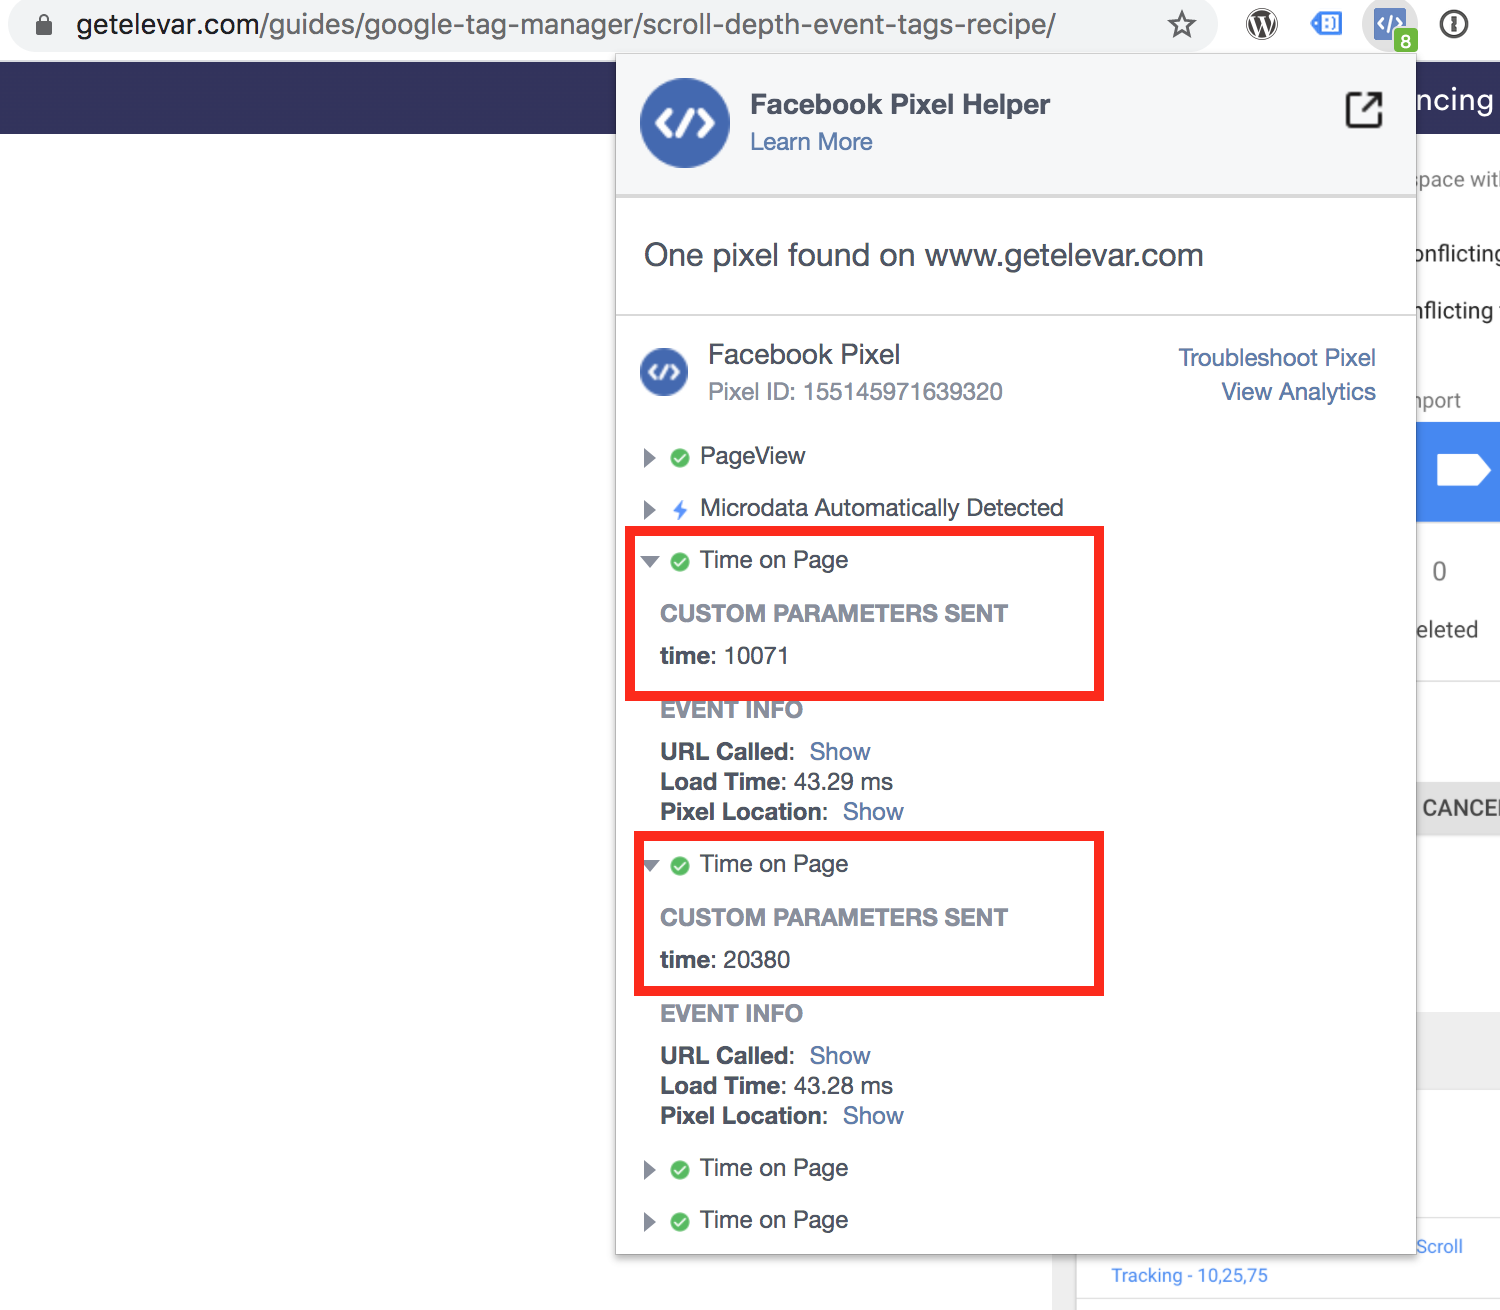
You can read the complete guide and download the GTM container for creating time on page Facebook events here.
Step 7: Setup Monitoring to Minimize Silent Tag Errors
Remember that feeling of frustration I mentioned in the beginning of this article?
When you are trying to put your tagging and event tracking to use but realize it’s broken or completely inaccurate?
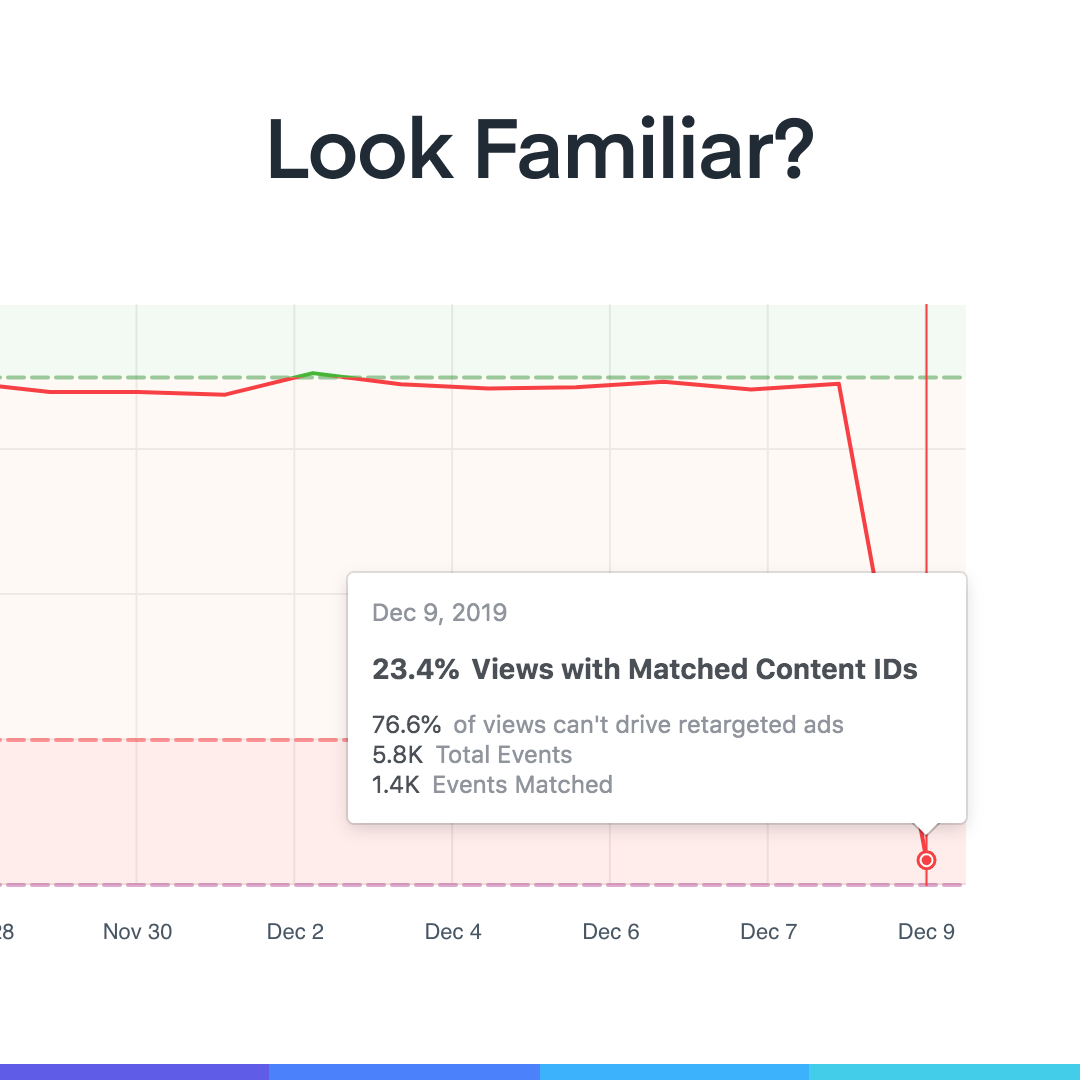
We’ve all been there and still are in many cases.
Tagging is susceptible to breaking in so many ways:
- Code deployments
- Conflicts with third party features
- Accidental removal
- Changes in the channel requirements
- Browser changes
- The list continues to grow over time
Unfortunately there are not many solutions that exist to monitor all of your marketing tags and pixels in one place.
Some channels will have their own error tracking that you can access – like Facebook and AdWords.
But you’re usually left hanging without answers to the “why?”
Why did my add to cart event break? Or why is my conversion tag missing revenue?
This is the reason we built our own tag monitoring solution that is built right into Google Tag Manager.
It provides the ability to track errors – and the why behind them – at the source of the tags. Google Tag Manager.
So now when any conversion tag is missing revenue you can see exactly when this started, what the error is, what browsers or pages it exists on, etc.
We’ve found that this significantly reduces the time to fix issues when they do inherently happen.
Which in turn protects wasted ad spend and prevents campaigns from being paused until the issue is resolved.
View Elevar Plans
Learn how Elevar can help you simplify your tagging and event tracking.
Step 8: Configure CCPA/GDPR (if required)
I won’t go into too much detail outlining if you are required to implement safeguards for complying with these laws.
But more importantly ensuring you’re aware that this does exist.
We have an article dedicated to CCPA compliance specific to Facebook pixel but this is just one small part of overall compliance with all of your marketing channels.
Your best bet is to start with your legal team to determine what you need to comply with.
Then you can move on to how to implement proper compliance.
And then apply to your marketing tags.
Step 9: Analyze and Implement Conversion Experiments
Phew. That’s a lot of work on implementing the first 8 steps.
But once you have:
- Data layer foundation in place
- Marketing tags setup and reporting properly
- Event tracking configured across your website
- Tag error monitoring in place
- Legal compliance in order
Then the real fun starts with conversion research and experimentation.
Whether you are doing this yourself, have a partner executing, or an internal team, the one dependency each has is a solid data foundation in place to make a hypothesis from.
The true goal of all of this is to help you convert more first time and repeat purchasers.
The companies that we see scale the fastest have mastered the first 8 steps through a proven process.
Some do everything in-house with their own teams dedicated to tagging initiatives.
Others leverage companies like Elevar to help simplify the process.
Either way the goal is to buy back more of your time to focus on strategy, scaling, and experimentation to improve your bottom line.
If you’re interested in learning more about how we can help please book a call with us here.
Or read some of our other guides on event tracking:
- How event tracking can help scale your business
- 26 free videos on how to make the most out of Google Tag Manager
View Elevar Plans
Learn how Elevar can help you simplify your tagging and event tracking.
Interessante o que acabei de ler aqui em seu blog, estou acompanhando seus artigos alguns dias e são muitas informações interessante gostei.
Vitoria da sorte resultado