How to Implement Google Optimize on Shopify in 2022
See how to launch Google Optimize with Shopify in minutes.

Google Optimize is Google’s version of Optimizely, Monetate, VWO, among others that allow you to test different variations of pages, content, and UX and measure how they perform against KPIs that you define.
For example you could test the following on your store:
- Hiding banners on mobile
- Changing position of reviews or other elements on product pages
- Changing text or banners based on Google Ads Campaigns
- Inserting new content onto landing pages
You can test layouts changes, layout additions, features, text, colors, links, etc through a/b, multivariate, or redirect (two completely separate pages) tests.
These are very simple examples but testing (even small changes) can really help you learn how your customers behave to ultimately boost conversion rates.
What’s even better is the ability to set targeting rules based on a user’s behavior, key traits identified through your data layer (you are using our Data Layer app for Shopify, right?!), and even based on specific AdWords campaigns.

Testing + Segmentation == Winning formula!
On to implementing.
Implement Google Optimize via Shopify Theme
As of 2022, we no longer recommend implementing Google Optimize via Google Tag Manager due to:
- Performance issues to end user
- Maximizing the % of users that are bucketed into the experiment
- Controlling async vs sync loading of the JS (for site speed)
Here is how:
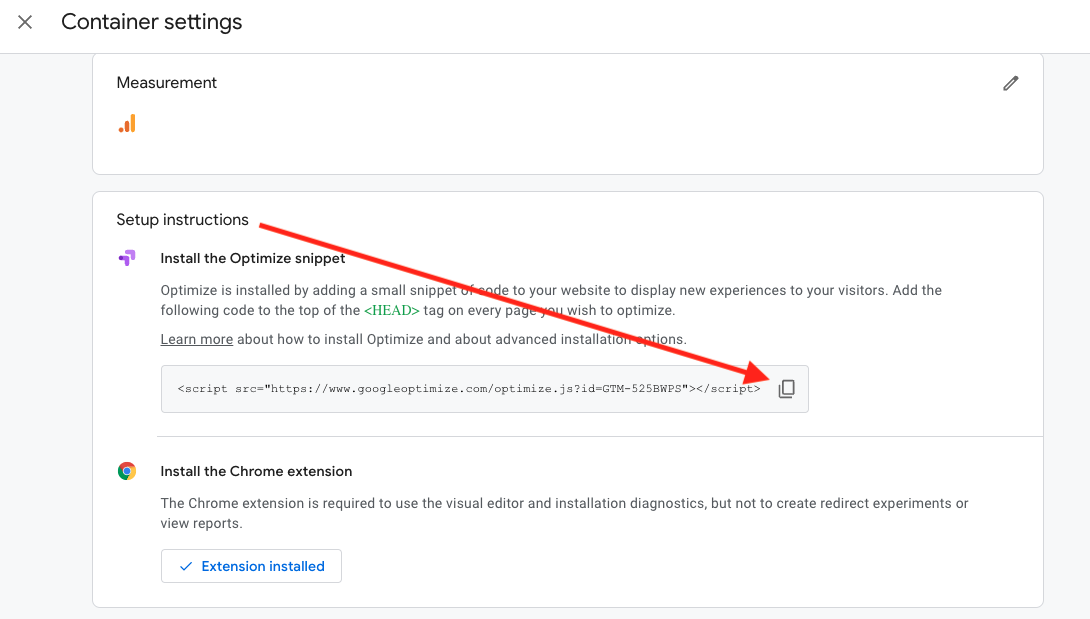
Step 1: Copy Google Optimize Snippet from Settings
Inside of Google Optimize, you can find your site’s script in the settings (top right corner of page).
Copy this code:

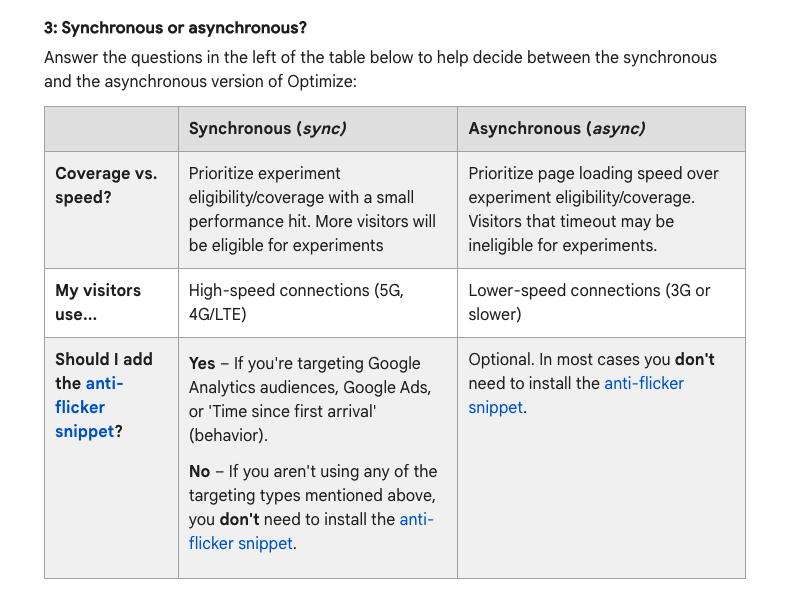
Step 2: Decide on Async vs Sync Script
Google gives you control over this setting in your script. Here is their basic decision grid:

Step 3: Implement Script in Shopify Theme
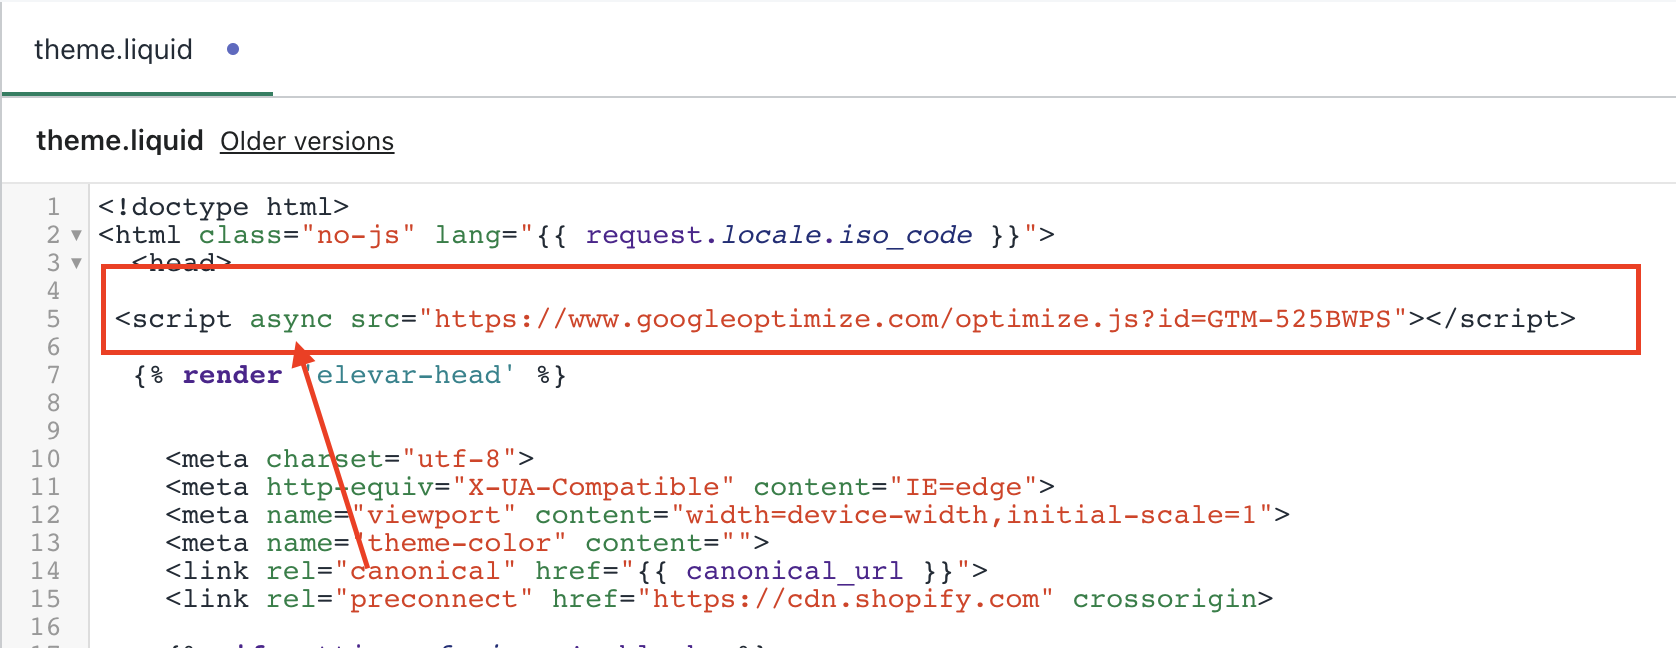
Now head to your Shopify theme > theme.liquid template.
Paste the script from step 1 at the very top of the file — including above the Elevar or any other data layer snippets:

Notice how I added “async” to my script. You can add this based on your decision from step 2.
This can be sync or async.
Once you have then you’re ready for testing!
Step 4: Verify Google Optimize is Working w/o Flicker
Once you’ve created and launched a new experiment in Google Optimize then you can validate that everything is working pretty quickly.
I always use the preview options before launching any test to verify everything works as expected and I’m not introducing bugs to my site!
I recommend using web and mobile previews to ensure your test (and other pages not intended for the test) are working as expected.

Then you should be able to view your test and confirm there is no flicker effect.
You’re now ready to launch an experiment in Google Optimize and on your way to becoming a conversion optimization expert :).
Common Issues
- AllowLinker mismatch
- Security notice that you can’t use Optimize editor with your website
If you are seeing an allowLinker warning and you’ve implemented via GTM then you might need to set your allowLinker to true on your Google Analytics variable > Fields to Set setting:

You also may see the security notice which as of now I don’t believe is fixable. This has to do with a server setting that Shopify starting setting on new stores about a year ago.


Hi Brad,
Thanks for this, really helpful. I’ve got a question about Step 2.
Your Optimize plugin is “ga(‘require’, ‘GTM-NGHLX97’);”
But when you copy it in your Shopify admin panel, there seems to be other lines of code. For instance: “(function(w,d,s,l,i)…”
I’ve got no additional GA Javascript at the moment. Am I fine to just add my version of ga(‘require’, ‘GTM-NGHLX97’); ? My addition GA script will litterally be:
[script](‘require’, ‘GTM-NGHLX97’)[/script]
Thanks Max. Yes, you can just copy the exact snippet from Google Optimize and paste into your additional scripts configuration. The additional lines of code in my screenshot is GTM.
Great article, thanks a lot!
Hello Brad,
I installed Google Tag Manager on Shopify using your tutorials How to Implement Google AdWords gtag.js on Shopify, thanks fo that.
I’m now trying to install Optimize following this tutorial but I still receiving an errors regarding a mismatch with “allowLinker”.
There is no ways I can get rid of it.
Hi Federico,
Thanks for the note, this is something new that I’ve started to see as well. I’ve just added a screenshot of how to resolve this issue in the post above.
Saved my ass 🙂
AWESOME ARTICLE!!! Cheers for that!
Can you advise on how to overcome revenue tracking? This is the biggest obstacle with testing on Shopify….
I followed your steps but this appears when I run an experiment https://prnt.sc/kyjjuc
Any idea what could be wrong?
Thanks for the video!
I keep getting an issue “Uncaught SyntaxError: Invalid or unexpected token” for the ga(‘require’) line, despite following your instructions exactly.
And Google Optimize doesn’t recognize the installation.
Do you know what could be wrong?
Hi Niklas – can you send a screenshot of your GA additional script field settings? Although, it looks like you got it worked out onsite already!
Great article – Unfortunately it is not working for me – can you take a look?
Hi RJ,
Happy to help! Can you post screenshots of your settings that you’ve implemented?
Hello Brad
the problem i’m getting is the “AllowLinker” issue – i have also set the variable of GA in GTM (Fields to set)to allowLinker -> True, but still all my tags in GTM fire with AllowLinker – > False
I follow the same steps but still getting error can I send you screenshots?
Hi, thanks for this great post ! Big big value 🙂 When I try to edit on mobile version I have this error message : “This page uses security features that are not compatible with the Optimize for Mobile editor. For more information, see our security requirements . ”
I tried to follow the steps but nothing changed.. Any ideas ?
Thank you for the awesome post! We have everything set up properly, however, whenever we go into the editor we get the following error:
This page uses security features that are incompatible with the Optimize editor. For more information, you can check out our security requirements.
Any idea how to fix this?
Thanks, Brad. Was wondering if the error with the security settings is an warning or actually prevents Google Optimize from working on the site. Trying to see decide it it is even worth it to go down this path if it isn’t going to work anyways. May try using some other software.
Just wanted to thank you Brad for the sweet tutorial. The “allowlinker = true” really solved my issue hehe. Just curious though, what shared variable would you recommend between Optimize & GA? as of now I’m using a regular Page View trigger, but Shopify do not recommend firing any Page View tags through Tag Manager. Would love to hear your quick thoughts if you have any 🙂
Hi,
Thanks for this awesome article!
I am using GTM and receiving allowLinker mismatch error, but having set allowLinker=true in analytics settings variable didn’t solve it.
I am using the same analytics settings variable also in the Optimize tag so I am having a hard time understanding the source of the mismatch.
Any help regarding where else allowLinker might be set to false and cause this erorr will be priceless!
Thanks!
Hey there, thanks for this great aritlce, I have google analytics set up on shopify and then just put on google tag manager and optimize. It’s linking appropriately to my analtyics but I get a red error in tag assistant that says “analytics configuration mismatch” under Optimizations. Should I just ignore this error? Thanks!
Hello!
Thanks for the great article. I am wondering in GTM where you have Google Optimize Tag with trigger on All Page Views. Will this conflict with the Google Analytics tags causing in double count of pageviews reported in GA?
Thank you for you help.