How to Setup Facebook Custom Event Tracking on Shopify via GTM
Learn how to enrich your Facebook audience data with custom events created via GTM in minutes.
By now you probably have Facebook pixel tracking already set up on your store via the Shopify admin (or maybe even our Shopify GTM app).
But you might wondering how to get more out of your Facebook and Instagram marketing efforts.
A large part of getting more out of your FB/IG marketing efforts is ensuring that not only your standard events work as expected, but that you also enrich your Facebook audience data with events that are unique to your business.
Why? You can use this data (like signing up for an email, watching a video, etc) to move a user down a funnel through unique audience targeting. A first time product detail viewer is quite a bit different than a 4th time product viewer who signed up for an email and watched a video.
This guide shows you how to:
- Audit the standard Facebook events (like viewing products, adding to cart) on your Shopify store
- Audit your custom landing pages (if they exist)
- Create custom events via Google Tag Manager and send to Facebook
Prerequisites:
- Download the Facebook Pixel Helper chrome extension
- Ensure you have access to your Google Tag Manager account
- Ensure you have access to your Shopify store
- Bonus: have access to your Facebook Business Manager account so you can view pixel data within FB
Related: Read our guide on how to get started with the Facebook Conversion API with Shopify.
Step 1: Implement Sitewide Pixel
You have two options for this:
- Implement via Shopify admin
- Implement via Google Tag Manager (with the help of our Google Tag Manager app for Shopify)
In the majority of cases implementing the base FB pixel via Shopify makes the most sense (and takes a few seconds).
Inside of Shopify Admin > Online Store > Preferences > you’ll find your FB pixel ID settings here:
![]()
Save. That’s it.
If you prefer to implement everything via Google Tag Manager then you can do this as well (or if you want to run two pixels in parallel, etc).
Keep in mind you will need to create at least the following events inside of GTM:
- Base pageview tag that triggers on all pages
- ViewContent tag that triggers on product pageviews
- Search tag that triggers after user completes an onsite search
- AddToCart tag that triggers on add to cart events
- InitiateCheckout that triggers on checkout started events
- Purchase events that triggers on, well purchases!
Then there are others that you might need to create:
- CompleteRegistration
- AddToWishlist
- AddPaymentInfo
- Lead
Since this custom GTM implementation is it’s own complete article, I’ll leave this for a future article (or you can see some of this in our knowledge base for our app) so we can get into the custom event setup!
GTM Suite for Shopify
Install our GTM app that comes with the complete Google dataLayer and pre-built containers.
Learn MoreStep 2: Validate Standard Facebook Events Trigger as Expected
Shopify states the 9 standard Facebook events listed below trigger by default:
- ViewContent
- Search
- AddToCart
- AddToWishlist (nope!)
- InitiateCheckout
- AddPaymentInfo (sometimes!)
- Purchase
- Lead (nope!)
- CompleteRegistration (nope!)
However in my experience this doesn’t always seem to be the case 🙁 .
You can check for yourself inside of Facebook Business Manager > Pixels > find your pixel > go to event data source. You should see something like this:
![]()
If you click into the pixel then you will see the list of events which should look something like this:
![]()
This is a view of the default Shopify FB Pixel setup. Notice missing events for Lead (email signup), CompleteRegistration (signups), AddToWishlist, and the AddPaymentInfo is more than Purchase?
In any case – pixel data will NEVER be 100% accurate between GA, FB, Shopify, AdWords, etc (example: I’ve gone into detail here on why GA doesn’t match AdWords data). But I would not fuss over small (10% or less) differences. Most of the time it’s not worth the time/stress.
But you do want to be sure your minimum events are firing without issues – like product views, add to carts, etc.
If you find missing events (like email signups aka Lead) then you can backfill these via GTM which I will show how to do in Step 4 below.
(optional) Step 2a: Validate on Shogun, Zipify, etc Pages
If you are using custom page builders for Shopify then you need to validate the proper event data is being sent from these unique pages as well.
If you are not using custom landing pages like these, then skip this step and go to step 3.
Most of these will apps pull in your Shopify FB Pixel ID by default, but if you implemented FB pixel via GTM then be sure you also have GTM implemented on your landing pages. Otherwise no FB pixels will trigger/send data to your FB account.
By using the FB Pixel Helper chrome extension you can simply click on it in your browser to validate the pixel fires and data populates as you expect like this example using Zipify Pages:
![]()
If you do not see any events firing then double check your landing page app help docs for this (there are too many to list out here and walk through!).
If you don’t find a FB pixel integration with your app then you might need to implement your Facebook event tags via GTM.
Step 3: Ideate YOUR Unique Custom Events
Now that you’ve audited your main site and custom landing pages, what does your list of missing events look like?
- Lead (for email signup)
- CompleteRegistration (for creating account)
- AddToWishlist
If you have others then add them to this list!
Now consider – what makes your shopping experience unique OR what would be helpful for you in defining your marketing funnels on FB/IG?
This is the same type of question you’ll want to ask yourself that I previously wrote in my guide on custom event tracking for Klaviyo to help in email personalization.
- Do you have product or brand videos?
- Blog posts?
- In depth reviews?
- Comparison tool?
- Subscription Quiz?
Let’s say you have product videos and a custom subscription quiz for users on site. I’ll show how to create these custom events and send to Facebook.
Step 4: Create Custom Event Tags in Google Tag Manager
In this step I’m going to show you how to fill in the gaps for the standard events of Lead and CompleteRegistration.
Plus you’ll learn how to create custom events for watching videos and taking a subscription quiz.
Create “Lead” event
What qualifies a lead is subjective, but let’s agree that a lead is a user who has signed up for an email.
We need to go to Google Tag Manager and:
- Create a trigger for any email form signup events
- Create a custom HTML tag for the Facebook custom event code
Inside of GTM you’ll want to put your container into Preview mode so you can browse your site with the debug console open like this:
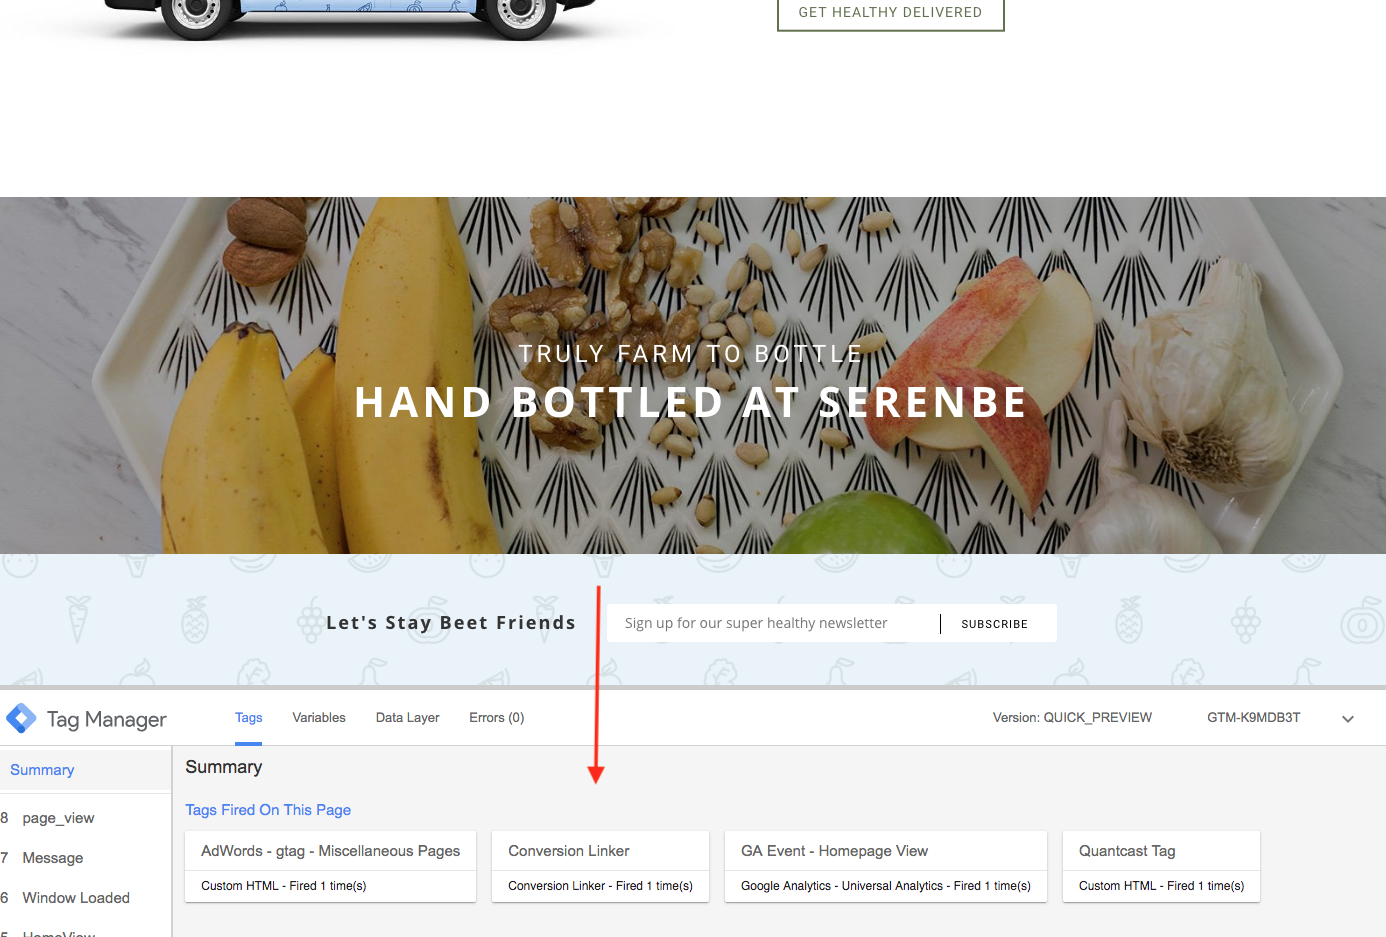
Then you’ll have to find each place you have an email signup. For example:
- In the footer
- A modal overlay (from Privy, etc)
- etc
It’s possible if you are using a tool like Privy to power your email signup forms that they have a built in integration that needs to be enabled (see Privy’s docs here).
But if your tool doesn’t then you can get close to this with GTM triggers.
Once you ensure your form variables are enabled inside of GTM, then create a dummy trigger using Form ID. This is only needed if you don’t already have a trigger using form variables.
Don’t worry about it’s accuracy for now. This step is so GTM will pick up form interaction data on the frontend when you are trying to find the proper Form ID. It’s a weird oddity that GTM won’t fire any form (or click) events in the preview console unless you have a trigger in your workspace using form variables (or click variables).
Navigate to your site (remember with Preview mode enabled) and sign up for an email. You should see something like this:
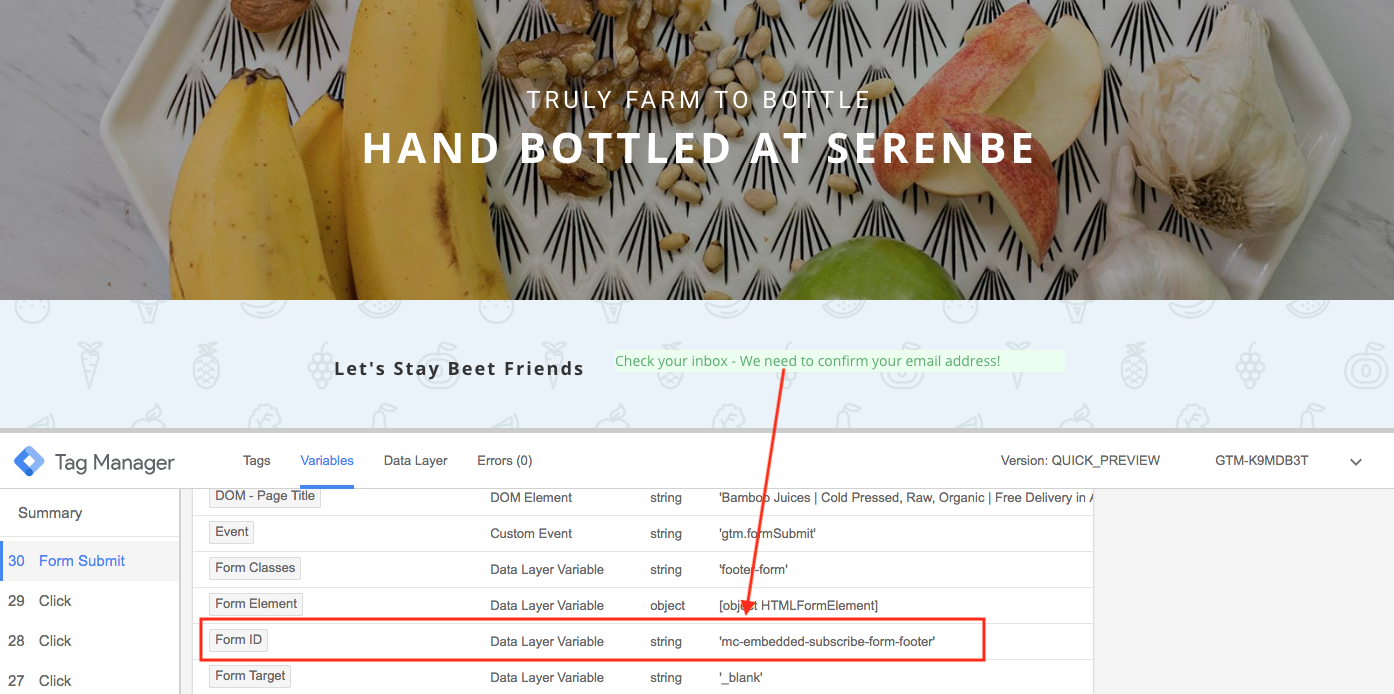
If you do then update your trigger inside of GTM to look like this:
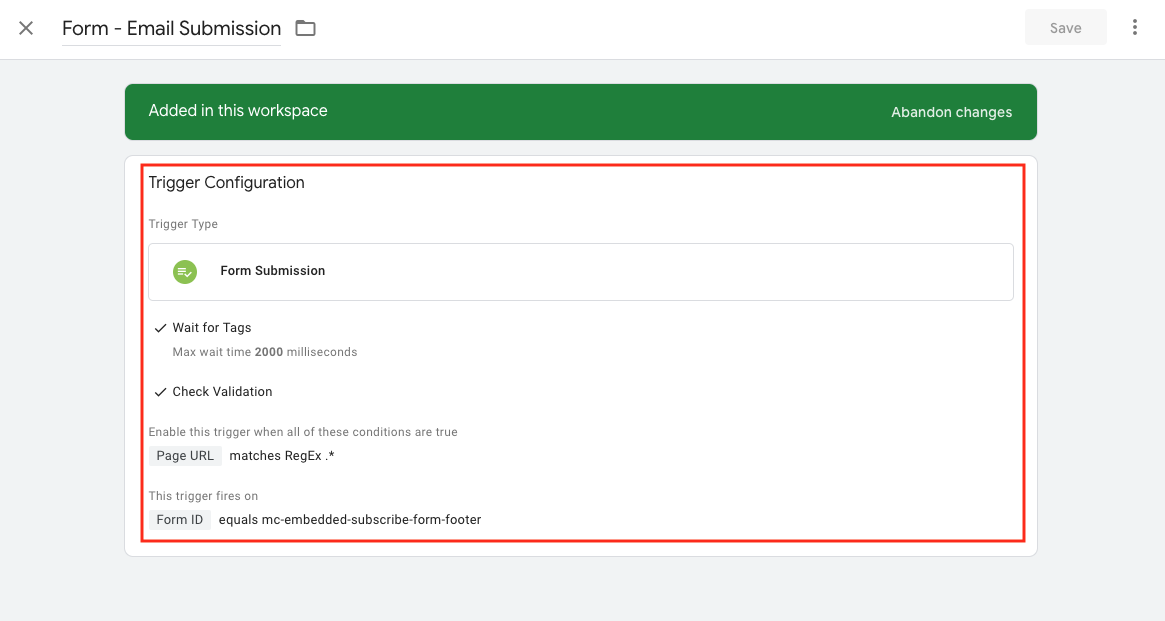
The Page URL matches RegEx .* means that this is valid on every page of the site.
Now you just need to go to Tags > Create new custom HTML tag and insert this code:
<script>
fbq('track', 'Lead');
</script>
And then assign the trigger you just created so you’ll end up with a tag that looks like this:
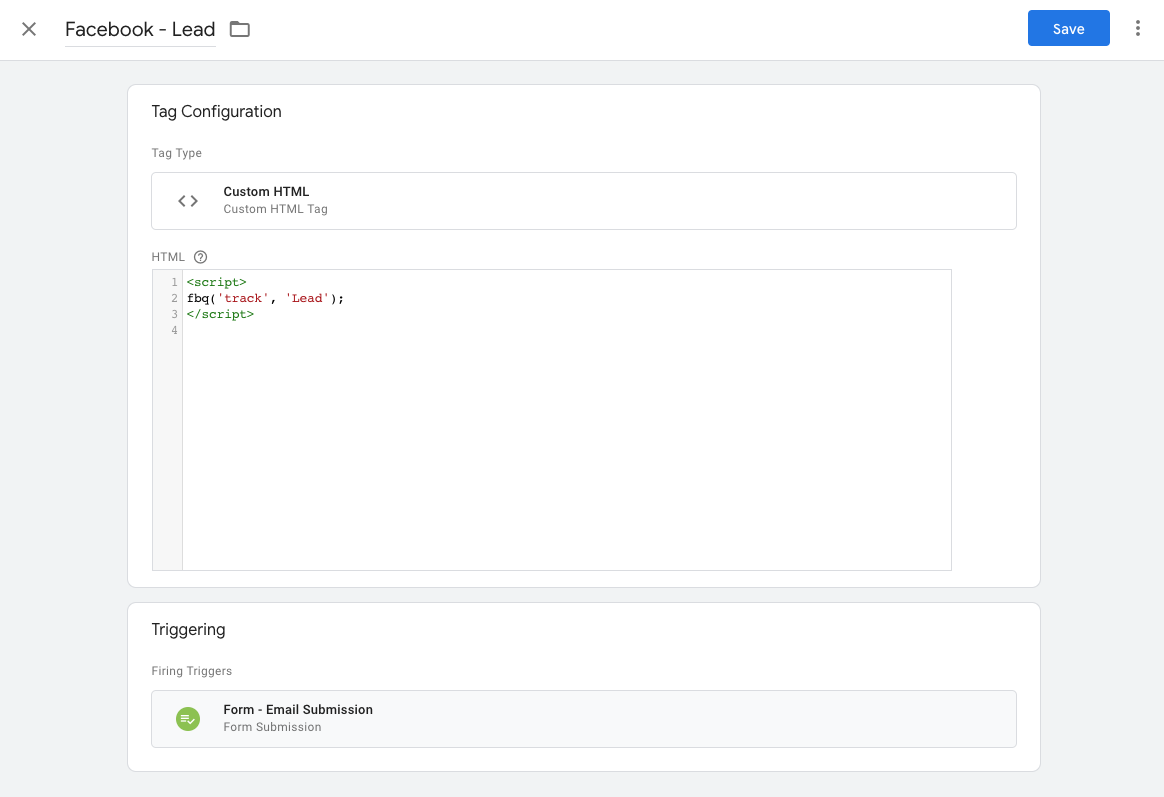
That’s it!
Once you repeat this for other email signups on your site then refresh your GTM preview mode data and verify it works.
This is what you’ll want to see in GTM preview after you test your signup:
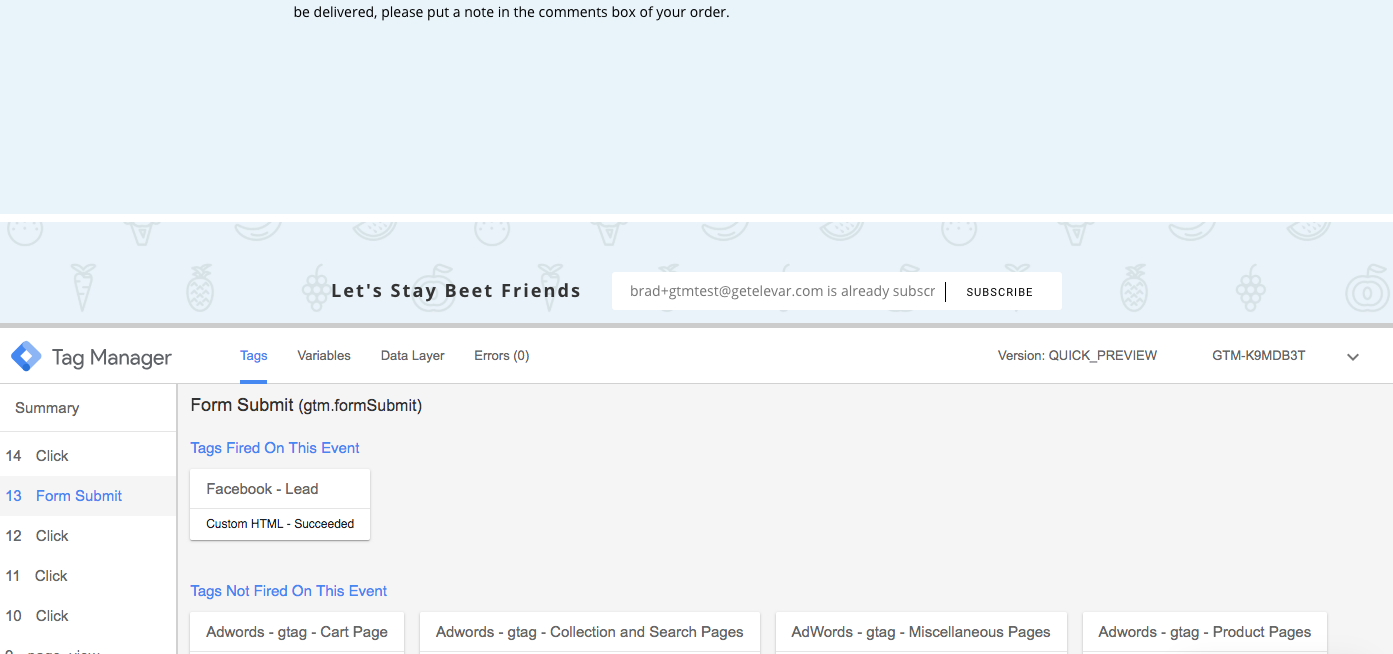
If you’re looking closely enough you’ll see this fired even though I’m subscribed.
Depending on your email implementation you might not see any tag fire in GTM when testing. If so then remove the “Check Validation” checkbox on your Form ID trigger in GTM => refresh your container => test again.
Hopefully you’ll see this trigger now but as you can see this can open up to inflated #’s as the tag fires anytime a person attempts to submit an email (vs the form confirming signup success).
Create CompleteRegistration Event
This is a similar step as above which you can implement quickly by navigating to your create account page and following the same steps as above.
A little trick on this when trying to get your Form ID:
When clicking “create account” button hit the ESC (escape) button on your keyboard. This will pause the page from finishing the reload so you can grab the ID like this:
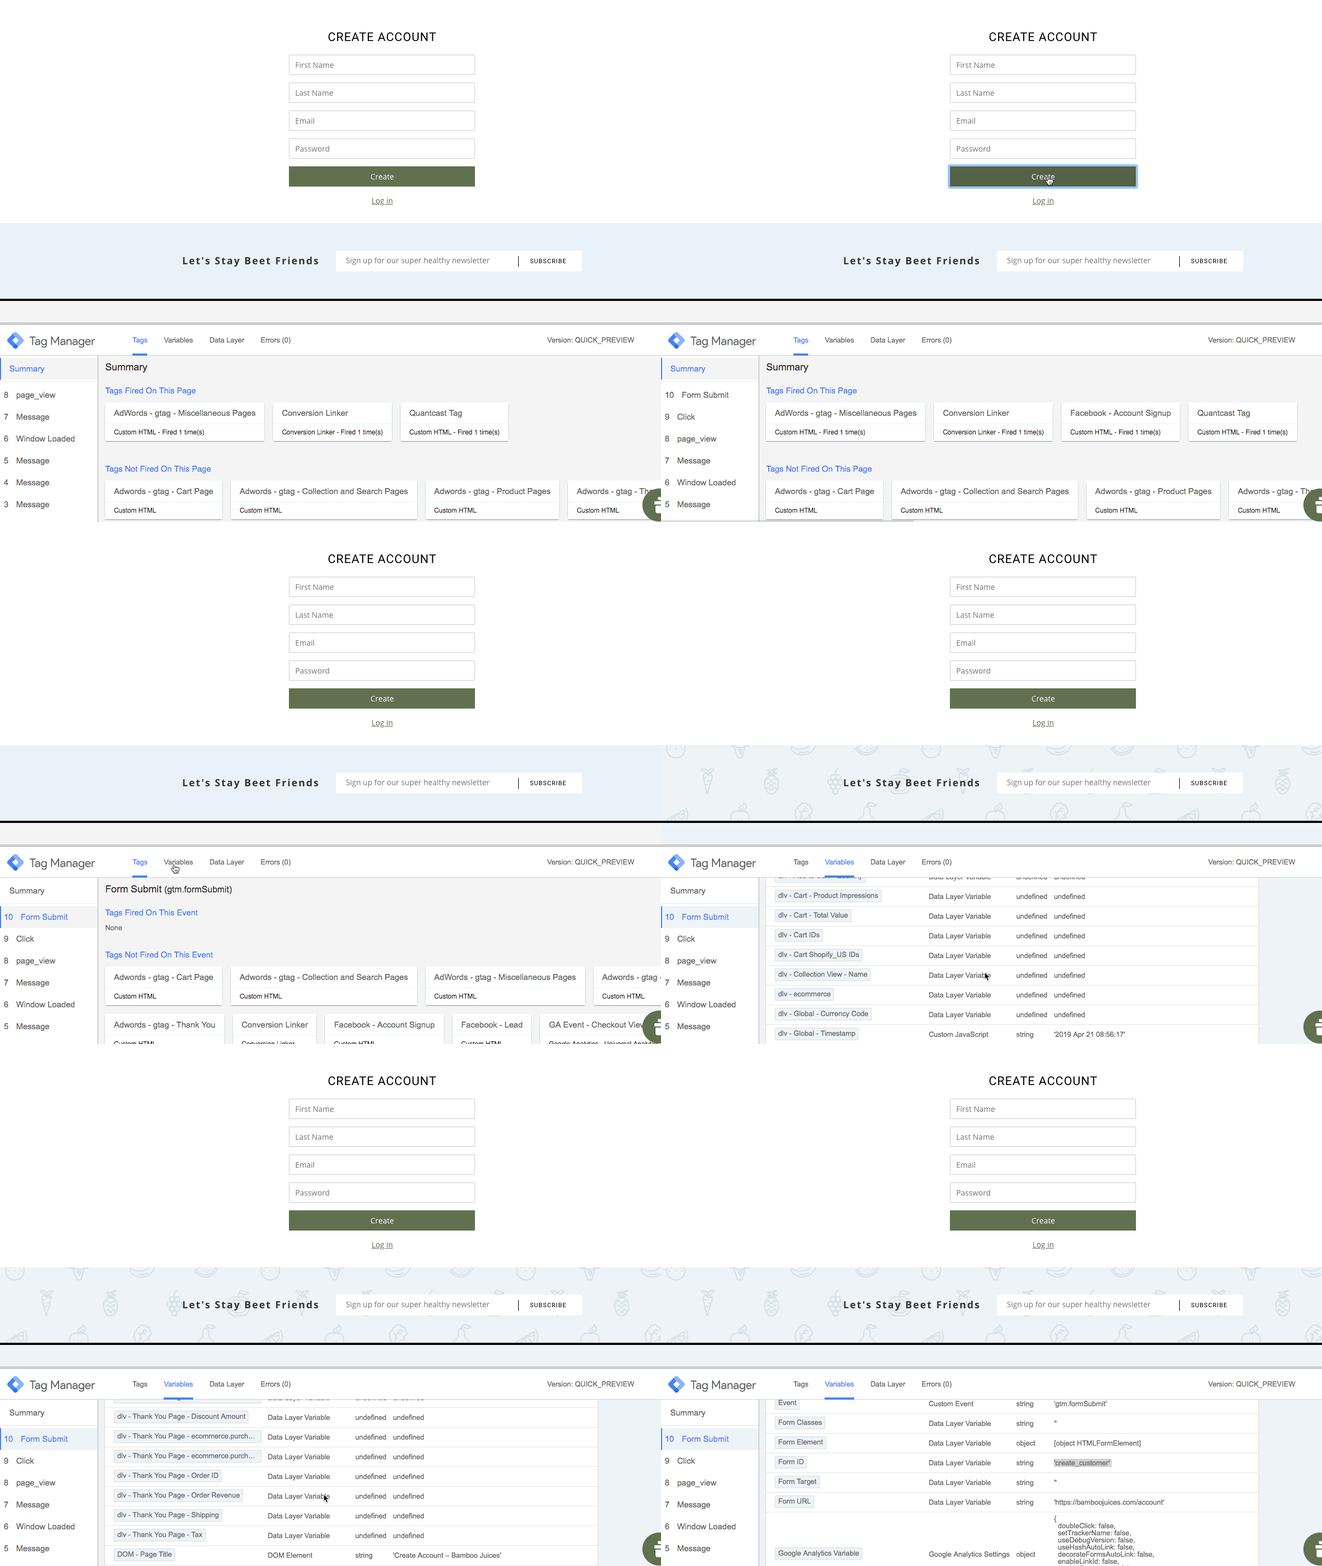
Once you have your trigger then create a custom HTML tag with this code below and assign your trigger:
<script>
fbq('track', 'CompleteRegistration');
</script>
Create Watched Video Custom Event
I show in full detail how to utilize GTM’s built in video trigger and variables in this related guide. Take a quick read for more background first or download our pre-built GTM container here.
Once you understand how to utilize these built in GTM features and have a trigger for “starting a video” then you need to create a new custom HTML Facebook tag.
This time I want to send a little bit of additional data to Facebook with the event: the video name that the user watched. The code for this is:
<script>
fbq(‘trackCustom‘, ‘WatchedVideo‘, {
video_name: ‘{{Video Title}}‘
});
</script>
Notice the items in bold are customizable.
Navigate to a page with a video and test it out with GTM and you should see the tag fire like this:
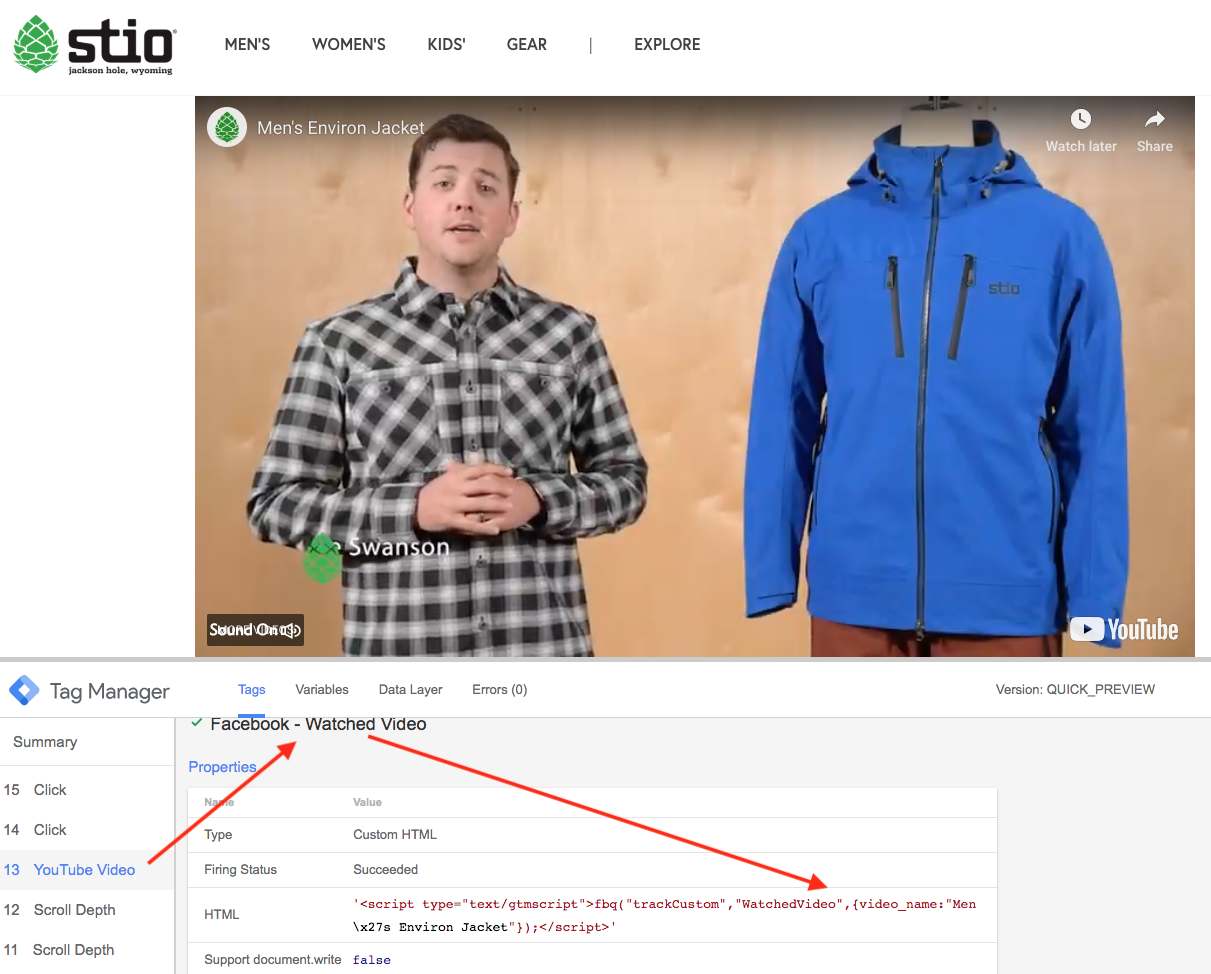
And then you can verify using the FB pixel helper that the tag triggered successfully:
![]()
You can customize/add additional content variables into your tag if you would like. For example if you wanted to send duration values then your FB tag might look like this:
<script>
fbq('trackCustom', 'WatchedVideo', {
video_name: '{{Video Title}}',
video_duration: '{{Video Duration}}'
});
</script>
Create Subscription Quiz Funnel Custom Events
This will require some work on your end but the data benefits can be extremely beneficial for customer targeting.
I’ll use an example of one of our customers Neat Nutrition, who has a 3 step subscription signup process.
In this last step there are 3 frequency options that I can select. As I show in the video below, the Click ID changes on each option which gives me the opportunity to translate into unique values to send to Facebook:
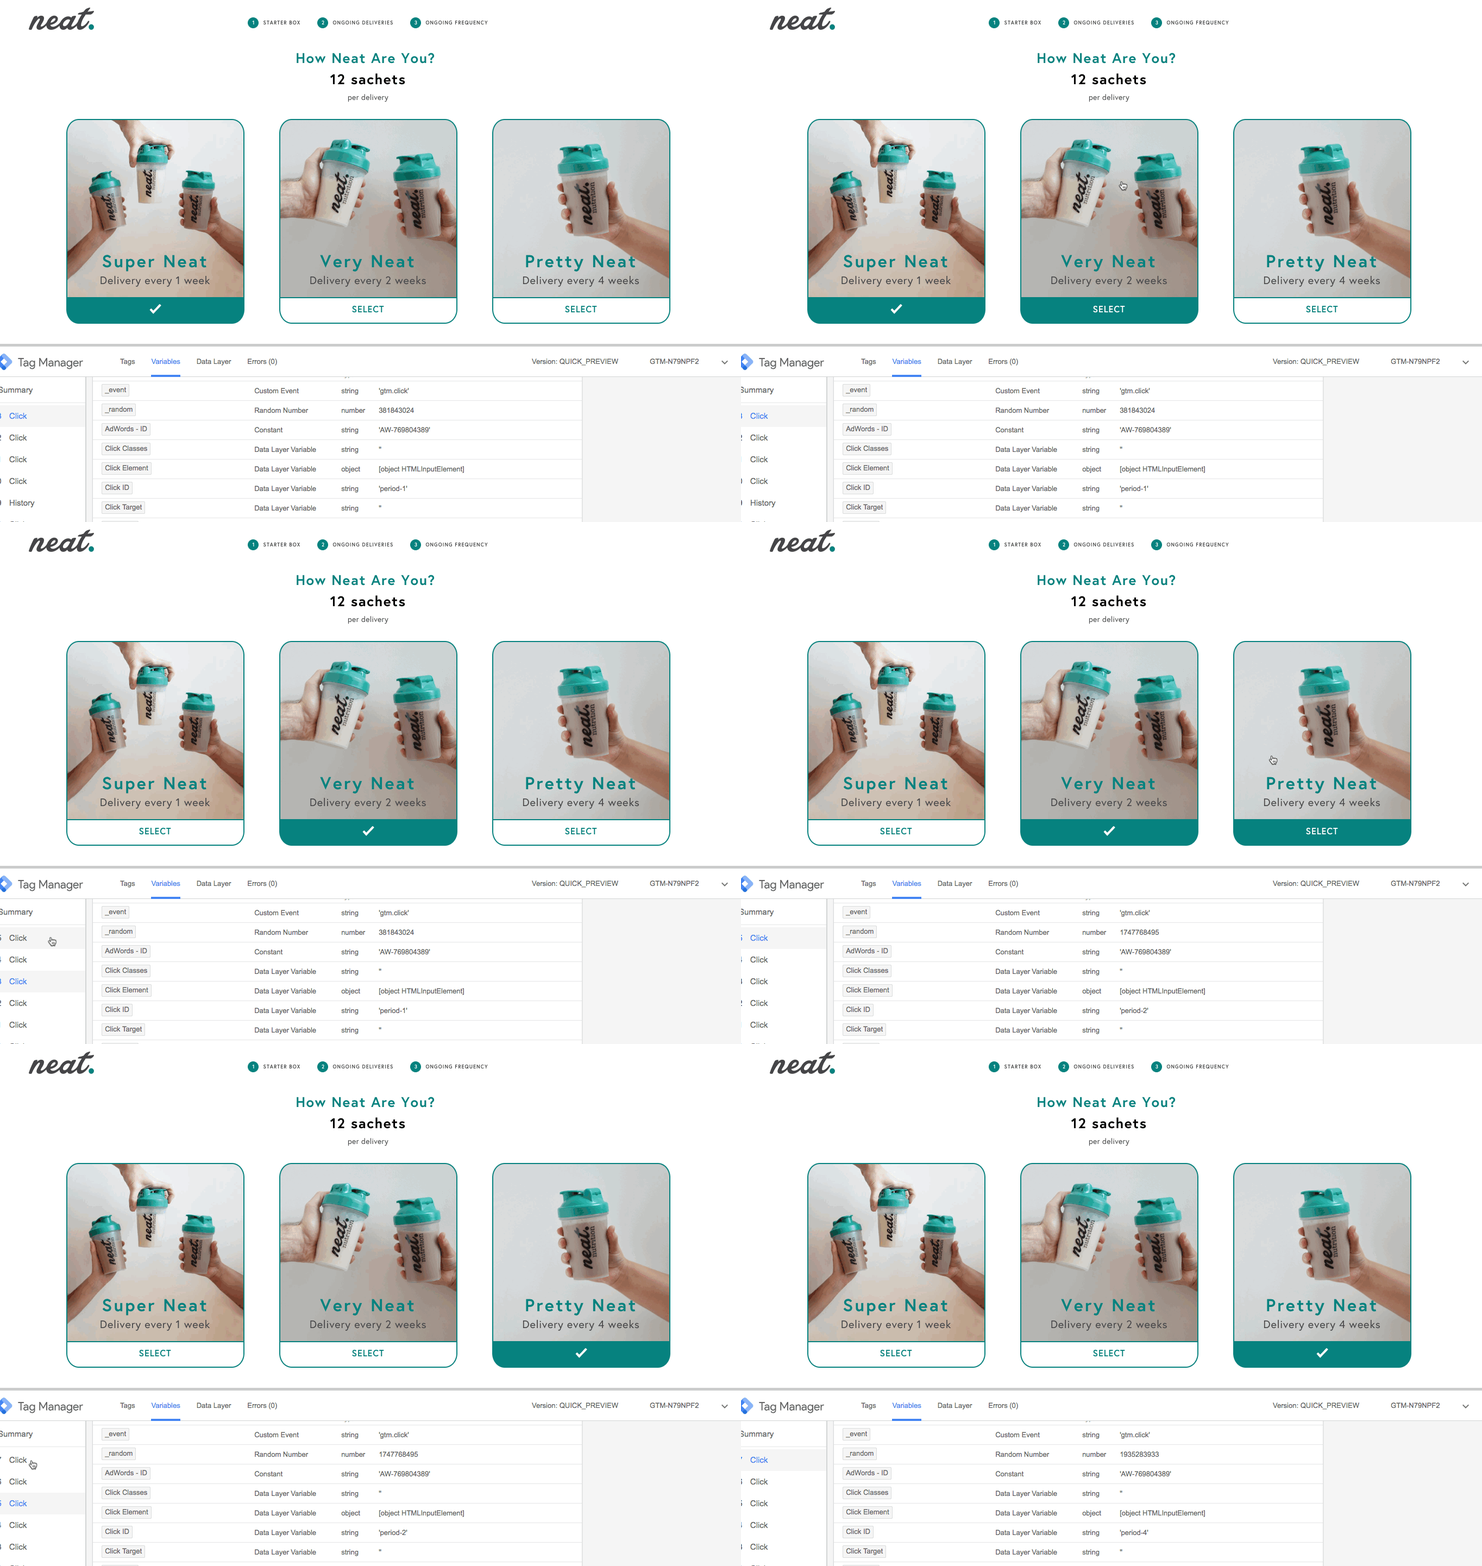
But period-1,2,4, won’t mean much in Facebook. So I translated this Click ID output to something that makes more sense before we send to Facebook using GTMs Lookup Table variables like this:
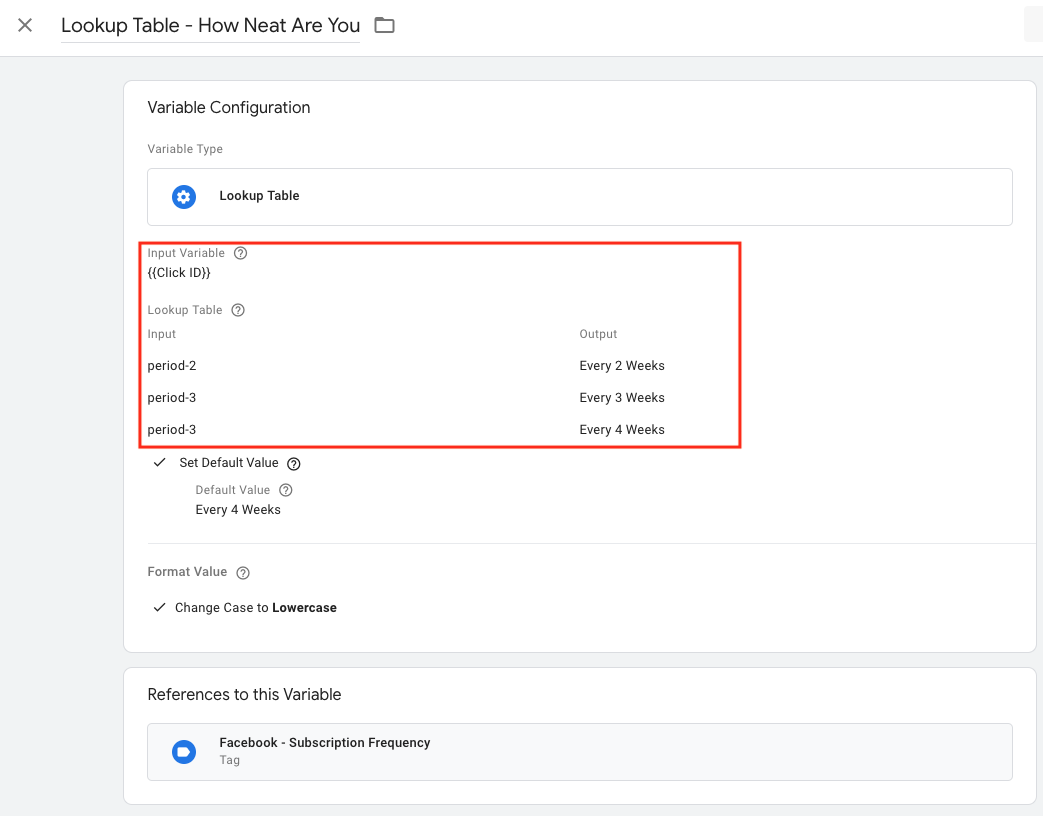
So now when I create the FB custom tag, I assign this lookup table variable (and another similar one):
<script>
fbq('trackCustom', 'SubscriptionFrequency', {
subscription_type: '{{Lookup Table - Subscription Type}}',
subscription_frequency: '{{Lookup Table - How Neat Are You}}'
});
</script>
And when the tag triggers this data populates like the below:
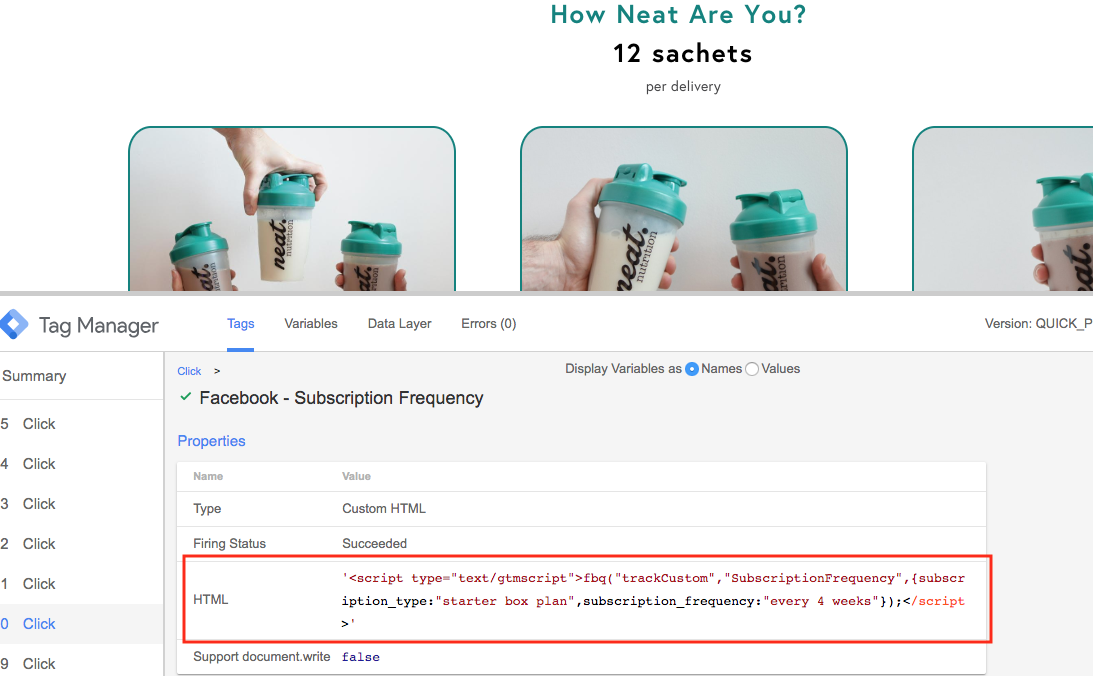
Now this data is available inside of Facebook to use for advanced targeting.
There are many variations you can think of if you have your own subscription or quiz on site.
For example:
- Sending hits on each step so you can have a mini funnel of events in FB
- Sending products selected in the quiz but that weren’t ultimately added to cart
What do you think? If you have any good ideas or suggestions leave them in the comments below!
Step 5: Preview Tags in GTM & Publish
Once you’ve completed the creation of your tags, triggers, and variables required for your custom Facebook event tracking then it’s always good to do the following:
- Test the different variations of tags fire via GTM preview mode
- If the tags do trigger then verify the data inside of the tag is correct
- Use the FB Pixel Helper to confirm the data is attached to your Facebook pixel
If all is good then go ahead and publish and begin watching the new event data populate in your Facebook account!
Looking for similar processes for enhanced marketing data collection? Try these related articles:

For newrst news you have to ppay a quick visit world wide
web and on internet I found this site as a most excellent wweb site for most recent updates.
php patterns
I now this if off topic but I’m looking into starting my own weblog and was curious what all
is needed to get set up? I’m assuming having a blog like yours
would cost a pretty penny? I’m not very internet savy so I’m noot
100% sure. Anyy tips or advicce would be greatly appreciated.
Kudos
php patterns
You could definitely see your expertise within the article you write.
The arena hopes for more passionate writers such as you who are not afraid to mention howw
they believe. At all times follow your heart. https://61C482F1F0A2E.Site123.me
You could definitely see yyour expertise within the article you write.
The arena hopes for more passionate writers suhh as
you who are not afraid to mention how thjey believe.
At all times follow your heart. https://61C482F1F0A2E.Site123.me
Hi there, just became alert to your blog through Google, and found
that it is truly informative. I am going to watch out for brussels.
I will appreciate if you continue this in future. A lot of people will be benefited from
your writing. Cheers!